1. Okwu mmalite
The Blackmagic Design ATEM Television Studio Pro 4K is a professional live production switcher designed for multi-camera setups, offering advanced features for broadcast-quality video production. This manual provides essential information for setting up, operating, maintaining, and troubleshooting your device to ensure optimal performance.
Atụmatụ gụnyere:
- 8x 12G-SDI inputs and outputs for Ultra HD formats up to 2160p60.
- Integrated audio/visual software for comprehensive control.
- Built-in Chroma Keyer, multiview, and motion clips.
- 6-band EQ audio mixer.
- 1/4" Headphone/Mic Inputs and 2-channel XLR Audio.
- Remote Multiview Ntinye.
2. Nhazi
2.1 Mwepu na nyocha
Carefully remove the ATEM Television Studio Pro 4K from its packaging. Inspect the unit for any signs of damage. Ensure all components listed in the packing slip are present.
2.2 Ijikọ ike
Connect the provided power cable to the 12V-30V 6A power input on the rear panel of the switcher. Plug the other end into a suitable power outlet. The unit will power on automatically.
2.3 Video Connections
The ATEM Television Studio Pro 4K features eight independent 12G-SDI inputs and multiple outputs. Use high-quality 12G-SDI cables for all video connections.
- SDI Inputs: Connect your cameras, computers, or other video sources to the SDI INPUTS (1-8).
- SDI Outputs: Connect your program output to monitors or recorders via the PGM (Program) output. Use the AUX and MULTIVIEW outputs for additional monitoring needs.
- REF IN: Connect a reference signal for genlock if required in your production environment.
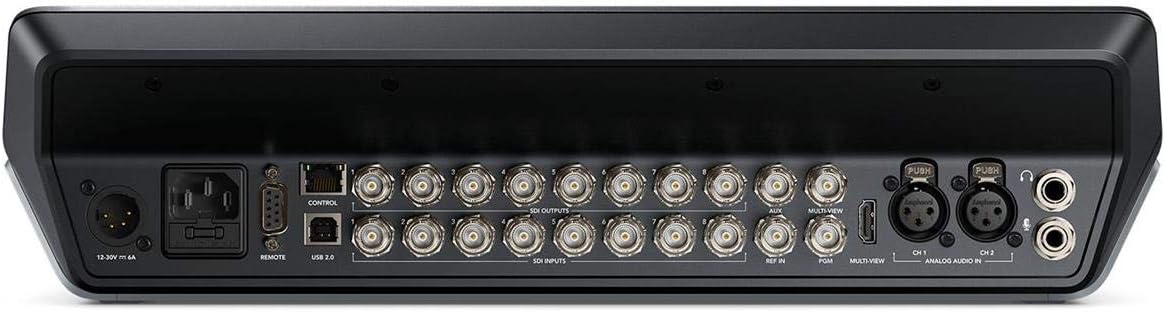
This image displays the rear panel of the ATEM Television Studio Pro 4K, highlighting the power input, remote control port, USB 2.0, multiple SDI inputs and outputs, AUX, Multiview, REF IN, PGM, and analog audio inputs (XLR and 1/4 inch headphone/mic inputs).
2.4 Njikọ ọdịyo
Connect external audio sources to the 2-channel XLR ANALOG AUDIO IN ports. For headphones or microphones, use the 1/4" Headphone/Mic Inputs.
2.5 netwọkụ na njikọ USB
- CONTROL (Ethernet): Connect an Ethernet cable to your network for control from a computer running ATEM Software Control.
- USB 2.0: Connect to a computer for software updates and direct recording.
3. Ntuziaka ọrụ
The ATEM Television Studio Pro 4K features an integrated control panel for direct operation, complemented by the ATEM Software Control for advanced settings and customization.

The control surface of the ATEM Television Studio Pro 4K features a comprehensive layout of illuminated buttons for source selection, transitions, effects, and audio control, along with a T-bar fader for smooth transitions.
3.1 Mgbanwe Isi
To switch between video sources:
- Press a source button in the PREVIEW row to select the next source to go live.
- Pịa KPỤRỤ button for an instant transition, or the AUTO button for a programmed transition (e.g., dissolve, wipe).
- Alternatively, use the T-bar fader for manual transitions.
3.2 Ngwakọta ọdịyo
The built-in 6-band EQ audio mixer allows for precise control over all audio inputs. Adjust levels, apply equalization, and manage audio routing directly from the control panel or via the ATEM Software Control.
3.3 Atụmatụ dị elu
- Chroma Keyer: Utilize the advanced Chroma Keyer for professional green screen effects.
- Multiview: Monitor all your inputs, program, and preview feeds on a single screen using the Multiview mmepụta.
- Motion Clips: Integrate motion graphics and clips into your live production.
3.4 Recording and Streaming
The ATEM Television Studio Pro 4K supports direct recording and live streaming capabilities. Refer to the ATEM Software Control manual for detailed instructions on configuring recording settings and streaming platforms.
4. Nlekọta
4.1 Nhicha
To maintain the appearance and functionality of your switcher, regularly clean the exterior with a soft, dry cloth. Avoid using abrasive cleaners or solvents. Ensure no liquids enter the device.
4.2 Mmelite ngwanrọ
Periodically check the Blackmagic Design website for the latest software updates for your ATEM Television Studio Pro 4K. Keeping your software up-to-date ensures access to new features, performance improvements, and bug fixes. Updates are typically performed via the USB connection to a computer.
5. Nchọpụta nsogbu
If you encounter issues with your ATEM Television Studio Pro 4K, consider the following common troubleshooting steps:
- Enweghị ike: Ensure the power cable is securely connected to both the switcher and a working power outlet. Verify the power supply is functioning correctly.
- Enweghị ntinye vidiyo: Check all SDI cable connections. Confirm that your video sources are powered on and outputting a compatible signal (up to 2160p60).
- Enweghị mmepụta vidiyo: Verify that your monitors or recording devices are correctly connected to the SDI outputs (PGM, AUX, Multiview) and are set to the correct input.
- Okwu ọdịyo: Check all audio cable connections. Ensure input levels are correctly adjusted on the audio mixer.
- Ogwe njikwa anaghị anabata: Restart the switcher. If using ATEM Software Control, ensure the Ethernet connection is stable and the software is correctly configured.
For persistent issues, consult the comprehensive Blackmagic Design support resources available on their official websaịtị ma ọ bụ kpọtụrụ nkwado ndị ahịa ha.
6. Nkọwapụta
| Njirimara | Nkọwa |
|---|---|
| Nọmba nlereanya | SWATEMTVSTU/PRO4K |
| Onye nrụpụta | Nhazi Blackmagic |
| Akụkụ ngwaahịa | 22 x 17 x 10 sentimita asatọ |
| Ibu Ibu | 14.3 pound |
| Ntinye vidiyo | 8 x 12G-SDI |
| Mpụta vidiyo | Multiple 12G-SDI (PGM, AUX, Multiview) |
| Ntinye ọdịyo | 2-channel XLR, 1/4" Headphone/Mic |
| Ụbọchị mbụ dị | Eprel 17, 2018 |
7. Akwụkwọ ikike na nkwado
For detailed warranty information, please refer to the official Blackmagic Design website or the warranty card included with your product. Blackmagic Design provides comprehensive support resources, including product manuals, software downloads, and a knowledge base.
You can typically find support and contact information on the official Blackmagic Design websaịtị: www.blackmagicdesign.com/support