1. Okwu mmalite
This manual provides comprehensive instructions for the installation, operation, and programming of your Salus RT510 Programmable Digital Thermostat. The RT510 is designed to control your heating system efficiently, allowing you to set specific temperatures at different times throughout the day and week.
2. Ozi nchekwa
- Installation should only be carried out by a qualified electrician or competent person in accordance with national wiring regulations.
- Always disconnect the mains power supply before installing or performing any maintenance on the thermostat.
- Ensure the thermostat is kept away from water and excessive moisture.
- Use only the specified battery type (Alkaline) and dispose of used batteries responsibly.
- Anwala ịrụkwa ma ọ bụ gbanwee unit ahụ n'onwe gị. Kpọtụrụ ndị ọrụ ruru eru.
3. Ihe ngwugwu
Biko lelee ma ngwugwu gị nwere ihe ndị a:
- Salus RT510 Digital Thermostat Unit
- Wall Mounting Backplate
- Ihe mgbakwasị ụkwụ na ihe nkwụnye mgbidi
- Batrị Alkaline
- Akwụkwọ ntuziaka (akwụkwọ a)
4. Ngwaahịa gafereview
The Salus RT510 thermostat features a clear digital display and intuitive controls for managing your heating system.
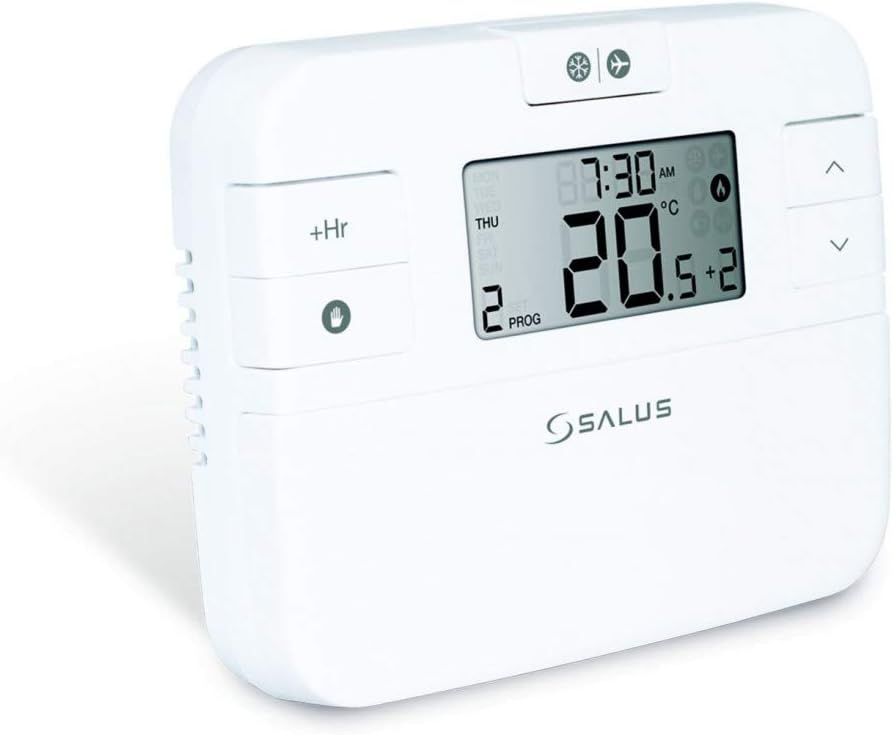
Figure 1: Salus RT510 Thermostat Front View
The image displays the Salus RT510 digital thermostat, a white rectangular unit with a large LCD screen. The screen shows the current time (8:30 AM), day (THU), current temperature (20.5°C), and program number (2 PROG). To the left of the screen are '+Hr' and a hand icon button for manual override. To the right are up and down arrow buttons. Above the screen are small icons for snowflake (cooling) and fan (ventilation), and an airplane (holiday mode). The Salus logo is visible below the screen.
Ihe ngosi:
- Oge na Ụbọchị: Na-egosi oge dị ugbu a na ụbọchị nke izu.
- Okpomọkụ dị ugbu a: Displays the ambient room temperature.
- Tọọ okpomọkụ: Indicates the desired temperature.
- Nọmba mmemme: Shows the active program period.
- Flame Icon: Illuminates when the heating system is active.
- Ihe ngosi batrị: Alerts when batteries are low.
bọtịnụ njikwa:
- Àkụ elu/ala: Adjust temperature settings, navigate menus.
- +Hr Button: Used for temporary manual override or extending current settings.
- Hand Icon Button: Activates manual mode or confirms selections.
- Mode Button (if present): Switches between heating, cooling (if supported), and off modes.
5. Nwụnye
The Salus RT510 is a hard-wired thermostat. Proper installation is crucial for safe and effective operation.
- Ịkwụsị ike: Before beginning, ensure the mains power supply to your heating system is completely disconnected at the consumer unit.
- Ebe Nkwanye: Choose an internal wall, approximately 1.5 meters from the floor, away from direct sunlight, drafts, or heat sources (e.g., radiators, lamps).
- Nwụnye azụ azụ:
- Separate the backplate from the thermostat unit.
- Secure the backplate to the wall using the provided screws and wall plugs. Ensure it is level.
- Wiring: Connect the electrical wiring from your heating system to the terminals on the backplate as per the wiring diagram provided with the product packaging. If you are unsure, consult a qualified electrician. The thermostat operates on 230 Volts.
- Tinye Thermostat: Once wiring is complete and secure, carefully attach the main thermostat unit to the backplate, ensuring it hooks over the top and is secured by two small screws at the bottom.
- Njikọta ike: Restore mains power to your heating system.
Mara: Incorrect wiring can damage the thermostat or your heating system. If you are not confident with electrical installations, please seek professional assistance.
6. Mbido Mbido
After installation and power-up, perform the following steps for initial configuration:
- Fanye batrị: Open the battery compartment (usually on the back or side) and insert the supplied Alkaline batteries, observing correct polarity. The thermostat display should illuminate.
- Set Time and Day:
- Press the appropriate button (refer to your unit's specific button, often a 'SET' or 'MENU' button, or hold the hand icon button) to enter time/day setting mode.
- Use the Up/Down arrows to adjust the hour, minute, and day of the week.
- Confirm each setting by pressing the appropriate button (e.g., hand icon or 'SET').
- Ngalaba okpomọkụ: If applicable, select between Celsius (°C) and Fahrenheit (°F) in the settings menu.
7. Ntuziaka ọrụ
7.1. Manual Temperature Adjustment
To temporarily adjust the temperature without changing the program:
- In normal operating mode, press the Up or Down arrow buttons. The set temperature will flash.
- Adjust to your desired temperature. The new setting will be active until the next programmed time period begins.
7.2. Manual Override (+Hr Function)
The '+Hr' button allows for a temporary override of the current program for a set number of hours.
- Press the '+Hr' button. The display will show the override duration (e.g., 1 hour).
- Use the Up/Down arrows to adjust the desired temperature for this override period.
- The thermostat will maintain this temperature for the set duration, then revert to the programmed schedule.
7.3. Holiday Mode (Airplane Icon)
If your unit features a holiday mode (indicated by an airplane icon), this allows you to set a constant, lower temperature for an extended period, saving energy while you are away.
- Activate holiday mode via the menu or a dedicated button.
- Set the desired temperature and duration (number of days).
- The thermostat will maintain this temperature until the holiday mode expires, then resume the normal program.
8. Programming the Thermostat
The Salus RT510 offers flexible programming options to suit your lifestyle. You can typically choose between 5/2 day programming (weekdays and weekends) or individual 7-day programming.
8.1. Ịbanye na usoro mmemme
Press and hold the 'PROG' or 'MENU' button (or similar, refer to your unit's specific button layout) until the display changes to show programming options.
8.2. Setting Program Periods
The thermostat allows for up to 6 temperature periods per day. Each period is defined by a start time and a target temperature. The period automatically ends when the next period begins.
- Select Day(s): Choose whether to program for 5 weekdays + 2 weekend days, or each day individually (Mon, Tue, Wed, etc.).
- Set Period 1 (P1):
- Adjust the start time for the first period using the Up/Down arrows.
- Adjust the desired temperature for this period.
- Confirm and move to the next setting.
- Repeat for P2-P6: Follow the same steps to set the start time and temperature for the remaining program periods (P2, P3, P4, P5, P6).
- Chekwa ma pụọ: Once all periods are set for the selected day(s), save your settings and exit programming mode (often by pressing the 'PROG' or 'MENU' button again, or waiting for an automatic exit).
Ndụmọdụ: Even if you only need a few changes, you may need to set all 6 periods. For example, if you want a consistent temperature for several hours, set multiple consecutive periods to the same temperature.
9. Nlekọta
9.1. Ngbanwe batrị
When the low battery indicator appears on the display, replace the batteries promptly to ensure continuous operation and prevent data loss.
- Mepee oghere batrị.
- Wepu batrị ochie.
- Insert new Alkaline batteries, ensuring correct polarity.
- Close the battery compartment. The time and program settings should be retained.
9.2. Nhicha
Clean the thermostat casing with a soft, dry cloth. Do not use abrasive cleaners, solvents, or spray directly onto the unit.
10. Nchọpụta nsogbu
| Nsogbu | Ihe nwere ike ime | Ngwọta |
|---|---|---|
| Ngosipụta bụ oghere ma ọ bụ nchara nchara. | Batrị dị ala ma ọ bụ nwụrụ anwụ. | Replace batteries with new Alkaline batteries. |
| Heating not turning on. |
|
|
| Incorrect time/day displayed. | Time/day not set correctly or power interruption. | Re-set the current time and day as per Section 6. |
| Thermostat anaghị azaghachi bọtịnụ. | Temporary software glitch or very low batteries. | Remove and re-insert batteries. If issue persists, contact support. |
11. Nkọwapụta
| Njirimara | Nkọwa |
|---|---|
| Nlereanya | RT510 |
| Ụdị | Salus |
| Ụdị | Igwe ọkụ dijitalụ nwere mmemme |
| Isi Iyi Ike | Corded Electric (230V) for heating system, Battery for unit operation |
| Voltage | 230 volts |
| Batrị | Alkaline (gụnyere) |
| Akụkụ (D x W x H) | 10 x 3 x 10 cm (ihe dị ka) |
| Ibu | 300 g |
| Ihe onwunwe | Plastic |
| Ụdị ngosi | Dijitalụ |
| Ụdị njikwa | Pịa bọtịnụ |
| Ịkwanye | Ugwu mgbidi |
| Atụmatụ pụrụ iche | Enwere ike ime mmemme |
| Njikọta | Wi-Fi (Note: This feature is listed in product specifications. Please refer to your specific model's documentation for Wi-Fi setup if applicable.) |
12. Akwụkwọ ikike na nkwado
For warranty information and technical support, please refer to the documentation included with your product or visit the official Salus websaịtị. Debe ihe akaebe nke ịzụrụ maka akwụkwọ ikike.
If you encounter issues not covered in this manual, please contact Salus customer support for assistance.