1. Okwu mmalite
Daalụ maka ịhọrọ ya KOLINK Refractor Midi-Tower computer case. This manual provides essential information for the proper installation, operation, and maintenance of your new PC chassis. Please read this manual carefully before beginning the assembly process to ensure a smooth and safe build.
1.1 Ozi nchekwa
- Kwụpụ mgbe ọ bụla ọkụ na-esi na mgbidi mgbidi tupu ịwụnye ma ọ bụ wepụ ihe ọ bụla.
- Yiri eriri nkwojiaka mgbochi static iji gbochie mwepu electrostatic (ESD) mebie ihe ndị nwere mmetụta.
- Handle components with care. Avoid touching pins or circuit boards directly.
- Debe obere akụkụ na ngwa n'ebe ụmụaka nọ.
- Ensure proper ventilation around the case to prevent overheating.
2. Ihe ngwugwu
Please verify that all the following items are present in your package:
- KOLINK Refractor Midi-Tower Chassis
- Igbe Ngwa (nwere skru, ihe mgbochi, eriri waya, wdg.)
- Akwụkwọ ntuziaka (akwụkwọ a)
If any items are missing or damaged, please contact your retailer or KOLINK support.
3. Ngwaahịa gafereview
Familiarize yourself with the key features and components of your KOLINK Refractor Midi-Tower.
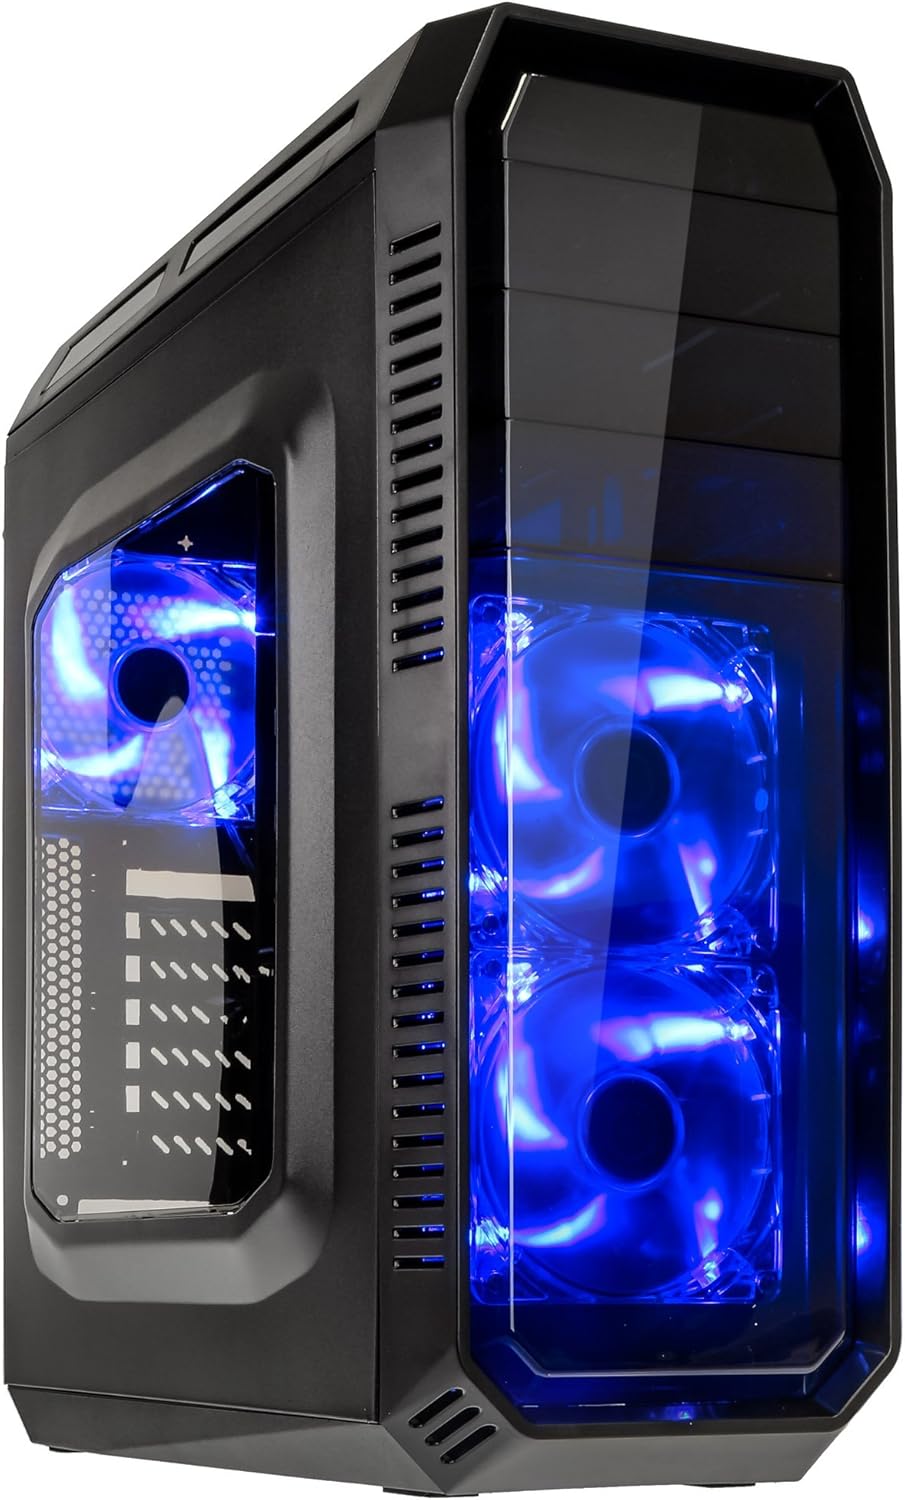
This image displays the KOLINK Refractor Midi-Tower from a front-left perspective, highlighting its sleek black design. The front panel features two pre-installed 120mm blue LED fans, visible through a transparent section, providing both cooling and aesthetic appeal. The left side panel includes a window, allowing visibility of internal components.

A top-front view of the case, illustrating the conveniently located I/O panel on the top. This panel includes two USB 3.0 ports, two USB 2.0 ports, and audio input/output jacks. The top surface also features a mesh area for additional ventilation, contributing to optimal airflow.

This image shows the right side panel of the KOLINK Refractor Midi-Tower. It is a solid black panel, designed for cable management behind the motherboard tray, ensuring a clean and organized interior.

This composite image provides three distinct views of the case. The left panel shows the front with its blue LED fans. The middle panel displays the rear of the case, featuring the motherboard I/O cutout, seven expansion slots, and a 120mm fan mount. The right panel offers a close-up of the top I/O ports, including USB 3.0, USB 2.0, and audio jacks.

A detailed close-up of the top I/O panel. It clearly shows the power and reset buttons, two USB 3.0 ports, two USB 2.0 ports, and the microphone and headphone jacks, providing easy access for peripherals.
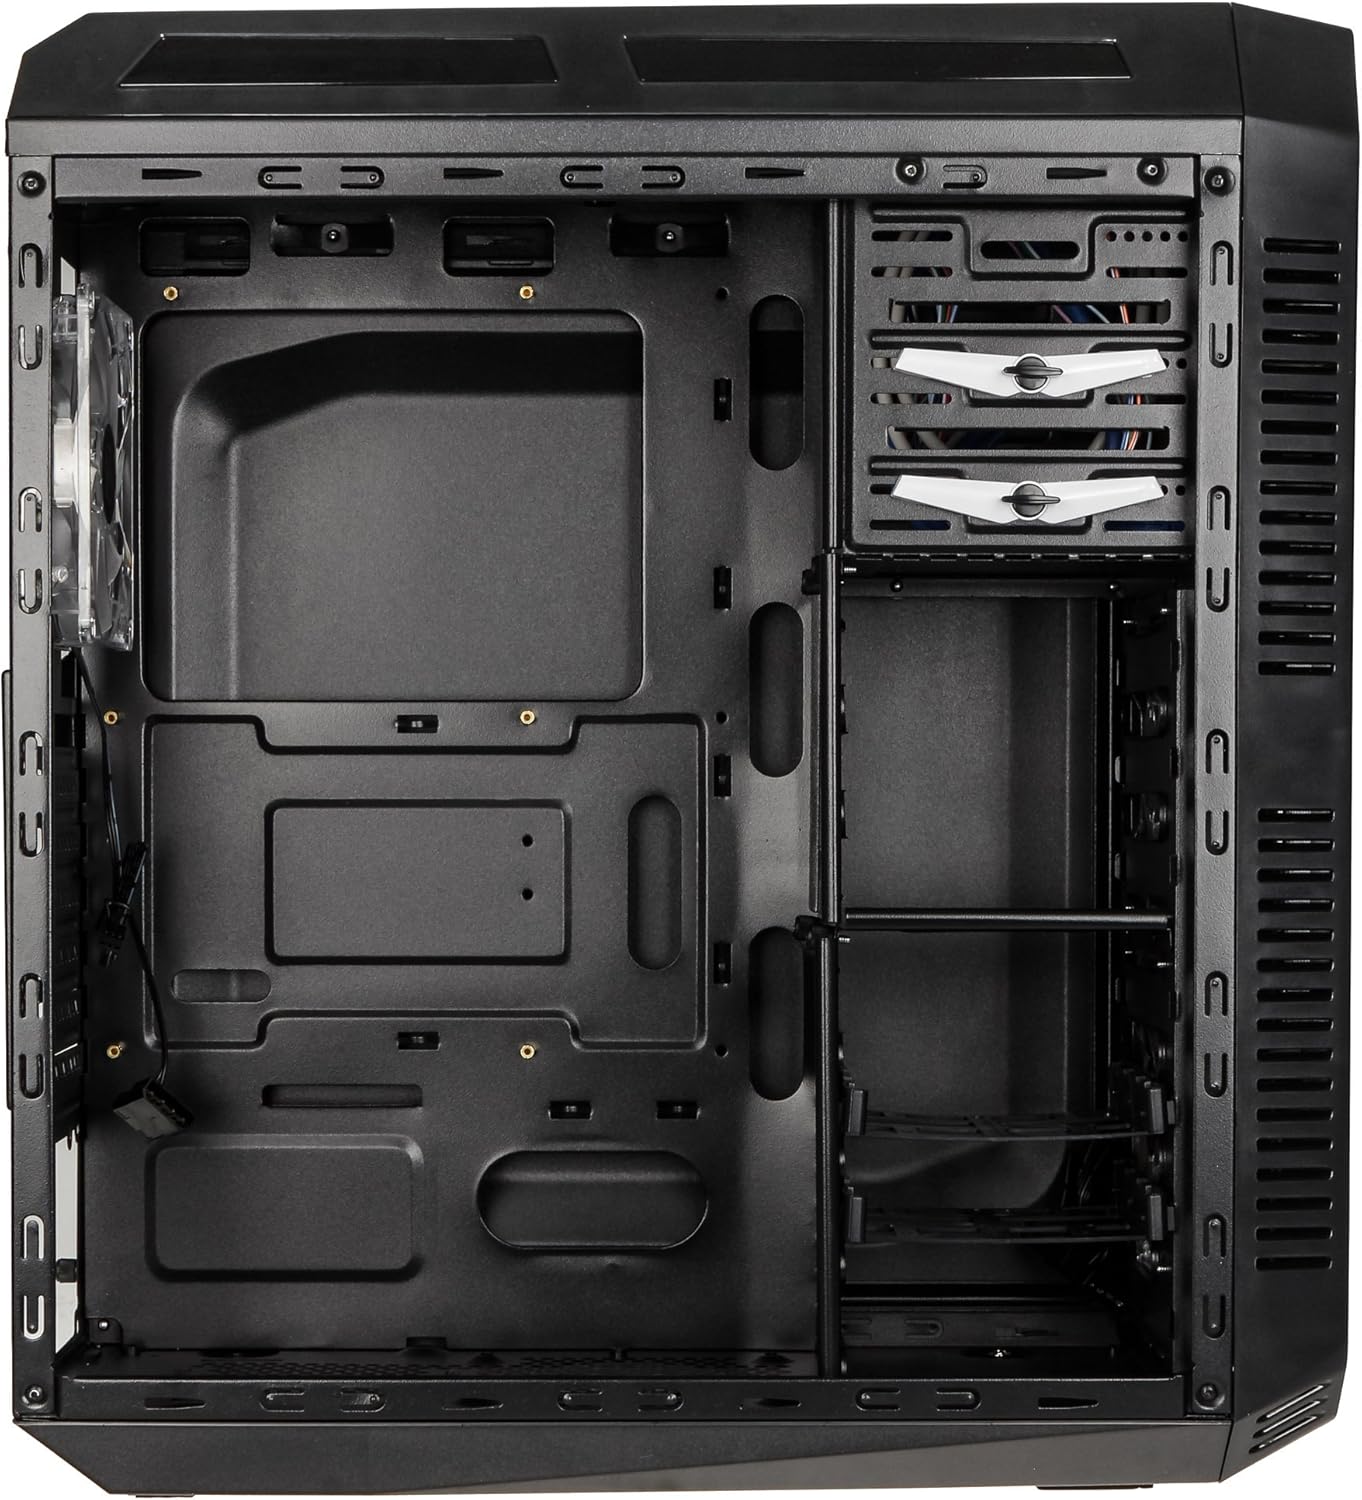
This image presents the interior of the case from the left side, revealing the spacious motherboard tray compatible with ATX motherboards. It features a large cutout behind the CPU area for easy cooler installation and multiple grommeted holes for efficient cable routing.

Nke ime view from the right side, focusing on the drive bay configuration. The case offers three external 5.25-inch bays and seven internal 2.5/3.5-inch drive bays, providing ample storage expansion options.

A closer look at the internal drive bays, illustrating the design for mounting 2.5-inch or 3.5-inch storage drives. These bays are designed for easy installation and removal of hard drives and SSDs.

Foto a na-egosi ihe dị n'ime view looking down from the top, showcasing the pre-installed 120mm blue LED fan at the rear for exhaust. The top panel's mesh area for additional fan mounting is also visible, contributing to overall system cooling.
4. Ntọala na nwụnye
Follow these steps to install your computer components into the KOLINK Refractor Midi-Tower.
4.1 Na-akwado ikpe ahụ
- Debe akpa ahụ n'elu ebe dị larịị ma kwụsie ike.
- Remove the left and right side panels by unscrewing the thumbscrews at the rear of the case and sliding the panels backward.
4.2 Nwụnye motherboard
- Install the I/O shield that came with your motherboard into the cutout at the rear of the case.
- Ensure the correct motherboard standoffs are installed for your ATX motherboard. Adjust or add standoffs as necessary using the provided accessory kit.
- Carefully place your motherboard onto the standoffs, aligning the screw holes.
- Jiri skru kwesịrị ekwesị site na ngwa mgbakwunye ahụ kechie motherboard ahụ.
4.3 Ntinye ike
- Position your ATX power supply unit (PSU) in the designated compartment at the bottom rear of the case.
- Align the PSU with the screw holes at the rear of the case.
- Secure the PSU using the screws provided with your power supply.
4.4 Ntinye draịva
5.25-inch External Drives:
- Remove the desired 5.25-inch bay cover from the front panel.
- Slide your optical drive or other 5.25-inch device into the bay from the front.
- Secure the drive using the tool-less clips or screws.
2.5/3.5-inch Internal Drives:
- Locate the internal drive bays.
- Mount your 2.5-inch SSD or 3.5-inch HDD into the drive trays.
- Slide the populated drive trays back into the drive cage until they click into place.
4.5 Ntinye Kaadị Mgbasawanye
- Wepu ihe mkpuchi oghere mgbasawanye dị mkpa n'azụ ikpe ahụ.
- Insert your graphics card or other PCIe expansion card into the corresponding slot on the motherboard.
- Secure the card with the provided screws.
4.6 Njikwa eriri
Utilize the cable routing holes and tie-down points behind the motherboard tray to organize cables. This improves airflow and gives your build a cleaner appearance.
4.7 Fan Installation (Optional)
The case comes with two 120mm blue LED fans pre-installed at the front and one 120mm blue LED fan at the rear. Additional fan mounting locations include:
- Top: 1x 120/140mm fan
- Bottom: 1x 120mm fan (under the PSU)
Install additional fans as needed for optimal cooling, ensuring proper airflow direction.
5. Ntuziaka ọrụ
5.1 Ike mbido
- Once all components are installed and cables are connected, replace both side panels.
- Jikọọ ihe nlekota gị, ahụigodo, òké, na ihe ndị ọzọ dị na ya.
- Connect the power cable to the PSU and then to a wall outlet.
- Press the power button on the top I/O panel to start your system.
5.2 Front Panel I/O Usage
Ogwe I/O dị elu na-enye ohere dị mma na:
- ọdụ ụgbọ mmiri USB 3.0 (x2): Maka mbufe data dị elu na ngwaọrụ dakọtara.
- ọdụ ụgbọ mmiri USB 2.0 (x2): Maka ijikọ ọkọlọtọ USB ngwaọrụ.
- Audio Jacks (Headphone/Microphone): For connecting headsets or external audio devices.
- Bọtịnụ ike: To turn the system on/off.
- Tọgharịa bọtịnụ: Iji malitegharịa sistemụ ahụ.
5.3 ọkụ ọkụ LED
The pre-installed front and rear fans feature blue LED lighting, which illuminates when the system is powered on, adding an aesthetic element to your build.
6. Nlekọta
Regular maintenance helps ensure optimal performance and longevity of your computer system.
6.1 Nhicha
- Ihe nzacha uzuzu: The case includes a removable dust filter under the PSU. Regularly remove and clean this filter to prevent dust buildup and maintain airflow.
- Mputa: Jiri nwayọ hichaa elu mpụta, damp akwa . Zere ndị na-ehicha ihe na-ekpo ọkụ.
- Ime: Periodically use compressed air to remove dust from internal components and fan blades. Ensure the system is powered off and unplugged before cleaning the interior.
6.2 nkwalite ikuku ikuku
Ensure that the case's ventilation areas (front, top, rear, bottom) are not obstructed. Proper cable management also contributes significantly to unrestricted airflow within the case.
7. Nchọpụta nsogbu
Akụkụ a na-ekwu maka nsogbu ndị ị nwere ike izute.
7.1 Okwu nkịtị
- Sistemụ anaghị arụ ọrụ:
- Check if the power cable is securely connected to both the PSU and the wall outlet.
- Gbaa mbọ hụ na ngbanwe PSU nọ n'ọnọdụ 'ON'.
- Hụ na eriri bọtịnụ ike nke panel ihu jikọtara nke ọma na motherboard.
- Confirm all internal power cables (24-pin ATX, CPU, GPU) are properly seated.
- Ndị Fans anaghị agba ọsọ:
- Check if the fan power cables are correctly connected to the motherboard or fan controller.
- Ensure the system is receiving power.
- Ọdụ ụgbọ mmiri USB anaghị arụ ọrụ:
- Verify that the front panel USB 3.0 and USB 2.0 headers are correctly connected to the motherboard.
- Ensure the device you are connecting is functioning correctly.
- Audio Ports Not Working:
- Check that the front panel audio header (HD Audio) is correctly connected to the motherboard.
- Confirm your audio drivers are installed and up to date.
For further assistance, please refer to your motherboard manual or contact KOLINK support.
8. Nkọwapụta
Detailed technical specifications for the KOLINK Refractor Midi-Tower.
| Njirimara | Nkọwapụta |
|---|---|
| Aha Nlereanya | Refractor Midi-Tower |
| Akụkụ (W x H x D) | 190 x 475 x 445 mm (7.5 x 18.7 x 17.5 inch) |
| Ihe onwunwe | Steel (body), Plastic (front) |
| Ibu | Ihe ruru. 4.8 n'arọ (10.6 lbs) |
| Agba | Nwa |
| Ụdị Ihe | Ụlọ elu Midi |
| Ndakọrịta Motherboard | ATX |
| External Drive Bays | 3 x 5.25 inch |
| Ọnụ ụzọ mbanye nke ime | 7x 2.5/3.5-inch |
| Oghere Mgbasawanye | 7 |
| Ndị Fans etinyegoro mbụ | 2x 120mm (front, blue LED), 1x 120mm (rear, blue LED) |
| Fan Support (Total Possible) | Front: 2x 120mm, Top: 1x 120/140mm, Bottom: 1x 120mm, Rear: 1x 120mm |
| Panel I/O | 2x USB 3.0, 2x USB 2.0, 1x Audio In/Out |
| Ogologo Kaadị eserese kacha | 360 mm |
| Igwe oyi oyi CPU kacha | 174 mm |
| PSU Compatibility | Standard ATX (optional) |
| Ihe nzacha uzuzu | Floor (under PSU, removable) |
9. Akwụkwọ ikike na nkwado
KOLINK products are manufactured to high-quality standards. This product is covered by a manufacturer's warranty against defects in materials and workmanship. The specific terms and duration of the warranty may vary by region and retailer.
Please retain your proof of purchase for warranty claims. For technical support, warranty inquiries, or to report missing/damaged parts, please contact your point of purchase or visit the official KOLINK websaịtị maka akụrụngwa nkwado.
KOLINK Official Websaịtị: www.kolink.eu (Please note: This is a general link and may not lead directly to a support page for this specific model.)


