1. Ngwaahịa gafereview
The Black Box Emerald KM Switch with Glide & Switch Mouse Switching (Model KV0004A-R2) allows a single user to access and control multiple computer systems and monitors using one keyboard and mouse. This device functions as an extended desktop switch, enabling seamless transitions between up to four connected PCs by simply moving the mouse cursor across screen borders. It supports simultaneous access to USB peripherals, including high-speed USB 2.0 devices.
This KM Switch integrates with the Black Box Agility IP-based KVM system, allowing it to interface with Agility receivers and switch Agility targets using a single keyboard and mouse. It is designed for environments requiring efficient multi-system control, such as command and control applications in finance, broadcasting, public safety, industrial, and defense sectors.
Akụkụ ndị bụ isi:
- Automatic channel switching with Glide and Switch Technology
- True USB emulation
- Optional LED Channel indicators
- Multiple Switching Options: Mouse, hotkeys, or front panel
- Compatibility with Windows & Mac OS (Linux may be supported in certain applications)
2. Kedu ihe dị na Igbe ahụ
- KM Switch with Glide & Switch Mouse Switching (Model KV0004A-R2)
- Ihe nkwụnye ọkụ na eriri ọkụ
- Flash Upgrade Adapter
- 4 x Self-adhesive Feet
3. Nhazi
3.1 Nhazi ngwaọrụ
Familiarize yourself with the ports on the KM Switch.

Foto nke 1: N'azụ view of the Black Box Emerald KM Switch. From left to right, it features a power input (DC 12V), a user console port (USB-A), a USB 2.0 port, an optical audio port, four USB-B ports labeled 1-4 for connecting to computers, two USB-A ports (USB 1, USB 2) for switched peripherals, and an Ethernet port.
3.2 Connecting Computers and Peripherals
Follow these steps to connect your systems:
- Njikọ ike: Connect the provided power adapter to the DC 12V input on the rear of the KM Switch and plug it into a power outlet.
- Njikọ Kọmputa: Use USB-B to USB-A cables (not included) to connect each computer's USB port to the corresponding USB-B input ports (labeled 1-4) on the rear of the KM Switch.
- Ahụigodo na òké: Connect your keyboard and mouse to the dedicated USB-A ports (labeled 'KM' or 'USB 1', 'USB 2') on the rear of the KM Switch.
- Additional USB Peripherals: For other USB devices (e.g., printers, scanners, USB drives), connect them to the available USB 2.0 ports on the rear of the switch.
- Njikọ ọdịyo: If using audio, connect your audio devices to the optical audio ports or 3.5mm audio jacks (if available on your specific model) on the switch and to your computers.
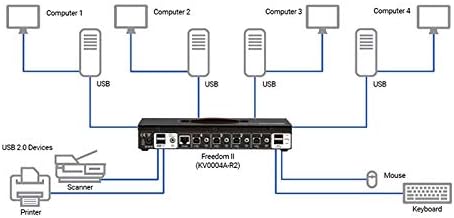
Foto nke 2: Connection diagram for the Freedom II KM Switch (KV0004A-R2). It shows four computers connected via USB to the switch's PC input ports. A keyboard and mouse are connected to the console USB ports. A printer and scanner are connected to the USB 2.0 devices port. This setup allows sharing of peripherals across multiple computers.
4. Ntuziaka ọrụ
4.1 Njikwa ihu ihu

Foto nke 3: N'ihu view of the Black Box Emerald KM Switch. It features a 'COMPUTER' button on the left, a digital display showing the active computer number, and a 'MODE' button on the right. LED indicators for KVM, SPK, USB1, and USB2 are also visible.
- Computer Selection Button: Press the 'COMPUTER' button on the front panel to cycle through the connected computers. The active computer number will be displayed on the digital screen.
- Bọtịnụ ụkpụrụ: Use the 'MODE' button to adjust settings or switch between different operating modes, as detailed in the advanced configuration section (refer to the full product manual for specific mode functionalities).
- Ihe ngosi LED: The LEDs (KVM, SPK, USB1, USB2) indicate the status of the keyboard/mouse, speaker, and USB peripheral connections for the currently selected computer.
4.2 Glide & Switch Mouse Switching
The Glide & Switch technology allows you to seamlessly switch between computers by simply moving your mouse cursor across the borders of your monitors. Once configured, moving the mouse from one screen to an adjacent screen will automatically switch control to the computer associated with that screen.
4.3 Hotkey Switching
The KM Switch supports hotkey commands for quick switching between computers. Refer to the full product manual for a complete list of hotkey combinations and their functions. Hotkeys are OS independent.
5. Nlekọta
- Nhicha: Jiri ákwà dị nro ma kpọọ nkụ hichaa mpụta nke ngwaọrụ ahụ. Zere ihe nhicha mmiri ma ọ bụ ihe mgbaze.
- Igwe ikuku: Ensure the device has adequate ventilation to prevent overheating. Do not block any ventilation openings.
- Mmelite femụwe: Periodically check the Black Box website for any available firmware updates for your model to ensure optimal performance and compatibility. Use the Flash Upgrade Adapter if an update is required.
6. Nchọpụta nsogbu
- Enweghị ike: Gbaa mbọ hụ na ejikọrọ ihe nkwụnye ọkụ ahụ na mgba ọkụ yana ebe ọkụ na-arụ ọrụ.
- No Keyboard/Mouse Response: Verify that the keyboard and mouse are correctly plugged into the designated ports on the KM Switch. Check the USB cables connecting the switch to the computers. Try restarting the computers and the switch.
- Achọpụtaghị ihe ndị dị n'akụkụ: Ensure all USB devices are properly connected. If using high-power USB devices, an external 5V power supply may be required for stability (check your specific model for a dedicated power input for peripherals).
- Okwu mgbanwe: Confirm that the Glide & Switch software (if applicable) is correctly installed and configured on all connected computers. If using hotkeys, ensure the correct combinations are being used.
- Njikọta na-adịte aka: Check all cable connections for looseness or damage. Ensure no other devices are causing interference.
7. Nkọwapụta
| Ụdị | Igbe ojii |
| Usoro | Freedom II |
| Nọmba nlereanya | KV0004A-R2 |
| Ndakọrịta sistemụ arụmọrụ | Windows, Mac OS (Linux may be supported in certain applications) |
| Ibu Ibu | 3.7 pound |
| Akụkụ ngwaahịa (LxWxH) | 13.5 x 12.6 x 3.9 sentimita asatọ |
| Isi Iyi Ike | Igwe ọkụ eletrik |
| ASIN | B011OOD5Z2 |
| Ụbọchị mbụ dị | Julaị 15, 2015 |
8. Akwụkwọ ikike na nkwado
For warranty information and technical support, please refer to the official Black Box documentation included with your product or visit the Black Box website. Specific warranty terms and support options may vary by region and purchase date.


