1. Okwu mmalite
This manual provides detailed instructions for the installation, operation, and maintenance of your SpeaKa Professional DL-1117 In-Wall/Ceiling Speaker. Please read this manual thoroughly before installation and use to ensure proper function and safety. Keep this manual for future reference.
2. Ngwaahịa gafereview
The SpeaKa Professional DL-1117 is a high-quality in-wall/ceiling speaker designed for various audio applications in both residential and industrial environments. Its robust metallic construction ensures durability and reliable performance.

Foto 2.1: N'ihu view of the SpeaKa Professional DL-1117 In-Wall/Ceiling Speaker. This image shows the speaker's front grille and mounting frame.
Akụkụ ndị bụ isi:
- Ideal for wall and ceiling mounting.
- Suitable for industrial and residential spaces.
- Solid metallic construction for enhanced durability.
3. Nkọwapụta
| Nkọwapụta | Uru |
|---|---|
| Ụdị | Ọkachamara SpeaKa |
| Aha Nlereanya | DL-1117 |
| Nọmba Nlereanya ihe | SP-1207908 |
| Ụdị Ọkà Okwu | In-Wall/Ceiling Speaker |
| Nha Ọkà Okwu | 8 Inches (77mm INWALL SPEAKER as per label) |
| Mgbochi | 8 ohms |
| Power (Nominal) | 15 Watt |
| Ike Mmepụta Ọkà Okwu Kachasị Elu | 25 Watt |
| Nzaghachi ugboro ugboro | 90Hz - 17,000Hz (as per label) |
| Ụdị nkwụnye | Ceiling Mount (also suitable for wall mount) |
| Akụkụ ngwaahịa (L x W x H) | 11 x 11 x 7 cm |
| Ibu Ibu | 520 grams |
| Agba | Nwa |
| Ọnụọgụ nke nkeji | 1 nkeji |
| Eji akwadoro | For computer (audio output), general audio systems |
| Ngwa dakọtara | Desktop computer, Laptop (via amplifier/receiver) |

Foto 3.1: Dimensional drawing of the SpeaKa Professional DL-1117 speaker. This diagram illustrates the speaker's diameter (Ø100mm), depth (49mm), and cutout dimensions (Ø74mm, Ø81mm).
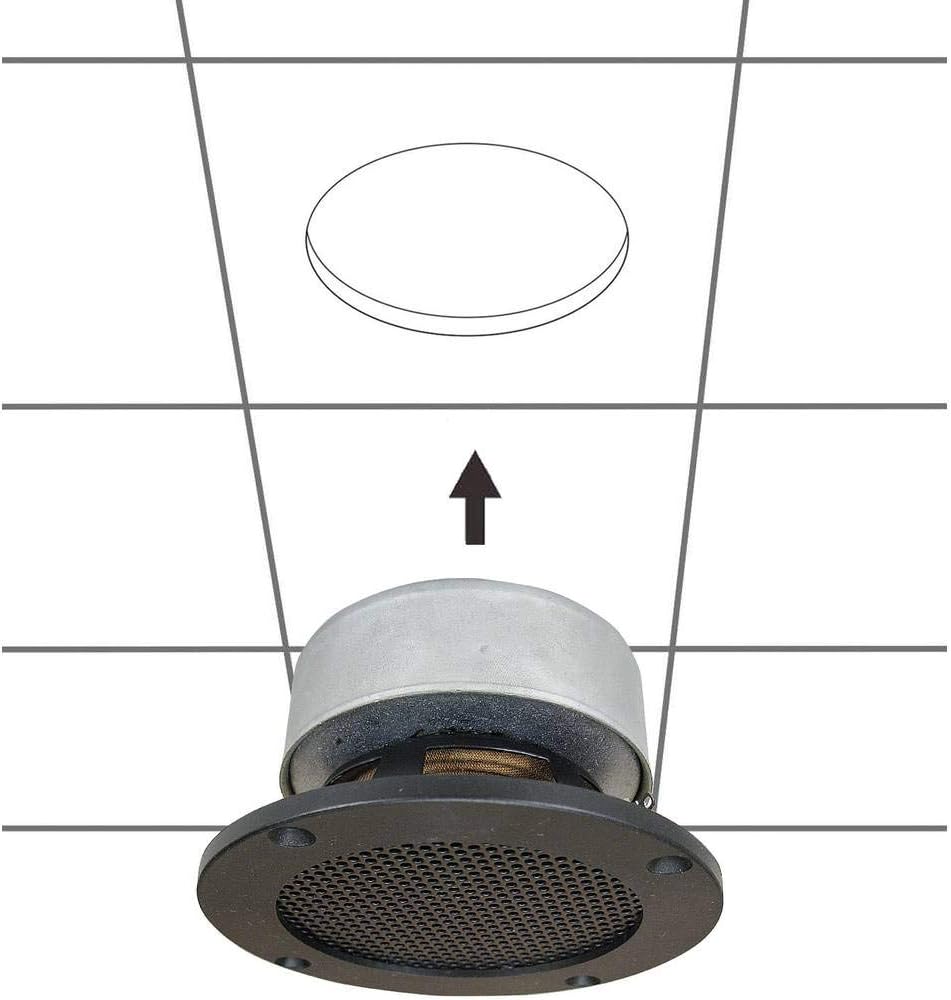
Foto 3.2: Azu view of the SpeaKa Professional DL-1117 speaker, showing the product label with model number DL-1117BK8, frequency response, power rating, and impedance.
4. Ntuziaka nchekwa
Biko debe ihe nchekwa nchekwa ndị a iji gbochie mmerụ ahụ ma ọ bụ mebie ngwaahịa a:
- Nchekwa Eletriki: Ensure all power to the audio system is disconnected before making any connections or performing installation. Incorrect wiring can cause damage to the speaker or ampna -emegharị ihe.
- Nwụnye: Installation should be performed by a qualified professional if you are unsure about electrical wiring or structural integrity. Ensure the mounting surface (wall or ceiling) can safely support the weight of the speaker.
- gburugburu: Do not expose the speaker to excessive moisture, extreme temperatures, or direct sunlight.
- Nhicha: Jiri ákwà dị nro ma kpọọ nkụ hichaa ya. Ejila ihe nhicha mmiri ma ọ bụ ihe na-eme ka ọ dị nro.
- Mbupu: Do not attempt to disassemble or modify the speaker. This will void the warranty and may cause damage or injury.
5. Ntọala na nwụnye
Follow these steps for proper installation of your in-wall/ceiling speaker:
5.1 Ngwa achọrọ
- Kwuo egwu
- Hole saw (matching cutout diameter, approx. Ø74-81mm)
- Screwdriver
- Waya waya
- Speaker wire (appropriate gauge for your amplifier and cable length)
5.2 Ebe nrịgo
Choose a suitable location in your wall or ceiling. Ensure there are no electrical wires, plumbing, or structural elements behind the chosen area. Use a stud finder if necessary.
5.3 Ịcha oghere
- Carefully mark the desired cutout diameter on the wall or ceiling. Refer to the dimensions in Figure 3.1.
- Using a hole saw, carefully cut the opening.
5.4 Waya
- Run speaker wire from your amplifier/receiver to the cutout opening.
- Strip approximately 1/2 inch (12mm) of insulation from the ends of the speaker wire.
- Connect the speaker wires to the terminals on the back of the DL-1117 speaker. Ensure correct polarity (+ to + and - to -) from the amplifier to the speaker. The terminals are typically screw-type or spring-loaded.
5.5 Installing the Speaker
- Carefully insert the speaker into the cutout opening.
- Secure the speaker using the integrated mounting clips or screws, if applicable. For this model, the design suggests it is inserted and then secured from the front.

Foto 5.1: Diagram illustrating the installation process of the SpeaKa Professional DL-1117 speaker into a ceiling opening. The speaker is inserted from below into the pre-cut hole.
6. Ntuziaka ọrụ
Once the speaker is correctly installed and wired to your amplifier or receiver:
- Gbaa mbọ hụ na njikọ niile echekwara.
- Gbanwuo gị amponye na-anata ihe.
- Start playing audio through your connected source.
- Gbanwee olu na gị amplifier/receiver to a comfortable listening level. Avoid excessively high volumes that could distort the sound or damage the speaker.
7. Nlekọta
The SpeaKa Professional DL-1117 speaker requires minimal maintenance:
- Nhicha: Periodically wipe the speaker grille and frame with a soft, dry cloth to remove dust. Do not use abrasive cleaners or solvents.
- Nyocha: Occasionally check the speaker for any visible damage or loose connections.
8. Nchọpụta nsogbu
Ọ bụrụ na ị na-enwe nsogbu na ọkà okwu gị, rụtụ aka na nsogbu na ngwọta ndị a na-emekarị:
| Nsogbu | Ihe nwere ike ime | Ngwọta |
|---|---|---|
| Enweghị ụda sitere na ọkà okwu | Waịkọ atọpụ ma ọ bụ ezighi ezi Amplifier/receiver off or muted Source device not playing audio | Check all speaker wire connections for proper polarity and tightness. Gbaa mbọ hụ amplifier/receiver is on and not muted, and volume is up. Verify audio is playing from the source device. |
| Ụda agbagọ | Esi elu Isi iyi ọdịyo adịghị mma Damaged speaker wire | Reduce the volume on your amponye na-anata ihe. Nwaa isi iyi ọdịyo dị iche iji wepụ nsogbu isi mmalite. Inspect speaker wires for fraying or damage and replace if necessary. |
| Ụda na-egbu oge | Njikọ rụrụ arụ Emejọ ampọwa mmiri ọkụ | Lelee ma chekwaa njikọ waya igwe okwu niile. Test the speaker with a different amplifier channel or a known working ampna -emegharị ihe. |
If the problem persists after trying these solutions, please contact SpeaKa Professional customer support.
9. Akwụkwọ ikike na nkwado
For warranty information and customer support, please refer to the documentation provided with your purchase or visit the official SpeaKa Professional websaịtị. Debe ihe akaebe nke ịzụrụ maka akwụkwọ ikike.
Onye nrụpụta: Ọkachamara SpeaKa
ASIN: B00CS2V1AQ


