Okwu mmalite
This instruction manual provides detailed guidance for the safe installation, operation, and maintenance of your new Progress Lighting Outdoor Wall Lantern. Please read all instructions carefully before beginning installation and retain this manual for future reference. Proper installation and care will ensure optimal performance and longevity of your lighting fixture.

Foto: N'ihu view of the 1-Light Clear Flat Glass Traditional Outdoor Wall Lantern Light in Antique Bronze finish.
Ozi nchekwa
- Ịdọ aka ná ntị: Ihe egwu nke ujo eletriki. Kwụpụ ike na ihe mgbawa sekit ma ọ bụ igbe fuse tupu etinye ma ọ bụ rụzie ya.
- All electrical connections must be in accordance with local codes, ordinances, or the National Electric Code (NEC). Contact a qualified electrician if you are unfamiliar with proper electrical wiring installations.
- Use only UL/cUL listed wire connectors.
- This fixture is designed for outdoor use and is suitable for wet locations.
- Agafela oke wattage akọwapụtara maka bọlbụ ahụ.
- Yiri ugogbe nchekwa na uwe aka n'oge ntinye.
Ihe ngwugwu
Hụ na akụkụ niile edepụtara n'okpuru dị na ngwugwu gị:
- A. Fixture Body (1)
- B. Mounting Plate (1)
- C. Mounting Screws (2)
- D. Wire Connectors (3)
- E. Decorative Nuts (2)
- F. Glass Panels (4, pre-installed)
Nkọwapụta
| Njirimara | Nkọwa |
|---|---|
| Nọmba nlereanya | P5607-20 |
| Akụkụ (W x H) | 4-1/2 inches x 8 inches |
| Mechaa | Bronze ochie |
| Ụdị iko | Clear Flat Glass |
| Ụdị bọlbụ | Ebe Ọkara (E26) |
| Max Wattage | 100 Watts (Incandescent equivalent) |
| Ogo ọnọdụ | Edepụtara ebe mmiri mmiri |
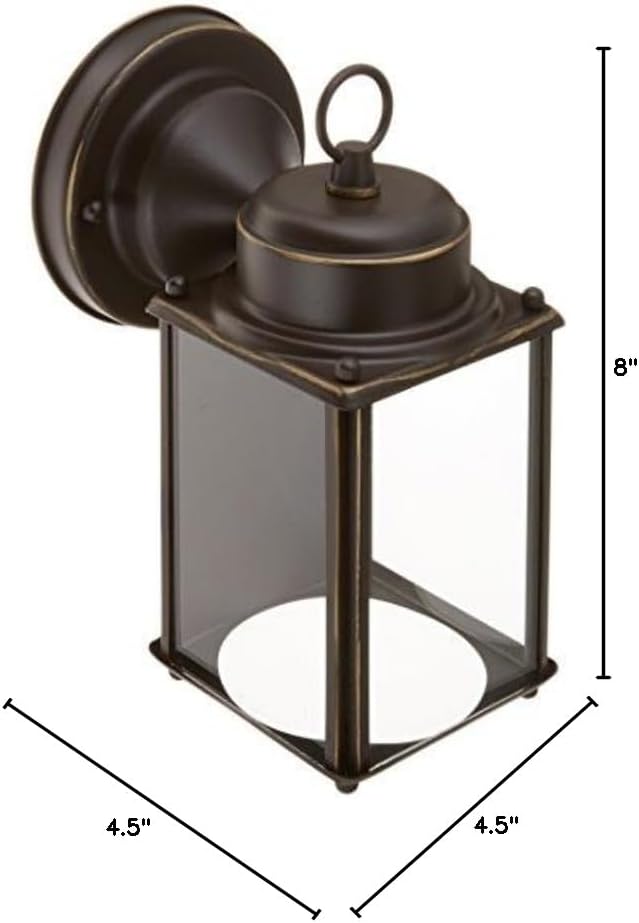
Image: Diagram showing the width (4.5 inches) and height (8 inches) of the wall lantern.
Ntuziaka nwụnye
Follow these steps for proper installation of your outdoor wall lantern. It is recommended to watch the accompanying video for visual guidance on sizing and placement.
Ngwa achọrọ:
- Phillips Isi Ihe Nleghari
- Flathead sikruuokwomoto
- Waya Strippers
- Teepu eletriki (nhọrọ)
- Igwe nchekwa
Nwụnye tupu:
- Gbanyụọ ike: Locate the circuit breaker or fuse box that supplies power to the light fixture location. Turn off the main power switch.
- Unpack contents: Carefully remove all components from the packaging. Keep the packaging materials until installation is complete to ensure no small parts are lost.
- Review existing wiring: Ensure the existing electrical box is securely mounted and capable of supporting the fixture's weight.
Ịkwanye ihe ndozi ahụ:
- Attach the mounting plate (B) to the electrical box using the mounting screws (C). Ensure the plate is level and secure.
- Pull the electrical wires from the electrical box through the center hole of the mounting plate.
Njikọ waya:
- Connect the bare copper ground wire from the fixture to the bare copper ground wire from the electrical box using a wire connector (D). If your electrical box has a ground screw, wrap the fixture's ground wire around it before connecting to the supply ground wire.
- Connect the white (neutral) wire from the fixture to the white (neutral) wire from the electrical box using a wire connector (D).
- Connect the black (hot) wire from the fixture to the black (hot) wire from the electrical box using a wire connector (D).
- Ensure all wire connections are secure. Wrap electrical tape around the wire connectors for added insulation if desired.
Chekwaa ihe ndozi ahụ:
- Carefully push all excess wiring into the electrical box.
- Align the holes on the fixture body (A) with the threaded posts on the mounting plate (B).
- Secure the fixture body to the mounting plate using the decorative nuts (E). Tighten firmly but do not overtighten.
Nwụnye bọlbụ:
- Insert one medium base (E26) bulb (not included) into the socket. Do not exceed the maximum recommended wattagnke 100 watts.

Foto: Akụkụ view of the wall lantern with a clear incandescent bulb installed, showing the internal socket.
Sizing and Selection Guidance Video:
For additional guidance on selecting the appropriate size and mounting height for outdoor lighting fixtures, please watch the official Progress Lighting video below:
Video: An official Progress Lighting guide on sizing and selecting outdoor lighting fixtures, covering optimal placement for entryways, garages, and other outdoor areas.
Ntuziaka ọrụ
Once the fixture is securely installed and wired, restore power at the circuit breaker. The light fixture can then be operated using your wall switch or external control system (if applicable).
Nlekọta
- Nhicha: Iji hichaa ihe nkwụnye ọkụ ahụ, gbanyụọ ike ahụ ma hapụ ya ka ọ jụọ oyi. Jiri ihe dị nro hichaa ya.amp Ákwà. Ejila ihe nhicha ma ọ bụ ihe mgbaze, n'ihi na ha nwere ike imebi ihe ma ọ bụ iko ahụ.
- Ndokwa bọlbụ: Ensure power is off before replacing the bulb. Allow the bulb to cool completely before touching. Replace with a new medium base (E26) bulb, not exceeding 100 Watts.
- Nyocha oge: Na-elele njikọ niile na ngwa mgbakwunye maka ike ha.
Nchọpụta nsogbu
| Nsogbu | Ihe nwere ike ime | Ngwọta |
|---|---|---|
| Ìhè anaghị agbanwuo. | Enweghị ikike na ngwa. | Lelee sekit ma ọ bụ fuse. Gbaa mbọ hụ na mgba ọkụ mgbidi agbanwuru. |
| Njikọ waya rụrụ arụ. | Gbanyụọ ike ma lelee njikọ waya niile. | |
| Bọlbụ nwere nkwarụ. | Dochie bọlbụ. | |
| Ìhè flickers. | bọlbụ rụrụ arụ. | Gbanyụọ bọlbụ na oghere. |
| Ụdị bọlbụ ezighi ezi ma ọ bụ wattage. | Hụ na bọlbụ ahụ ruru ihe ndị e kwuru kpọmkwem. | |
| Waịkọ rụrụ arụ. | Gbanyụọ ike ma lelee njikọ waya niile. |
Akwụkwọ ikike na nkwado
Progress Lighting products are manufactured to the highest standards and are backed by a limited warranty. For specific warranty details, technical support, or replacement parts, please visit the official Progress Lighting websaịtị ma ọ bụ kpọtụrụ ngalaba ọrụ ndị ahịa ha. Debe nnata nzụta gị ka ihe akaebe nke ịzụrụ.
Maka ozi ndị ọzọ, gaa na: Progress Lighting Store on Amazon


