1. Okwu mmalite
Thank you for choosing the FITNATION Vertical Cycle Trainer. This manual provides essential information for the safe and effective use of your new fitness equipment. Please read this manual thoroughly before assembly and operation to ensure proper use, maximize your workout benefits, and prevent injury.
The FITNATION Vertical Cycle Trainer is designed for indoor use, offering a compact and efficient way to engage in cardiovascular exercise. Its vertical design allows for a space-saving footprint while providing a full cycling experience.
2. Ntuziaka nchekwa dị mkpa
WARNING: Before starting any exercise program, consult your physician. This is especially important for individuals over the age of 35 or those with pre-existing health conditions.
- Always place the cycle trainer on a flat, stable surface.
- Gbaa mbọ hụ na agbachiela bolts na mkpụrụ niile nke ọma tupu ejiri nke ọ bụla.
- Debe ụmụaka na anụ ụlọ n'ebe akụrụngwa nọ mgbe a na-arụ ọrụ.
- Wear appropriate exercise clothing and athletic shoes. Avoid loose clothing that could get caught in moving parts.
- Do not exceed the maximum user weight limit (if specified by manufacturer, not available in provided data).
- If you experience pain, dizziness, or shortness of breath, stop exercising immediately and consult your physician.
- Perform regular maintenance checks as described in this manual.
- Do not modify the equipment. Use only manufacturer-approved replacement parts.
3. Ihe ngwugwu
Carefully unpack your FITNATION Vertical Cycle Trainer and verify that all components are present and undamaged. If any parts are missing or damaged, do not assemble the unit. Contact customer support immediately.
Ọdịnaya ngwungwu a na-ahụkarị gụnyere:
- Mgbakọ isi Frame
- Mgbakọ Handlebar
- Pedal (aka ekpe na aka nri)
- Ihu na azụ stabilizers
- Ngwa ngwaike (bolts, washers, nuts, tools)
- Akwụkwọ ntuziaka onye ọrụ
4. Mgbakọ na Ntọala
Mgbakọ na-achọkarị mmadụ abụọ. Soro usoro ndị a nke ọma:
-
Nzọụkwụ 1: Tinye ihe ndị na-eme ka ihe sie ike
Attach the front and rear stabilizer bars to the main frame using the provided bolts and washers. Ensure they are securely fastened to provide a stable base.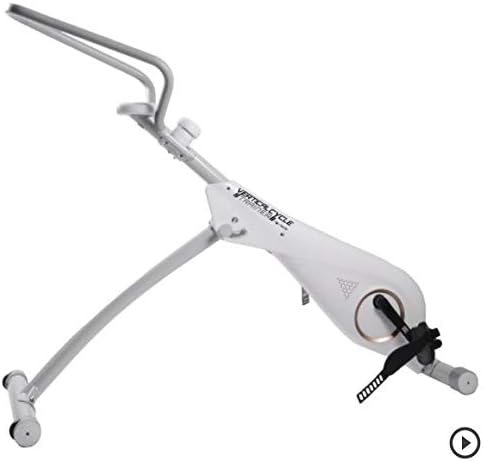
Figure 4.1: Initial assembly showing the main frame and base components.
-
Nzọụkwụ nke 2: Wụnye Pedals
Identify the left (L) and right (R) pedals. The left pedal typically threads counter-clockwise, and the right pedal clockwise. Thread them into the crank arms and tighten securely with a wrench. -
Step 3: Attach Handlebar Assembly
Connect the handlebar assembly to the main frame's upright post. Secure it with the designated locking pin or knob, ensuring it is firmly in place and does not wobble.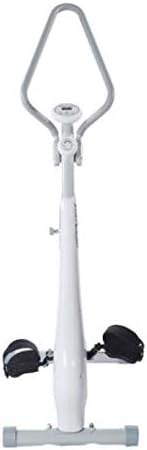
Figure 4.2: Fully assembled FITNATION Vertical Cycle Trainer.
-
Nzọụkwụ 4: Nyocha ikpeazụ
Before first use, double-check all connections, bolts, and nuts to ensure they are tight and secure. Test the stability of the unit by gently rocking it.
5. Ntuziaka ọrụ
The FITNATION Vertical Cycle Trainer is designed for straightforward operation.
5.1 Na-edozi Nguzogide
The trainer features an adjustable resistance mechanism. Locate the resistance knob, typically found on the main frame near the handlebars. Turn the knob clockwise to increase resistance for a more challenging workout, and counter-clockwise to decrease resistance for an easier ride.
5.2 Using the Display Console (if applicable)
If your model includes a display console, it typically tracks metrics such as time, distance, speed, and calories burned. Refer to the specific console manual for detailed instructions on mode selection, reset functions, and battery replacement.
5.3 Starting Your Workout
- Step onto the pedals, ensuring your feet are securely placed in the foot straps.
- Jidesie aka aka ike.
- Begin pedaling at a comfortable pace. Adjust resistance as needed throughout your workout.
- Maintain a steady, controlled motion. Avoid jerky movements.
6. Nlekọta na nlekọta
Regular maintenance will extend the life of your FITNATION Vertical Cycle Trainer and ensure safe operation.
- Nhicha: Jiri mgbasa ozi hichaa akụrụngwa ahụamp ákwà mgbe ejiri ya mee ihe ọ bụla iji wepụ ọsụsọ na uzuzu. Ejila ihe nhicha ma ọ bụ ihe mgbaze.
- mmanu mmanu: Periodically check for any moving parts that may require lubrication. Apply a silicone-based lubricant as needed, avoiding contact with the resistance mechanism unless specifically instructed.
- Nyochaa ngwaike: Every few weeks, inspect all bolts, nuts, and screws. Tighten any that have become loose.
- Nchekwa: Store the trainer in a cool, dry place away from direct sunlight and extreme temperatures.
7. Nchọpụta nsogbu
This section addresses common issues you might encounter with your cycle trainer.
| Nsogbu | Ihe nwere ike ime | Ngwọta |
|---|---|---|
| Na-ama jijiji ma ọ bụ na-egweri mkpọtụ | Loose hardware; lack of lubrication; worn parts. | Check and tighten all bolts. Apply lubricant to moving joints. If noise persists, contact customer support. |
| Unit anaghị akwụsi ike | Uneven surface; loose stabilizer bolts. | Ensure the trainer is on a flat, level surface. Tighten stabilizer bolts. |
| Nguzogide anaghị agbanwe | Resistance mechanism issue; knob not properly engaged. | Ensure the resistance knob is fully engaged. Check for any obstructions. If problem continues, contact support. |
| Pedal na-adị mfe | Pedals adịghị ike nke ọma. | Re-tighten pedals firmly with a wrench. Remember the left pedal is reverse-threaded. |
8. Nkọwapụta ngwaahịa
- Nọmba nlereanya: YP41ZAFXXX01
- Akara: NKWUKWU
- Onye nrụpụta: Viatek
- Assembled Dimensions (LxWxH): 55.1 x 19.3 x 47.2 sentimita asatọ
- Compact/Base Dimensions (DxWxH): 15"D x 15"W x 6"H (approximate, may refer to base or folded state)
- Akụkụ ngwugwu (LxWxH): 51.2 x 18 x 9.8 sentimita asatọ
- Ibu ngwugwu: 24.04 kilogram
- Eji akwadoro: Ime ụlọ
- UPC: 813061020920
- ASIN: B00A2WHJ32
- Nke mbụ dị: Eprel 9, 2014
9. Akwụkwọ ikike na nkwado ndị ahịa
For warranty information, technical assistance, or to order replacement parts, please contact FITNATION customer support. Keep your purchase receipt and model number (YP41ZAFXXX01) readily available when contacting support.
While specific warranty terms are not detailed in this manual, most fitness equipment comes with a limited warranty covering manufacturing defects. Please refer to the warranty card included with your product or visit the official FITNATION websaịtị maka amụma akwụkwọ ikike kachasị ọhụrụ.
For general inquiries or to explore other FITNATION products, you may visit the FITNATION Store on Amazon.


