Okwu mmalite
This manual provides essential information for the proper setup, operation, and maintenance of your Hitachi Touro Desk Dx3 2TB External Hard Drive. Please read these instructions carefully before using the device to ensure optimal performance and longevity.
Ihe ngwugwu
Chọpụta na ihe niile dị na ngwugwu:
- Hitachi Touro Desk Dx3 2TB External Hard Drive
- USB 3.0 data USB
- AC Power Adapter (EURO plug)
- Ntuziaka mmalite ngwa ngwa (ọ bụrụ na etinyere ya)
Ngwaahịa gafereview
The Hitachi Touro Desk Dx3 is a 2TB external desktop hard drive designed for reliable data storage and backup. It features a stylish, stackable design and SuperSpeed USB 3.0 connectivity for fast data transfers, while also being backwards compatible with USB 2.0.

Foto 1: N'ihu view of the Hitachi Touro Desk Dx3. This image displays the sleek, black, vertically ribbed casing of the external hard drive. A small, rectangular indicator light is visible towards the bottom center of the front panel, signifying power or activity status.
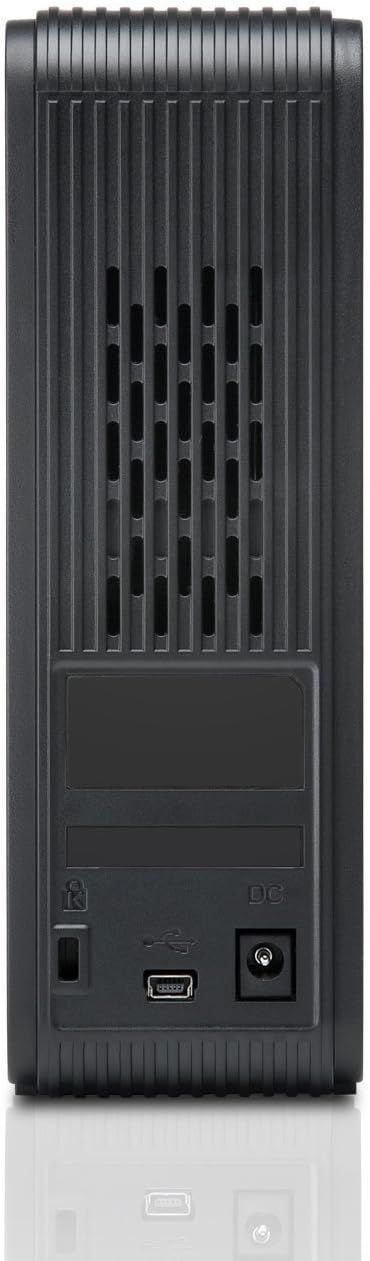
Foto 2: Azu view of the Hitachi Touro Desk Dx3. This image shows the rear panel of the hard drive, which includes the DC power input port on the right, the USB 3.0 data port in the center, and a security lock slot on the left. Ventilation grilles are visible across the top portion of the back panel.
Melite
Follow these steps to set up your external hard drive:
- Jikọọ ihe nkwụnye ọkụ: Plug the AC power adapter into the DC power input port on the back of the Touro Desk Dx3. Then, plug the other end of the power adapter into a wall outlet. The drive will power on automatically.
- Jikọọ eriri USB: Connect one end of the supplied USB 3.0 data cable to the USB port on the back of the Touro Desk Dx3. Connect the other end of the USB cable to an available USB port on your computer. For optimal performance, use a USB 3.0 port.
- Nghọta Sistemu arụ ọrụ: Your computer's operating system (Windows or macOS) should automatically detect and install the necessary drivers for the hard drive. The drive will appear as a new storage device in 'My Computer' (Windows) or 'Finder' (macOS).
- Initial Formatting (Optional): The drive comes pre-formatted. If you wish to reformat the drive or partition it, refer to your operating system's disk management tools. Note: Reformatting will erase all data on the drive.
Na-arụ ọrụ
Once connected, your Touro Desk Dx3 is ready for use.
- Nyefee data: Dọrọ na dobe files or folders to and from the Touro Desk Dx3 icon on your desktop or in your file explorer. The USB 3.0 interface allows for rapid data transfer speeds.
- Ndabere: Use your operating system's built-in backup utilities or third-party software to create backups of your important files on the external drive.
- Mwepụ nke ọma: Always safely eject the hard drive before disconnecting it from your computer. In Windows, right-click the drive icon in the system tray and select 'Eject'. In macOS, drag the drive icon to the Trash or click the Eject button next to the drive in Finder. This prevents data corruption.
Nlekọta
Proper maintenance ensures the longevity of your device.
- Nhicha: Jiri akwa dị nro, kpọrọ nkụ, akwa na-enweghị lint iji hichaa mpụta draịva ahụ. Ejila ihe nhicha mmiri ma ọ bụ ikuku ikuku.
- Ọnọdụ gburugburu: Store and operate the drive in a cool, dry environment, away from direct sunlight, extreme temperatures, and high humidity. Avoid placing the drive near strong magnetic fields.
- Nlekọta anụ ahụ: Handle the drive with care. Avoid dropping it or subjecting it to strong impacts, as this can damage the internal components.
Nchọpụta nsogbu
Ọ bụrụ na ị na-enwe nsogbu, rụtụ aka na azịza nkịtị ndị a:
- Amataghị mbanye:
- Ensure the power adapter is securely connected to both the drive and a working power outlet.
- Verify the USB cable is firmly connected to both the drive and your computer. Try a different USB port or cable.
- Malitegharịa ekwentị gị na kọmputa.
- Check Disk Management (Windows) or Disk Utility (macOS) to see if the drive is detected but not assigned a drive letter or mounted.
- Ọsọ mbufe nwayọ:
- Ensure you are connected to a USB 3.0 port on your computer for SuperSpeed performance. USB 2.0 ports will operate at slower speeds.
- Zere ịnyefe ọtụtụ obere obere files simultaneously; large files transfer more efficiently.
- Close other applications that might be using system resources or the USB bus.
- Drive Light Not On:
- Lelee njikọ nkwụnye ọkụ na draịva na oghere mgbidi.
- Gbalịa nweta ike dị iche.
Nkọwapụta
| Ike Nchekwa Dijitalụ | 2 TB |
| Interface Hard Disk | USB 3.0 |
| Teknụzụ Njikọta | USB |
| Ụdị | Hitachi |
| Ihe kpatara ụdị diski ike | 3.5 sentimita asatọ |
| Ngwa dakọtara | Kọmputa kọmputa |
| Ụdị nwụnye | N'elu tebụl |
| Agba | Nwa |
Ozi akwụkwọ ikike
This product is covered by a limited warranty. For detailed information regarding warranty terms, conditions, and duration, please refer to the warranty card included in your product packaging or visit the official Hitachi support websaịtị. Debe ihe akaebe nke ịzụrụ maka akwụkwọ ikike.
Nkwado ndị ahịa
For further assistance, technical support, or to inquire about service, please visit the official Hitachi support webweebụsaịtị ma ọ bụ kpọtụrụ ngalaba ọrụ ndị ahịa ha. Enwere ike ịchọta ozi kọntaktị na nke onye nrụpụta websaịtị ma ọ bụ na akwụkwọ ngwaahịa.