1. Okwu mmalite
The J-Tech Digital JTD-EX-120M HDMI Extender is designed to transmit High-Definition Multimedia Interface (HDMI) signals over a single Cat5e/6/7 cable. This system converts the HDMI signal to standard TCP/IP for transmission, allowing for extension up to 120 meters (394 feet) while maintaining full HD 1080p resolution. It also includes Infrared (IR) extension functionality for remote control of source devices.
This manual provides detailed instructions for the installation, operation, and troubleshooting of your J-Tech Digital HDMI Extender.
2. Ozi nchekwa
- Ewepụla akụkụ a na mmiri, iru mmiri, ma ọ bụ oke iru mmiri.
- Edokwala unit ahụ n'elu elu anaghị akwụsi ike.
- Use only the provided power adapters. Using unauthorized power adapters may damage the device and void the warranty.
- Gbaa mbọ hụ na ikuku ikuku dị na gburugburu unit ahụ iji gbochie ikpo oke ọkụ.
- Anwala imepe ma ọ bụ rụzie ihe niile dị na ngalaba ahụ n'onwe gị. Nye ndị ọrụ ruru eru ọrụ niile.
- Debe ihe ahụ ka ọ ghara ịpụta ìhè n'anwụ, ebe okpomọkụ na-esi, na ebe magnet siri ike.
3. Ihe ngwugwu
Chọpụta na ihe niile dị na ngwugwu gị:
- 1x HDMI Extender Transmitter (JTD-EX-120M)
- 1x HDMI Extender Receiver (JTD-EX-120M)
- 2x DC 5V/1A Power Adapters
- 1 x eriri igwe nnabata IR
- 1 x eriri nnyefe IR
- 1x Akwụkwọ ntuziaka onye ọrụ

Image: Contents of the J-Tech Digital HDMI Extender package, including the transmitter, receiver, power adapters, IR cables, and user manual.
4. Ngwaahịa gafereview
The JTD-EX-120M system consists of a Transmitter unit and a Receiver unit. Both units feature an Ethernet port for Cat5e/6/7 cable connection, HDMI ports, power ports, and IR ports.
4.1 Nkeji nnyefe

Foto: Zuru ezu view of the J-Tech Digital HDMI Extender Transmitter unit, showing the Ethernet Port, Power Port, IR TX Port, Reset Button, Status Indicator, Power Indicator, and HDMI Input.
- Njikọ Ethernet: Connects to the Receiver unit via Cat5e/6/7 cable.
- Power Port (DC/5V): Connects to the included 5V power adapter.
- IR TX Port: Connects to the IR Transmitter cable to send IR signals to the source device.
- Tọgharịa bọtịnụ: Used to reset the unit.
- Ntinye HDMI: Connects to the HDMI source device (e.g., Blu-ray player, cable box).
- Ngosipụta ọnọdụ: Indicates the operational status of the unit.
- Ihe ngosi ike: Indicates if the unit is receiving power.
4.2 Ngalaba nnata

Foto: Zuru ezu view of the J-Tech Digital HDMI Extender Receiver unit, showing the Ethernet Port, Power Port, IR RX Port, Reset Button, Status Indicator, Power Indicator, and HDMI Output.
- Njikọ Ethernet: Connects to the Transmitter unit via Cat5e/6/7 cable.
- Power Port (DC/5V): Connects to the included 5V power adapter.
- IR RX Port: Connects to the IR Receiver cable to receive IR signals from a remote control.
- Tọgharịa bọtịnụ: Used to reset the unit.
- Ihe mmepụta HDMI: Connects to the HDMI display device (e.g., TV, projector).
- Ngosipụta ọnọdụ: Indicates the operational status of the unit.
- Ihe ngosi ike: Indicates if the unit is receiving power.
5. Ntọala na nwụnye
Follow these steps to set up your J-Tech Digital HDMI Extender:
- Kwadebe eriri: Ensure you have a high-quality Cat5e, Cat6, or Cat7 Ethernet cable of the appropriate length (up to 120m/394ft). Also, have your HDMI cables ready.
- Connect HDMI Source to Transmitter: Connect an HDMI cable from your source device (e.g., DVD player, game console, PC) to the Ntinye HDMI port on the Transmitter unit.
- Connect HDMI Display to Receiver: Connect an HDMI cable from your display device (e.g., HDTV, projector) to the HDMI mmepụta port on the Receiver unit.
- Jikọọ eriri Ethernet: Connect one end of the Cat5e/6/7 cable to the Ọdụ ụgbọ mmiri Ethernet on the Transmitter unit and the other end to the Ọdụ ụgbọ mmiri Ethernet on the Receiver unit.
- Connect IR Cables (Optional):
- Jikọọ IR TX Cable ka IR TX Port on the Transmitter unit. Position the IR emitter head near the IR sensor of your source device.
- Jikọọ IR RX Cable ka IR RX Port on the Receiver unit. Position the IR receiver head in a location where it can receive signals from your remote control.
- Tinye Ike: Connect the two included 5V power adapters to the Power Ports (DC/5V) on both the Transmitter and Receiver units, then plug them into power outlets. The Power Indicator LEDs on both units should illuminate.
- Nyochaa njikọ: Once all connections are made and power is supplied, turn on your HDMI source and display devices. The Status Indicator LEDs on both units should show a stable connection, and the video should appear on your display.
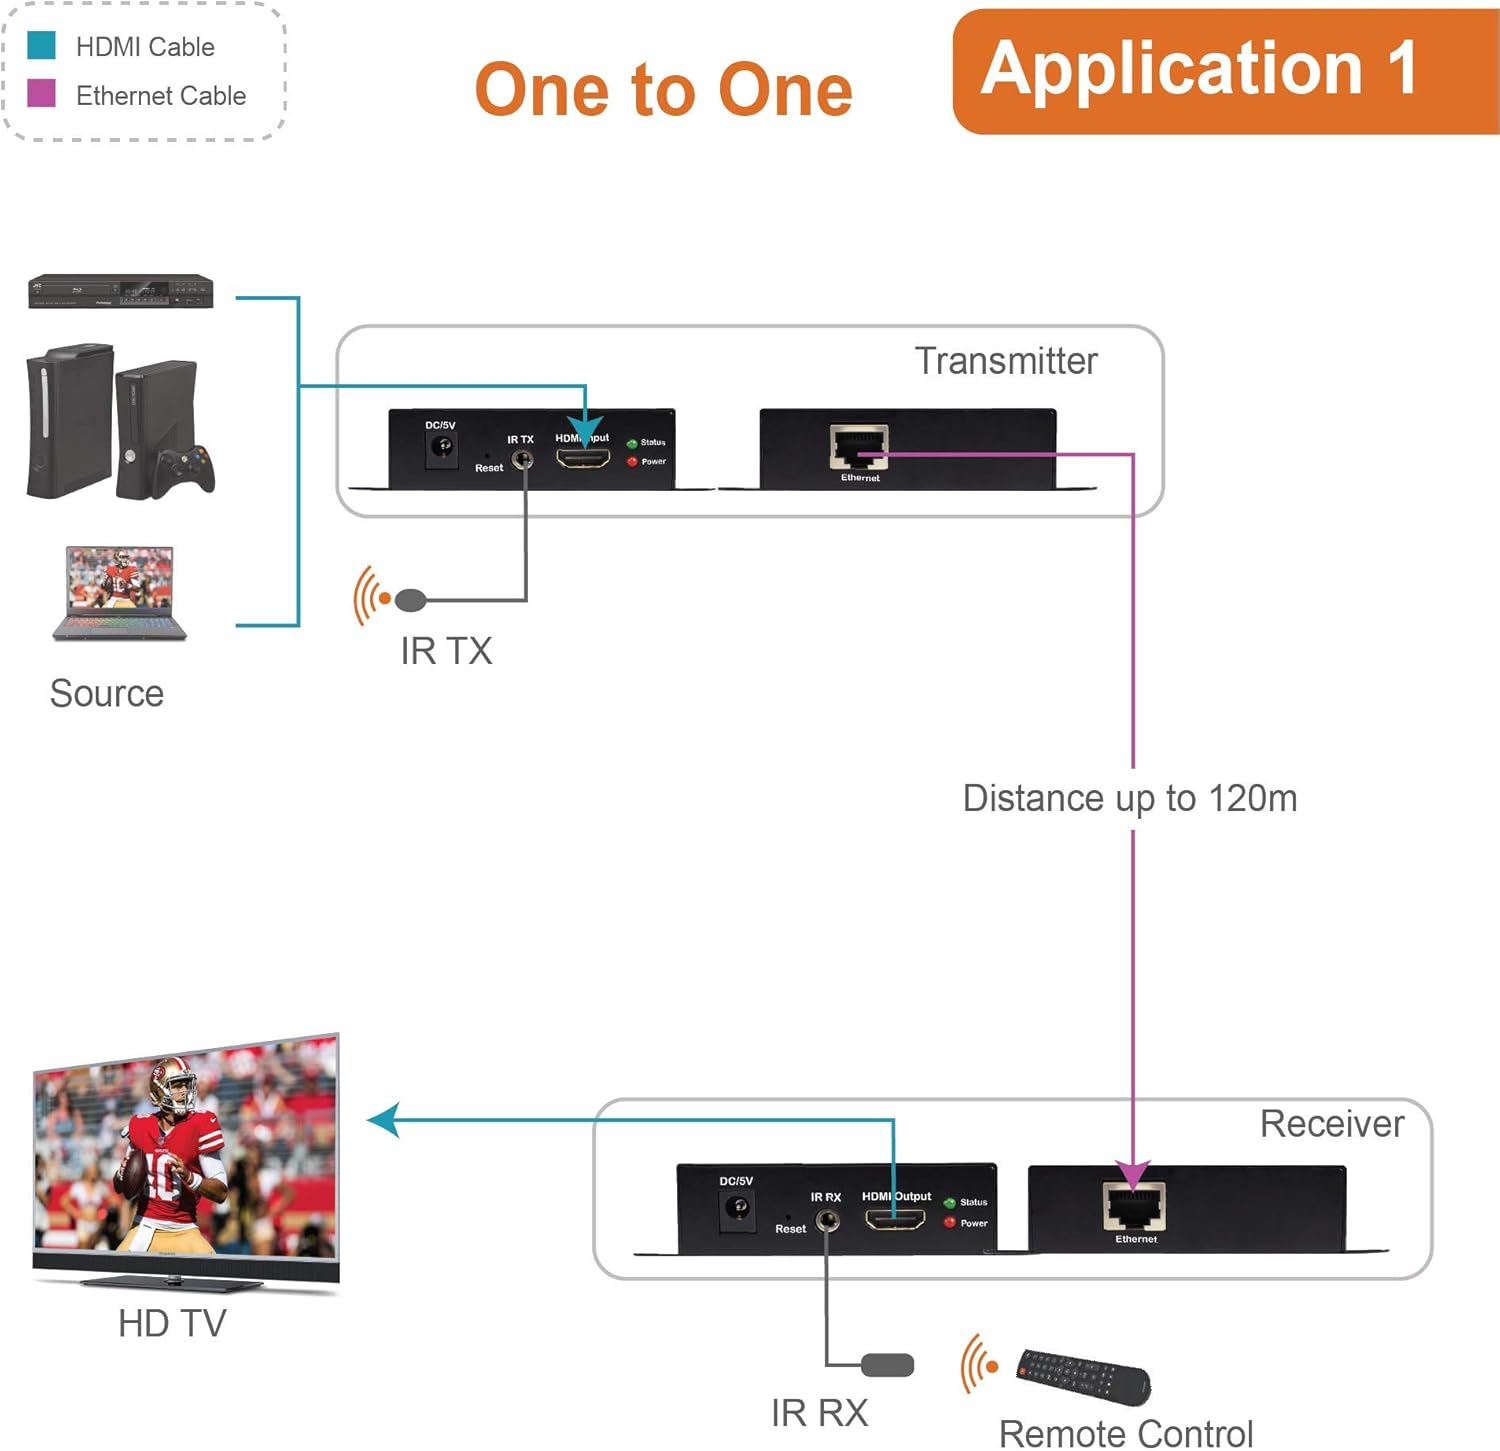
Image: Diagram illustrating a typical one-to-one setup for the J-Tech Digital HDMI Extender, showing a source device connected to the Transmitter, a Cat cable connecting Transmitter and Receiver, and the Receiver connected to an HD TV. IR cables are also shown for remote control functionality.
5.1 Multi-Receiver Application (via Ethernet Switch)
This extender supports a one-to-many configuration using an Ethernet switch. To achieve this, connect the HDMI Transmitter to an Ethernet switch, and then connect multiple HDMI Receivers to the same Ethernet switch. Each Receiver will then connect to its respective display.

Image: Diagram showing the J-Tech Digital HDMI Extender in a multi-receiver setup. A laptop (source) connects to the Transmitter, which then connects to an Ethernet switch. Multiple Receiver units are connected to the switch, each feeding a separate display, extending the signal up to 400ft.
6. Ntuziaka ọrụ
Once the setup is complete, the extender operates automatically. Ensure all devices are powered on in the correct sequence (source, then extender units, then display) for optimal performance.
6.1 IR Control Functionality
The IR extension feature allows you to control your HDMI source device from the location of your display. Point your remote control at the IR Receiver head connected to the Receiver unit. The signal will be transmitted through the Cat cable to the IR Emitter head connected to the Transmitter unit, which then relays the command to your source device.

Image: Diagram illustrating the IR extender control feature. A remote control sends a signal to the IR RX connected to the Receiver unit. This signal is then transmitted via the Cat cable to the IR TX connected to the Transmitter unit, which controls the source device.
7. Nlekọta
- Clean the unit with a soft, dry cloth. Do not use liquid or aerosol cleaners.
- Keep the unit free from dust and debris to ensure proper ventilation.
- Na-elele njikọ eriri mgbe niile iji hụ na ha dị nchebe.
8. Nchọpụta nsogbu
If you encounter issues with your HDMI Extender, refer to the following common problems and solutions:
| Nsogbu | Ihe nwere ike ime | Ngwọta |
|---|---|---|
| No video or audio on display. | Loose cable connections, power issue, incorrect input selection on display. | Check all HDMI and Ethernet cable connections. Ensure both Transmitter and Receiver units are powered on. Verify the display is set to the correct HDMI input. Try restarting all devices. |
| Poor video quality (flickering, distortion). | Low quality or damaged Cat cable, excessive cable length, interference. | Use a high-quality Cat6 or Cat7 cable. Ensure cable length does not exceed 120m (394ft). Avoid running Cat cable near strong electrical interference sources. |
| IR remote control not working. | IR emitter/receiver misaligned, IR cables not connected properly. | Ensure the IR emitter is directly over or very close to the IR sensor of the source device. Confirm the IR receiver is positioned to receive signals from your remote. Check that both IR cables are securely plugged into their respective ports. |
| Power indicator not lit. | Njikọghị ihe nkwụnye ike, ebe nkwụnye ike nwere nsogbu. | Ensure the power adapter is securely connected to the unit and a working power outlet. Try a different power outlet. |
9. Nkọwapụta
| Njirimara | Nkọwa |
|---|---|
| Nọmba nlereanya | JTD-EX-120M |
| Ụdị HDMI | Supports 1080p, 3D, HDCP |
| Nkwado ọdịyo | Dolby TrueHD, DTS Master Audio |
| Ogologo nnyefe | Up to 120m (394ft) over single Cat5e/6/7 cable |
| Video Color Support | 36bit (CAT7); 24bit (CAT6) |
| Mkpakọ onyonyo | M-JPEG technique (no image quality loss) |
| Mgbatị IR | Ee |
| Ịnye ọkụ | DC 5V/1A (x2) |
| Akụkụ ngwaahịa | 4 x 3 x 1 sentimita asatọ (otu nke ọ bụla) |
| Ibu Ibu | 1 pound (total) |
10. Akwụkwọ ikike na nkwado
J-Tech Digital products are designed for reliability and performance. For warranty information and technical support, please refer to the official J-Tech Digital website or contact their customer service directly. Contact information is typically provided in the product packaging or on the manufacturer's websaịtị.
Onye nrụpụta: Ụlọ ọrụ J-Tech Digital INC
Websaịtị: www.jtechdigital.com


