Okwu mmalite
This manual provides detailed instructions for the installation, operation, and maintenance of your OSD Audio SVC205 In-Wall Volume Control. Please read this manual thoroughly before installation and use to ensure proper function and safety.
The OSD Audio SVC205 is a high-quality in-wall volume control designed to manage audio levels for a pair of speakers in a multi-room audio system. It features a 12-step linear rotary knob for precise volume adjustment and an integrated on/off switch for complete audio control.
Ozi nchekwa
- Gbanyụọ ike ọkụ eletrik mgbe niile tupu echichi ma ọ bụ rụzie ọrụ.
- Gbaa mbọ hụ na njikọ waya niile echekwabara ma soro koodu eletriki mpaghara.
- Do not exceed the maximum power rating of 100 Watts per channel.
- Emebere ngwaọrụ a maka naanị ime ụlọ.
- Consult a qualified electrician if you are unsure about any installation steps.
Njirimara ngwaahịa
- Ijikwa ike: Rated at 100 Watts per channel with minimal bass roll-off.
- Njikwa olu: 12-step linear rotary-style knob for precise volume adjustment.
- Mgbanwu ma ọ bụ gbanyụọ: Integrated switch for completely turning off audio.
- Impedance Protection: Assists in stabilizing the ohm load to prevent amplifier damage when multiple speakers are connected.
- Adjustable Jumpers: Front-mounted adjustable jumpers for easy impedance adjustment.
- Nhazi: Décor plates designed for easy installation into a standard single gang box (2.9” depth).
- Wiring: Accepts up to 14 gauge wiring.
Ihe ngwugwu
- OSD Audio SVC205 In-Wall Volume Control Unit
- Matching Wall Plate
- Ịkwanye kposara
Ntọala na nwụnye
Proper installation is crucial for optimal performance and safety. If you are not comfortable with electrical wiring, please consult a professional installer.
Ngwa achọrọ:
- Screwdriver (Phillips na Flathead)
- Waya Strippers
- Teepu eletriki (nhọrọ)
- Voltage Tester (a na-atụ aro ya)
Wiring Diagram and Connections:
The SVC205 features screw terminals for secure wire connections. Ensure proper polarity (positive to positive, negative to negative) for all connections.
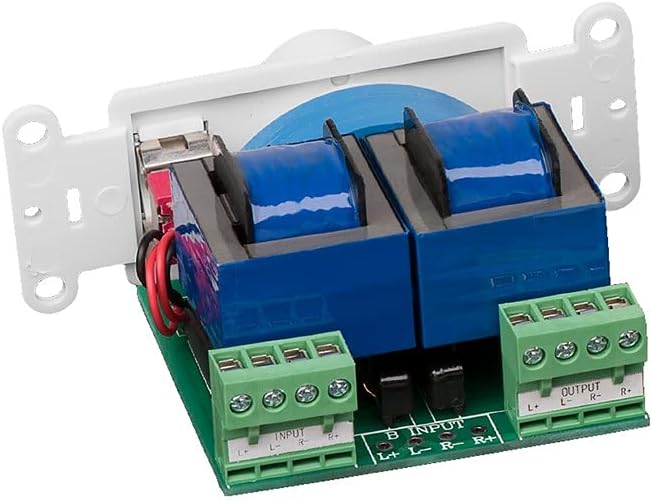
Foto: N'azụ view of the SVC205 showing the input and output screw terminals for speaker wire connections. The green terminal blocks are clearly labeled for Left and Right channels, and positive (+) and negative (-) connections.

Image: A visual representation of speaker wire (red and black) being connected to the input terminals of the SVC205 volume control. This illustrates the type of wiring accepted by the unit.
- Gbanyụọ ike: Before beginning any wiring, ensure that the power to the audio system and the circuit where you are installing the volume control is completely turned off at the main breaker.
- Kwadebe wires: Strip approximately 1/2 inch of insulation from the ends of your speaker wires. The SVC205 accepts up to 14 gauge wiring.
- Connect Input Wires: Jikọọ wired ọkà okwu site na gị amplifier or receiver to the "INPUT" terminals on the SVC205. Match the positive (+) and negative (-) terminals for both Left (L) and Right (R) channels.
- Connect Output Wires: Connect the speaker wires leading to your speakers to the "OUTPUT" terminals on the SVC205. Again, ensure correct polarity for Left (L) and Right (R) channels.
- Adjust Impedance Jumpers (if applicable): The SVC205 includes front-mounted adjustable jumpers for impedance matching. Refer to the diagram below for typical settings. Adjust these jumpers based on the total impedance of your connected speakers to prevent overheating and damage to your ampna -emegharị ihe.
- Ịkwanye: Carefully push the wired SVC205 unit into a standard single gang electrical box. The unit requires a minimum depth of 2.9 inches. Secure the unit to the electrical box using the provided mounting screws.
- Wụnye Plate Wall: Attach the matching wall plate over the installed volume control unit.
- Weghachi ike: Once all connections are secure and the unit is mounted, restore power to the circuit.

Image: A close-up diagram illustrating the location and configuration of the impedance protection jumpers on the SVC205 circuit board. These jumpers allow for adjustment to match the impedance of connected speakers.
Ntuziaka ọrụ
The OSD Audio SVC205 is simple to operate:

Foto: N'ihu view of the OSD Audio SVC205 In-Wall Volume Control, showing the prominent rotary volume knob and the smaller on/off toggle switch located below it.
- Gbanyụọ/ Gbanyụọ: Use the small toggle switch located below the rotary knob to turn the audio on or off. Flipping the switch will completely mute or unmute the sound.
- Ndozi olu: Rotate the large knob clockwise to increase the volume and counter-clockwise to decrease it. The 12-step linear design provides precise control over the audio level.

Image: A graphic illustrating the 12-step linear rotary action of the volume knob, indicating the range of precise volume control available.
Nlekọta
The OSD Audio SVC205 requires minimal maintenance.
- Nhicha: Use a soft, dry cloth to clean the surface of the wall plate and knob. Do not use abrasive cleaners or solvents.
- Nyocha: Periodically check the wall plate for any signs of damage or loose connections. If any issues are found, disconnect power and address them promptly.
- Enweghị akụkụ ndị ọrụ nwere ike ịrụ ọrụ: The internal components of the SVC205 are not user-serviceable. Do not attempt to open or repair the unit.
Nchọpụta nsogbu
| Nsogbu | Ihe nwere ike ime | Ngwọta |
|---|---|---|
| Enweghị ụda sitere na ndị ọkà okwu. |
|
|
| Distorted or low-quality sound. |
|
|
| Unit does not fit in electrical box. |
|
|
Nkọwapụta
| Aha Nlereanya | SVC205 |
| Ijikwa ike | 100 Watts per channel (300 Watts total) |
| Volume Control Type | 12-step linear rotary |
| Impedance Protection | Yes, with adjustable jumpers |
| Ndakọrịta waya | Up to 14 gauge |
| Ụdị nkwụnye | In-Wall (fits standard single gang box) |
| Omimi igbe kacha nta | 2.9 sentimita asatọ |
| Agba | Ọcha |
| Akụkụ (Ngwaahịa) | 6 x 3 x 3 sentimita (ihe dị ka) |
| Ibu Ibu | 0.01 ounces |
| Ojiji ime ime/n'èzí | Ime ụlọ |
Akwụkwọ ikike na nkwado
OSD Audio products are designed for reliability and performance. For warranty information and technical support, please visit the official OSD Audio websaịtị ma ọ bụ kpọtụrụ ngalaba ọrụ ndị ahịa ha.
Onye nrụpụta: OSD Audio
Websaịtị: www.osdaudio.com
For further assistance, refer to the contact information provided on the manufacturer's websaịtị.


