1. Okwu mmalite
The SPL 2Control is a compact and user-friendly stereo monitor controller designed to provide comprehensive control over your digital audio workstation's (DAW) monitoring functions. It ensures high-quality audio reproduction through both studio monitors and headphones, allowing you to hear every detail of your mix. Key features include a precise speaker volume potentiometer, active circuitry for sound integrity, and a unique Crossfeed control for accurate headphone monitoring that simulates a stereo speaker image.
2. Ntuziaka nchekwa
- Read these instructions thoroughly before operating the device.
- Debe akwụkwọ ntuziaka a maka ntụnye aka n'ọdịnihu.
- Ewepụla unit ahụ na mmiri ozuzo ma ọ bụ mmiri iji gbochie ọkụ ma ọ bụ ujo eletrik.
- Gbaa mbọ hụ na ikuku ikuku kwesịrị ekwesị; egbochila oghere ventilashị ọ bụla.
- Jiri naanị mgbakwunye / ngwa ndị nrụpụta akọwapụtara.
- Kwupu eriri ọkụ n'oge oke mmiri ozuzo ma ọ bụ mgbe ejighi ya ogologo oge.
- Tụtụ aka n'aka ndị ọrụ ruru eru.
- Zere idobe otu ahụ n'akụkụ ebe okpomọkụ dị ka radiators, ndekọ okpomọkụ, stovu, ma ọ bụ ngwa ndị ọzọ (gụnyere amplifiers) nke na-emepụta okpomọkụ.
3. Ihe ngwugwu
Mgbe ị na-ewepụ ihe ndị a, biko hụ na ihe ndị a gụnyere:
- 1 x SPL 2Control Module
- 1 x Cdọ Ike
- Akwụkwọ ntuziaka onye ọrụ a
4. Ngwaahịa gafereview
4.1 Njikwa ihu ihu na ihe ngosi
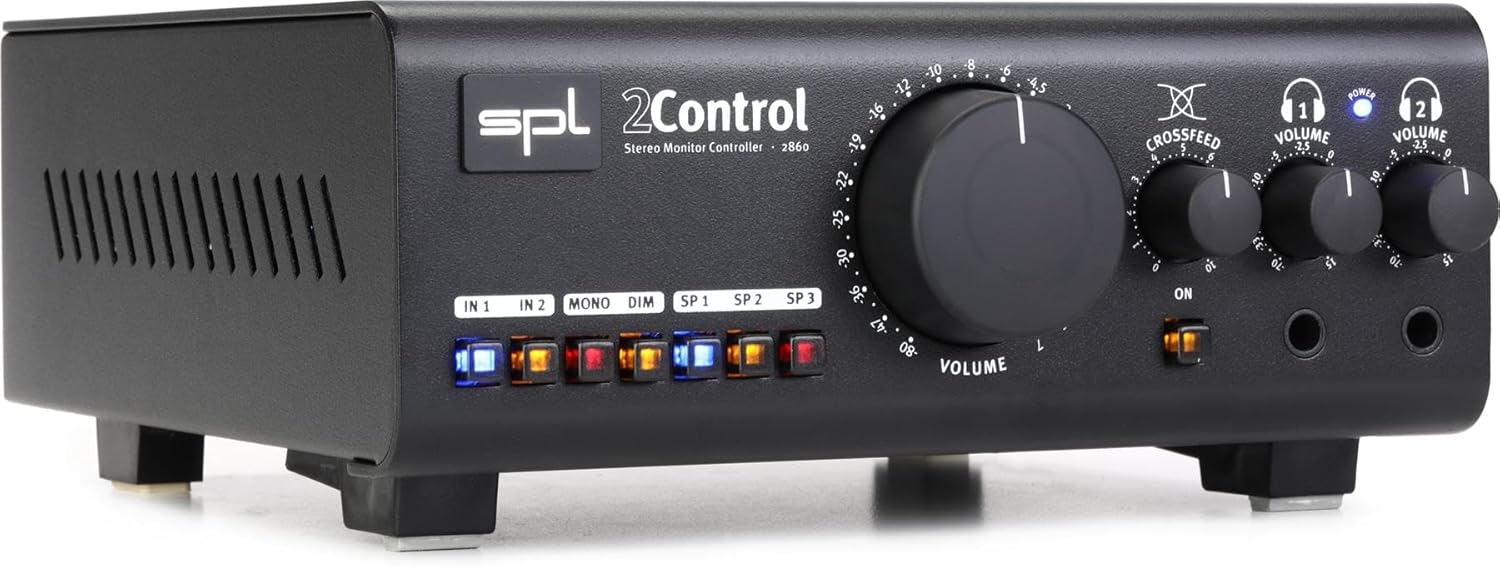
Foto 1: Front Panel of the SPL 2Control Stereo Monitor Controller.
This image displays the front panel of the SPL 2Control. From left to right, it features input selection buttons (IN 1, IN 2), function buttons (MONO, DIM), speaker output selection buttons (SP 1, SP 2, SP 3), a large central master VOLUME knob, a CROSSFEED knob, and two individual headphone VOLUME knobs with corresponding headphone output jacks. A power indicator LED is visible above the headphone controls.
- IN 1 / IN 2 Buttons: Selects the active stereo input source.
- MONO Button: Sums the stereo signal to mono for compatibility checking.
- Bọtịnụ DIM: Reduces the output volume by a fixed amount (e.g., -20dB) for temporary level reduction.
- SP 1 / SP 2 / SP 3 Buttons: Selects the active stereo speaker output pair.
- Mpịakọta olu: Master volume control for selected speaker outputs.
- CROSSFEED Knob: Adjusts the stereo panorama for headphone monitoring to simulate a speaker listening environment.
- HEADPHONE VOLUME 1 / 2 Knobs: Independent volume controls for the two headphone outputs.
- HEADPHONE 1 / 2 Jacks: 1/4-inch stereo headphone outputs.
- Ike Ikanam: Na-egosi na agbanyere unit ahụ.
4.2 Rear Panel Connections (Inferred)
The rear panel typically houses the audio input and output connections, as well as the power input. Based on common audio equipment and product specifications, you can expect:
- Ntinye Analog: Balanced XLR or TRS inputs for connecting your audio interface or mixer.
- Mpụta okwu: Multiple sets of balanced XLR or TRS outputs for connecting up to three pairs of studio monitors.
- Ntinye ike: Connector for the included power cord.
5. Nhazi
- Nkwanye: Position the SPL 2Control on a stable, flat surface, ensuring adequate ventilation around the unit.
- Njikọ ike: Connect the provided power cord to the power input on the rear panel of the 2Control and then to a suitable AC power outlet.
- Njikọ ntinye: Connect the stereo outputs of your audio interface, mixer, or other audio source to the IN 1 and/or IN 2 inputs on the rear panel using balanced XLR or TRS cables.
- Njikọ Ọkà Okwu: Connect your studio monitors to the SP 1, SP 2, and/or SP 3 outputs on the rear panel using balanced XLR or TRS cables. Ensure correct left and right channel connections.
- Headphone Connections: Plug your headphones into the HEADPHONE 1 and/or HEADPHONE 2 jacks on the front panel.
- Ike izizi: Ensure all volume controls are set to their minimum positions before powering on the unit. Then, connect the power cord to the wall outlet. The POWER LED on the front panel will illuminate.
6. Ntuziaka ọrụ
- Ịhọrọ ntinye: Pịa nke ọ bụla N'afọ 1 or N'afọ 2 button to select your desired audio source. The active button will illuminate.
- Selecting Speaker Outputs: Pịa SP1, SP2, ma ọ bụ SP3 button to route the audio to the corresponding pair of studio monitors. Only one speaker output can be active at a time.
- Adjusting Master Volume: Slowly turn the large Mpịakọta knob clockwise to increase the listening level for the selected speaker outputs. Turn counter-clockwise to decrease.
- Mono Summing: Pịa MONO button to sum the stereo signal to mono. This is useful for checking phase compatibility and mix balance. Press again to return to stereo.
- Ọrụ nhụsianya: Pịa DIM button to temporarily reduce the output volume. This is useful for quick conversations or when you need to lower the volume without losing your main volume setting. Press again to restore the original volume.
- Nleba anya ekweisi:
- Plug your headphones into the desired headphone jack (HEADPHONE 1 or 2).
- Hazie onye ahụ HEADPHONE VOLUME 1 or 2 knob to set the listening level for your headphones.
- Jiri ihe GAfere knob to adjust the stereo image for headphone listening. Turning it clockwise increases the crossfeed, simulating a more natural speaker-like stereo field by blending the left and right channels slightly.
7. Nlekọta
- Nhicha: Use a soft, dry cloth to clean the exterior of the unit. Do not use liquid cleaners or solvents.
- Igwe ikuku: Ensure that the ventilation slots are kept clear of dust and debris to prevent overheating.
- Nchekwa: Ọ bụrụ na ị na-echekwa unit ahụ ruo ogologo oge, kwụpụ ya na ike ma chekwaa ya n'ebe dị jụụ na nkụ.
8. Nchọpụta nsogbu
| Nsogbu | Ihe nwere ike ime | Ngwọta |
|---|---|---|
| Enweghị ụda sitere na ndị ọkà okwu. |
|
|
| Enweghị ụda sitere na ekweisi. |
|
|
| ọdịyo agbagọ. |
|
|
9. Nkọwapụta
| Njirimara | Nkọwa |
|---|---|
| Aha Nlereanya | 2 Control (also known as 2860) |
| Ụdị | SPL |
| Ụdị Ọkà Okwu | Nyochaa |
| Eji akwadoro | Control, Volume for Monitors |
| Ngwa dakọtara | Monitors, Speakers |
| Nhazi ọwa ụda gburugburu | 2.0 |
| Agba | Nwa |
| Ngwa gụnyere | 1 x SPL Control Module |
| Akụkụ ngwaahịa (D x W x H) | 8.66" x 8.46" x 3.15" |
| Ibu Ibu | 7.06 pound (ihe dị ka 3.2 n'arọ) |
| Isi Iyi Ike | Igwe ọkụ eletrik |
| Teknụzụ Njikọta | TRS, XLR |
| Ọnọdụ mmepụta ọdịyo | Stereo |
| Ụdị nkwụnye | Ugwu okpokoro |
| Onye nrụpụta | Sound Performance Lab |
10. Akwụkwọ ikike na nkwado
The SPL 2Control Monitor Controller comes with a limited warranty. For specific warranty terms, duration, and conditions, please refer to the documentation provided with your purchase or visit the official SPL website. For technical support, service, or inquiries, please contact the manufacturer, Sound Performance Lab, or your authorized dealer.
Onye nrụpụta: Sound Performance Lab


