Okwu mmalite
The TRENDnet 4-Port USB KVM Switch with Audio, model TK-409K, enables control of up to four computers using a single set of console controls. This device supports high-resolution video output and includes all necessary cabling for immediate setup. It is designed for environments requiring efficient management of multiple PCs.
Atụmatụ igodo
- Control up to 4 Computers: Manage four PCs with one keyboard, mouse, and monitor.
- High Quality VGA Resolution: Supports resolutions up to 2048 x 1536 at 60Hz.
- Nkwado ọdịyo: Features 3.5mm microphone and speaker jacks for full audio integration.
- Ike USB: Powered directly via USB cables, eliminating the need for an external power adapter.
- KVM Cables Included: Comes with four sets of KVM cables (2 x 1.2m, 2 x 1.8m) for immediate use.
- Njikwa mgbanwe: Offers front panel push buttons and keyboard hotkey commands for computer switching.
- Multi-Tasking Capability: Allows listening to music or using a microphone from one computer while operating another.
- NDAA Compliant: Meets U.S. integrity and supply chain standards for government contracts.
Ihe ngwugwu
- TRENDnet 4-Port USB KVM Switch (TK-409K)
- 2 x 1.2m (4 ft.) KVM Cables (VGA, USB, Audio)
- 2 x 1.8m (6 ft.) KVM Cables (VGA, USB, Audio)
Ngwaahịa gafereview
The TK-409K KVM switch features a compact design with clearly labeled ports for easy connection. The front panel includes console ports and switching buttons, while the sides house the PC connection ports.

Foto: Nwere akụkụ ihu view of the TRENDnet TK-409K 4-Port USB KVM Switch, showing the console ports and switching buttons.

Foto: N'ihu view of the KVM switch, highlighting the console VGA, USB, speaker, and microphone ports.

Foto: N'azụ view of the KVM switch, showing the PC 1 and PC 2 VGA and audio ports.

Foto: Top view of the KVM switch, displaying the numbered push buttons for switching between connected computers.
Ntuziaka nhazi
Follow these steps to connect your TRENDnet TK-409K KVM Switch:
- Connect Console Devices: Plug your VGA monitor, USB keyboard, USB mouse, 3.5mm speakers, and 3.5mm microphone into the corresponding 'CONSOLE' ports on the KVM switch.
- Jikọọ Kọmputa: Use the provided KVM cables to connect each computer to the KVM switch. Each cable set includes VGA, USB, and audio connectors. Connect the VGA, USB, speaker, and microphone plugs from one KVM cable to the respective ports on your first computer and to a 'PC' port (e.g., PC 1) on the KVM switch. Repeat this for up to four computers.
- Ike Na: Ensure all computers are powered on. The KVM switch draws power from the connected computers via the USB connections, so no external power adapter is required.

Image: A diagram illustrating the connections between the KVM switch, a monitor, keyboard, mouse, speakers, microphone, and four computers.
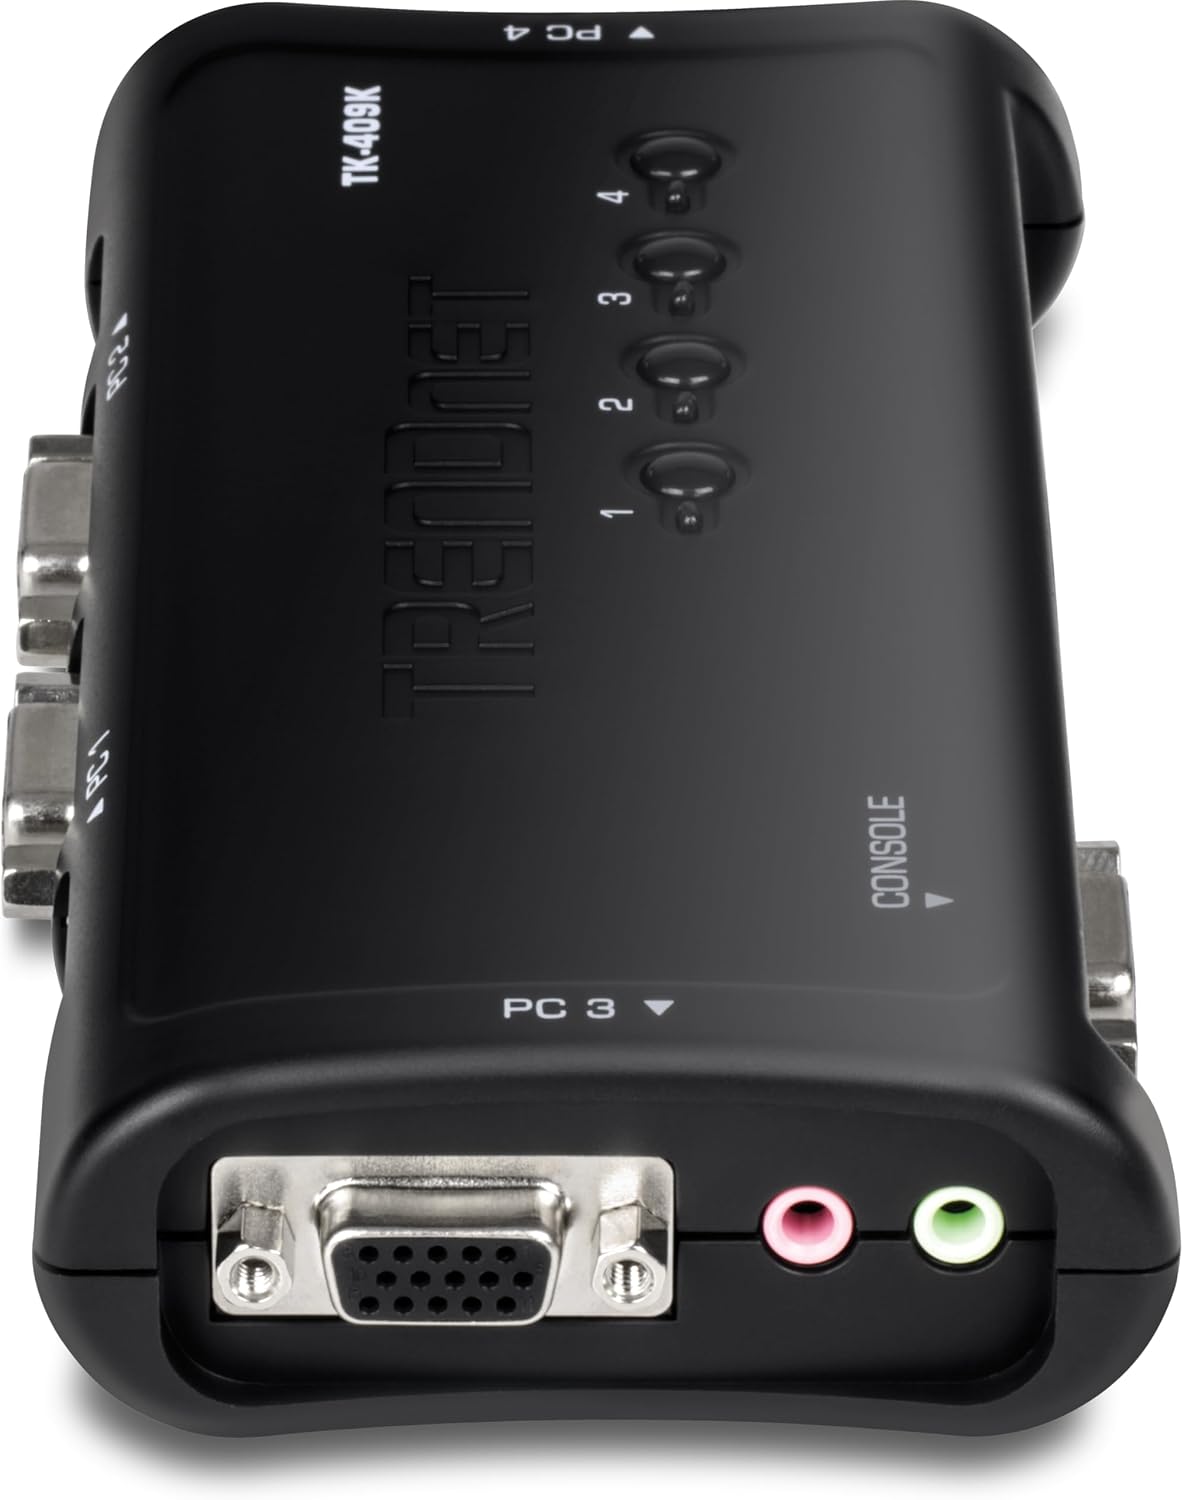
Image: A visual representation of the KVM connection interfaces, showing how VGA, USB, and audio cables connect from the KVM switch to individual PCs and console devices.

Image: Four sets of KVM cables, each comprising VGA, USB, and audio connectors, are shown as included accessories.
Video: An instructional video demonstrating the setup and functionality of the TRENDnet 4-Port USB KVM Switch Kit with Audio, model TK-409K. This video provides a visual guide to connecting your computers and console devices.
Ọrụ
The TRENDnet TK-409K KVM Switch offers multiple methods for switching between connected computers:
- Front Panel Push Buttons: Press the numbered buttons (1, 2, 3, or 4) on the front of the KVM switch to directly select the desired computer.
- Keyboard Hotkey Commands: Utilize predefined hotkey combinations on your keyboard to switch between computers. Refer to the software utility (if installed) or the product's full manual for specific hotkey sequences. Common hotkeys often involve double-tapping a specific key like 'Scroll Lock'.
- Ọrụ nyocha akpaaka: The KVM switch supports an auto-scan interval (10-60 seconds) for monitoring computers. This feature can typically be activated via hotkey commands.
Audio functionality allows you to listen to music or use a microphone from one computer while actively working on another, providing flexibility in your workflow.
Nkọwapụta
| Njirimara | Nkọwa |
|---|---|
| Nọmba nlereanya | TK-409K |
| Ngwa ngwa | 1 x VGA /SVGA HDB 15-pin (Female), 2 x USB ports (Keyboard / Mouse), 1 x 3.5mm speaker jack, 1 x 3.5mm microphone jack |
| Computer Interface (per PC) | 1 x USB 2.0 Type A, 1 x VGA /SVGA HDB 15-pin (Female), 1 x 3.5mm speaker jack, 1 x 3.5mm microphone jack |
| Mkpebi VGA | Ruo 2048 x 1536 @ 60Hz |
| USB Power Consumption | Oke 0.7W |
| Switching Control | Front panel push buttons, keyboard hotkey commands, Auto-Scan (10-60 secs) |
| Okpomọkụ na-arụ ọrụ | 32 ruo 104°F (0 ruo 40°C) |
| Akụkụ (L x W x H) | 8.1 x 7 x 5.5 sentimita (20.6 x 17.8 x 14 cm) |
| Ibu Ibu | 6.5 ounces (184.3 g) |
| Agba | Nwa |
| Ihe onwunwe | Plastic |
Nchọpụta nsogbu
If you encounter issues with your KVM switch, consider the following general troubleshooting steps:
- Lelee njikọ niile: Ensure all VGA, USB, and audio cables are securely connected to both the KVM switch and the computers. Loose connections are a common cause of display or input issues.
- Nyochaa ike: Confirm that all connected computers are powered on, as the KVM switch draws its power from their USB ports.
- Malitegharịa ngwaọrụ: Try restarting the connected computers and the KVM switch (by unplugging and replugging the USB connections) to reset the system.
- Test Peripherals Directly: If a specific peripheral (keyboard, mouse, monitor) is not working, test it by connecting it directly to a computer, bypassing the KVM switch, to rule out a peripheral malfunction.
- Mmelite ndị ọkwọ ụgbọala: Ensure your computer's display and USB drivers are up to date.
For more detailed troubleshooting or specific technical support, please refer to the official TRENDnet support resources.
Nlekọta
To ensure optimal performance and longevity of your TRENDnet TK-409K KVM Switch, follow these general maintenance guidelines:
- Debe Ọcha: Regularly clean the device with a soft, dry cloth. Avoid using liquid cleaners or solvents.
- Ikuku ikuku nke ọma: Ensure the KVM switch is placed in a location with adequate airflow to prevent overheating.
- Njikwa USB: Organize cables to prevent tangling and strain on the ports.
- Ọnọdụ gburugburu: Operate the device within the specified temperature range (32 to 104°F / 0 to 40°C) and avoid excessive humidity.
Akwụkwọ ikike na nkwado
TRENDnet is committed to providing reliable networking solutions. For information regarding product warranty, technical support, or to access additional resources such as drivers and firmware updates, please visit the official TRENDnet websaịtị ma ọ bụ kpọtụrụ nkwado ndị ahịa ha ozugbo. Debe akwụkwọ nnata ịzụrụ maka akwụkwọ ikike.


