1. Okwu mmalite
This manual provides detailed instructions for the safe and correct installation, operation, and maintenance of your Generic Fricpart-145225 replacement ice maker. This part is designed to replace the ice maker in Whirlpool GS2SHAXSS01 refrigerator models. Please read this manual thoroughly before beginning installation to ensure proper function and to prevent damage to the product or your appliance.
2. Ozi nchekwa
Always observe the following safety precautions to reduce the risk of electric shock, injury, or damage.
- Kwụpụ ike: Before attempting any installation or maintenance, always unplug the refrigerator from the power outlet or turn off the circuit breaker to avoid electrical shock.
- Yiri ngwa nchebe: It is recommended to wear work gloves to protect your hands from sharp edges and safety glasses to protect your eyes.
- Nwụnye ọkachamara: If you are unsure about any step of the installation process, it is advisable to consult a qualified appliance technician.
- Jiri Nlekọta Aka: The ice maker assembly contains delicate components. Handle it carefully to prevent damage.
- Nnyefe mmiri: Ensure the water supply to the refrigerator is turned off before disconnecting any water lines.
3. Ndakọrịta
This replacement ice maker (Fricpart-145225) is specifically designed for use with the Whirlpool GS2SHAXSS01 refrigerator model. Appliance parts can appear similar across different models. To ensure correct fitment and function, please verify your refrigerator's model number before proceeding with installation. The model number is typically located inside the refrigerator compartment or on the back of the unit.
4. Ntuziaka nwụnye
Follow these steps carefully to install your new ice maker.
Ngwa achọrọ:
- Screwdriver (Phillips or flathead, depending on your refrigerator model)
- Gọọfụ ọrụ
- Ugogbe nchekwa
Ntuziaka nzọụkwụ site na nzọụkwụ:
- Kwadebe friji:
- Kpupu ngwa nju oyi na nbata mgbidi.
- Gbanyụọ mmiri na friji.
- Empty the ice bin and remove any existing ice.
- Locate and Access the Old Ice Maker:
The ice maker is typically located in the freezer compartment, usually on the upper left side. You may need to remove shelves or the ice bin to gain full access.
- Disconnect the Old Ice Maker:
- Carefully disconnect the electrical wiring harness. This usually involves pressing a tab and pulling the connector apart.
- Unscrew the mounting screws that secure the ice maker to the freezer wall. There are typically 2-3 screws.
- Gently remove the old ice maker assembly from the freezer.
- Install the New Ice Maker:
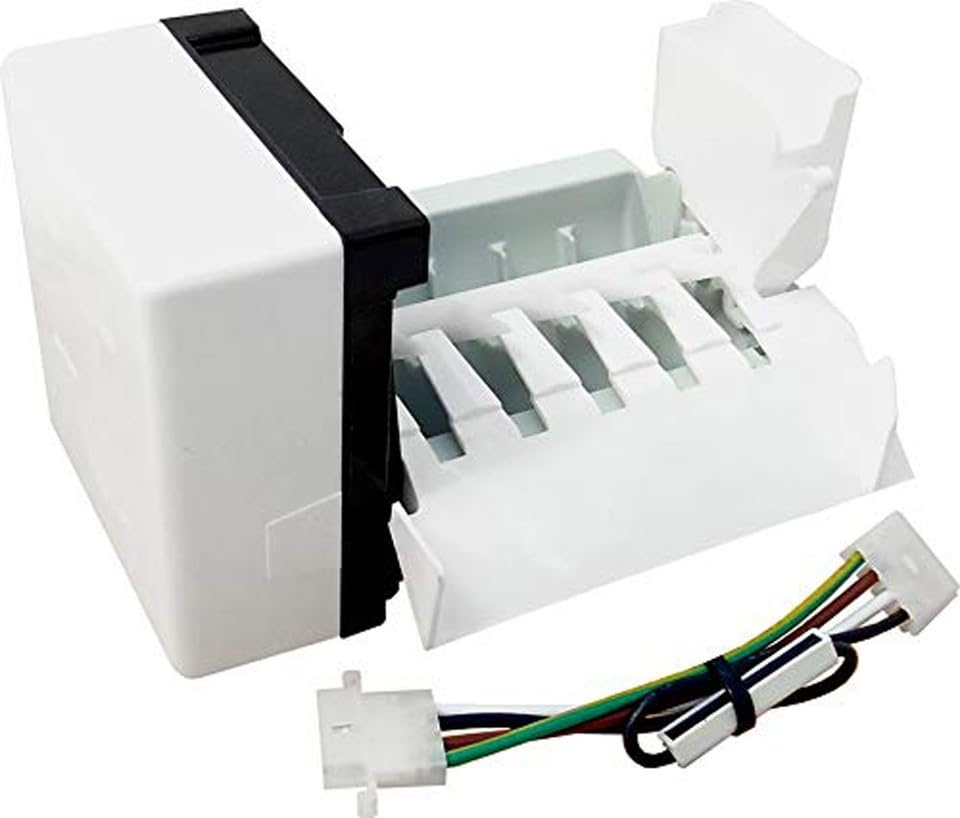
Image 1: The Generic Fricpart-145225 replacement ice maker. This image shows the complete assembly, including the motor, ice mold, and wiring harness, ready for installation into a compatible Whirlpool refrigerator.
- Align the new Fricpart-145225 ice maker with the mounting holes in the freezer.
- Secure the ice maker with the mounting screws removed earlier. Do not overtighten.
- Connect the electrical wiring harness to the new ice maker. Ensure it clicks securely into place.
- Weghachite ike na mmiri:
- Turn on the water supply to the refrigerator. Check for any leaks around the water inlet tube.
- Plug the refrigerator back into the power outlet or turn on the circuit breaker.
- Nnwale izizi:
Allow several hours for the freezer to reach its operating temperature and for the ice maker to cycle. The first batch of ice may take 12-24 hours to produce. Discard the first few batches of ice to ensure any manufacturing residues are flushed out.
5. Ọrụ
Once installed and powered, the ice maker will automatically begin producing ice. The ice maker typically has an arm or sensor that detects when the ice bin is full and will stop production until ice is removed. Ensure the ice maker's shut-off arm is in the down position for ice production to occur.
- First Ice Production: It may take 12-24 hours for the first batch of ice to be produced after installation and initial startup.
- Ọnụego mmepụta ice: The rate of ice production can vary based on freezer temperature, frequency of door openings, and water pressure.
- Shut-Off Arm: Ensure the metal shut-off arm is not obstructed and can move freely. If it is in the up position, the ice maker will not produce ice.
6. Nlekọta
Ịrụzi ice gị mgbe niile na-enyere aka hụ na ọ na-arụ ọrụ nke ọma ma na-adịte aka.
- Clean Ice Bin: Periodically empty and clean the ice bin with mild soap and water. Rinse thoroughly and dry before returning it to the freezer.
- Check Water Filter: If your refrigerator has a water filter, ensure it is replaced according to the manufacturer's recommendations to maintain water quality and ice production.
- Lelee eriri mmiri: Occasionally inspect the water supply line for kinks, leaks, or damage.
- Na-ekpochapu: If ice builds up around the ice maker, it may be necessary to manually defrost the freezer or clear the obstruction.
7. Nchọpụta nsogbu
Lee tebụl na-esonụ maka nsogbu ndị a na-enwekarị na ngwọta ha.
| Nsogbu | Ihe nwere ike ime | Ngwọta |
|---|---|---|
| Onye na-eme ice anaghị emepụta ice. |
|
|
| Small or hollow ice cubes. |
|
|
| Ice cubes taste bad. |
|
|
Ọ bụrụ na nsogbu ahụ na-aga n'ihu mgbe ị nwara azịza ndị a, biko kpọtụrụ nkwado ndị ahịa ma ọ bụ onye ọkachamara tozuru etozu.
8. Nkọwapụta
| Nọmba nlereanya: | Fricpart-145225 |
| Compatible Refrigerator Model: | Whirlpool GS2SHAXSS01 |
| Akara: | N'ozuzu |
| Onye nrụpụta: | Akụkụ nke fricparts |
| Ụdị akụkụ: | Refrigerator Ice Maker Replacement |
9. Akwụkwọ ikike & Nkwado
This product is covered by the standard warranty provided by the retailer or manufacturer at the time of purchase. Please retain your proof of purchase for warranty claims.
For technical support, troubleshooting assistance beyond what is provided in this manual, or to inquire about warranty service, please contact the seller or manufacturer directly using the contact information provided with your purchase.