
1. Okwu mmalite
This manual provides detailed instructions for the installation, operation, and maintenance of your Petokix V1 1080P Mini Car Dashboard Camera. Please read this manual thoroughly before using the device to ensure proper functionality and safety.
2. Kedu ihe dị na Igbe ahụ
Chọpụta na ihe niile dị na ngwugwu:
- V1 Dash Cam
- 64GB microSD kaadị
- Igwe nchaji USB
- ACC Charging Cable (Hardwire Kit)
- Akwụkwọ ntuziaka onye ọrụ
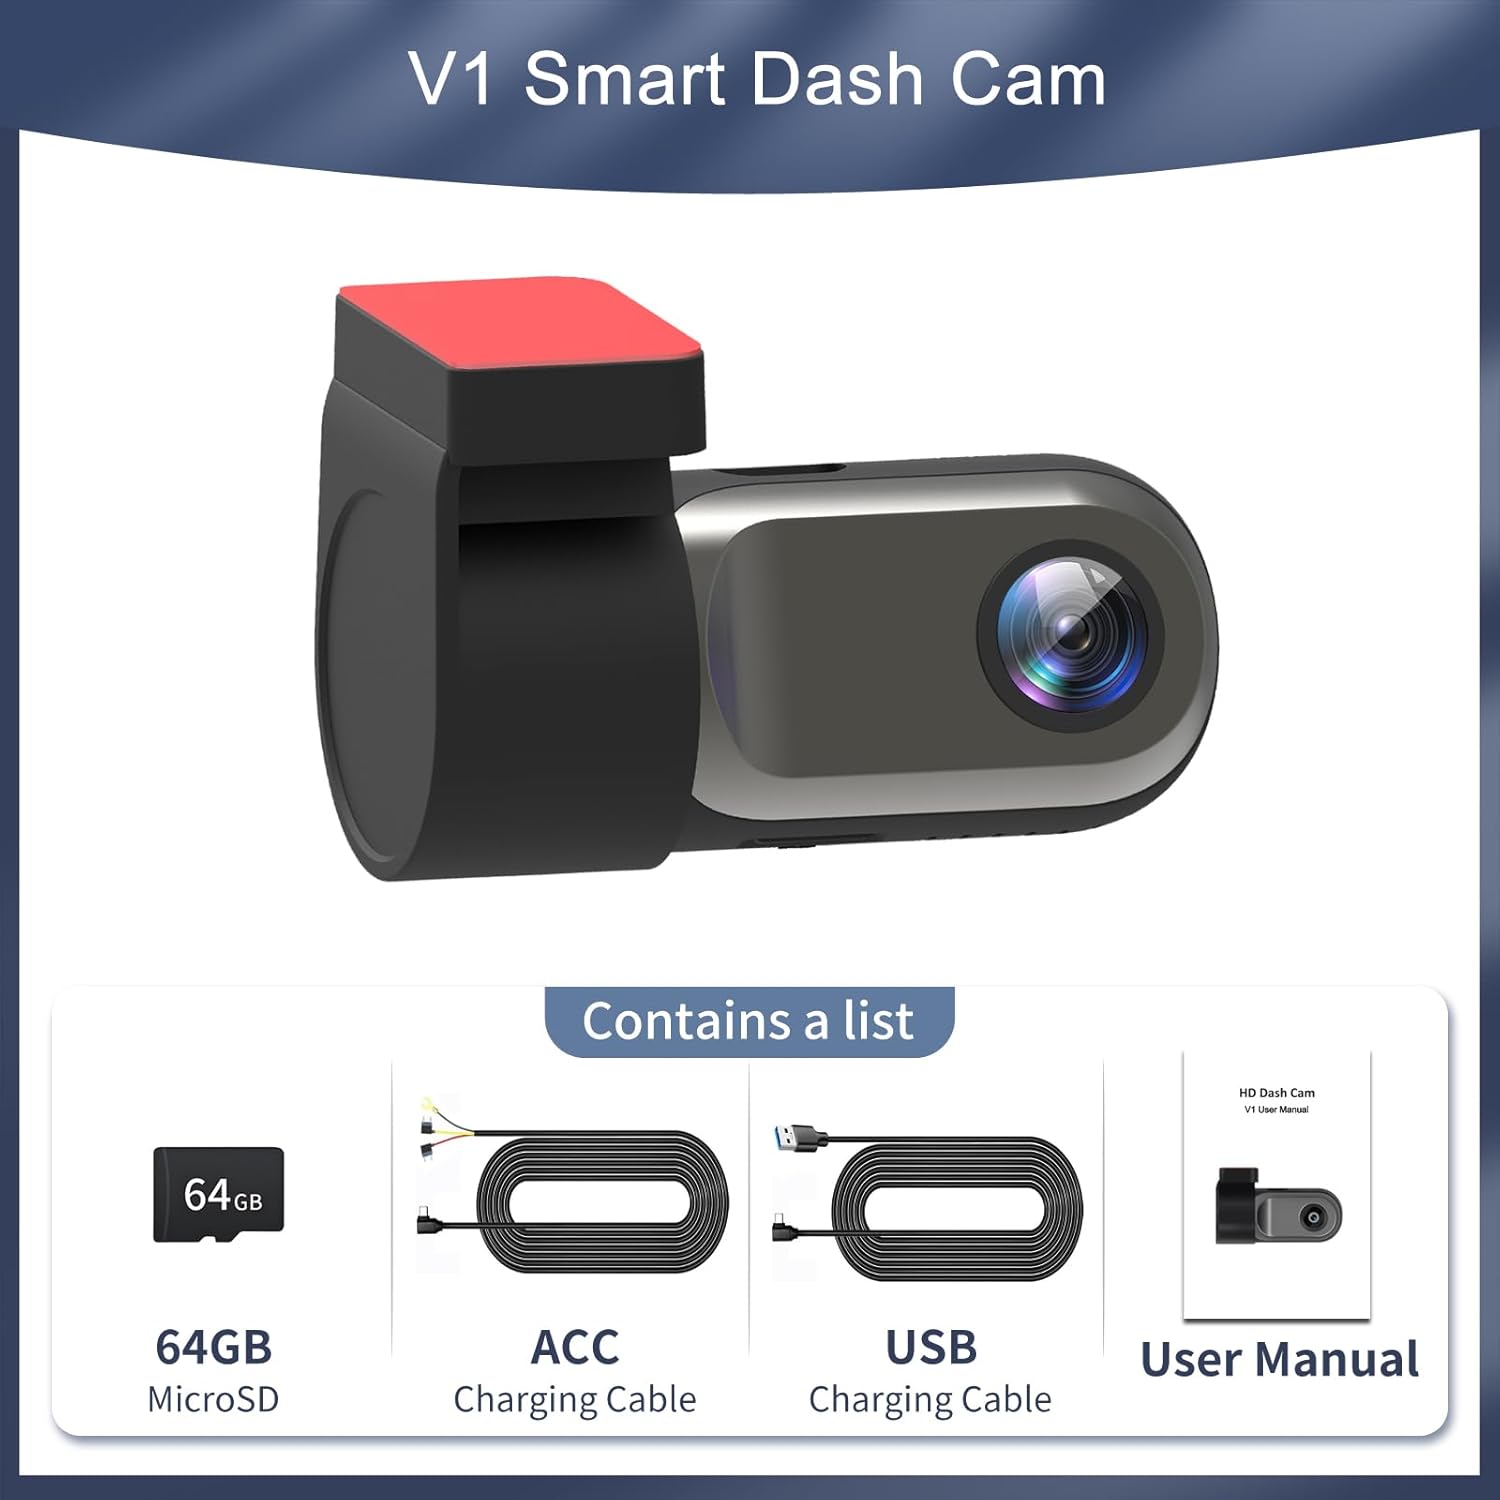
Figure 2.1: Package Contents. The image displays the Petokix V1 Dash Cam, a 64GB microSD card, a USB charging cable, an ACC charging cable (hardwire kit), and the user manual.
3. Ngwaahịa gafereview
The Petokix V1 is a compact 1080P Full HD car dashboard camera designed for discreet installation and reliable recording. It features a heat-resistant metal shell, adjustable camera angle, and WiFi connectivity for app control.
Akụkụ ndị bụ isi:
- 1080P Full HD Recording: Captures clear video at 1920x1080P resolution.
- oghere oghere obosara 120°: Provides broad road coverage.
- Akụkụ igwefoto nwere ike imezi: Allows for optimal positioning.
- Night Vision & WDR: Enhances clarity in low-light conditions.
- WiFi App Control: View ndu footage, download, and manage settings via a smartphone app.
- Ndekọ loop: Na-ehichapụ ihe ochie na akpaghị aka files mgbe kaadị ebe nchekwa jupụtara.
- G-ihe mmetụta: Detects collisions and locks current video files to prevent overwriting.
- Ụdị ebe a na-adọba ụgbọala awa iri abụọ na anọ n'ụbọchị asaa: Records motion or impacts when the vehicle is parked (requires ACC hardwire kit).
- Compact & Hidden Design: Small form factor (2.9"x1.4"x1.8") for discreet placement behind the rearview mirror.
- Ihe owuwu na-eguzogide okpomọkụ: Durable ABS plastic and metal shell for stable operation in various temperatures.
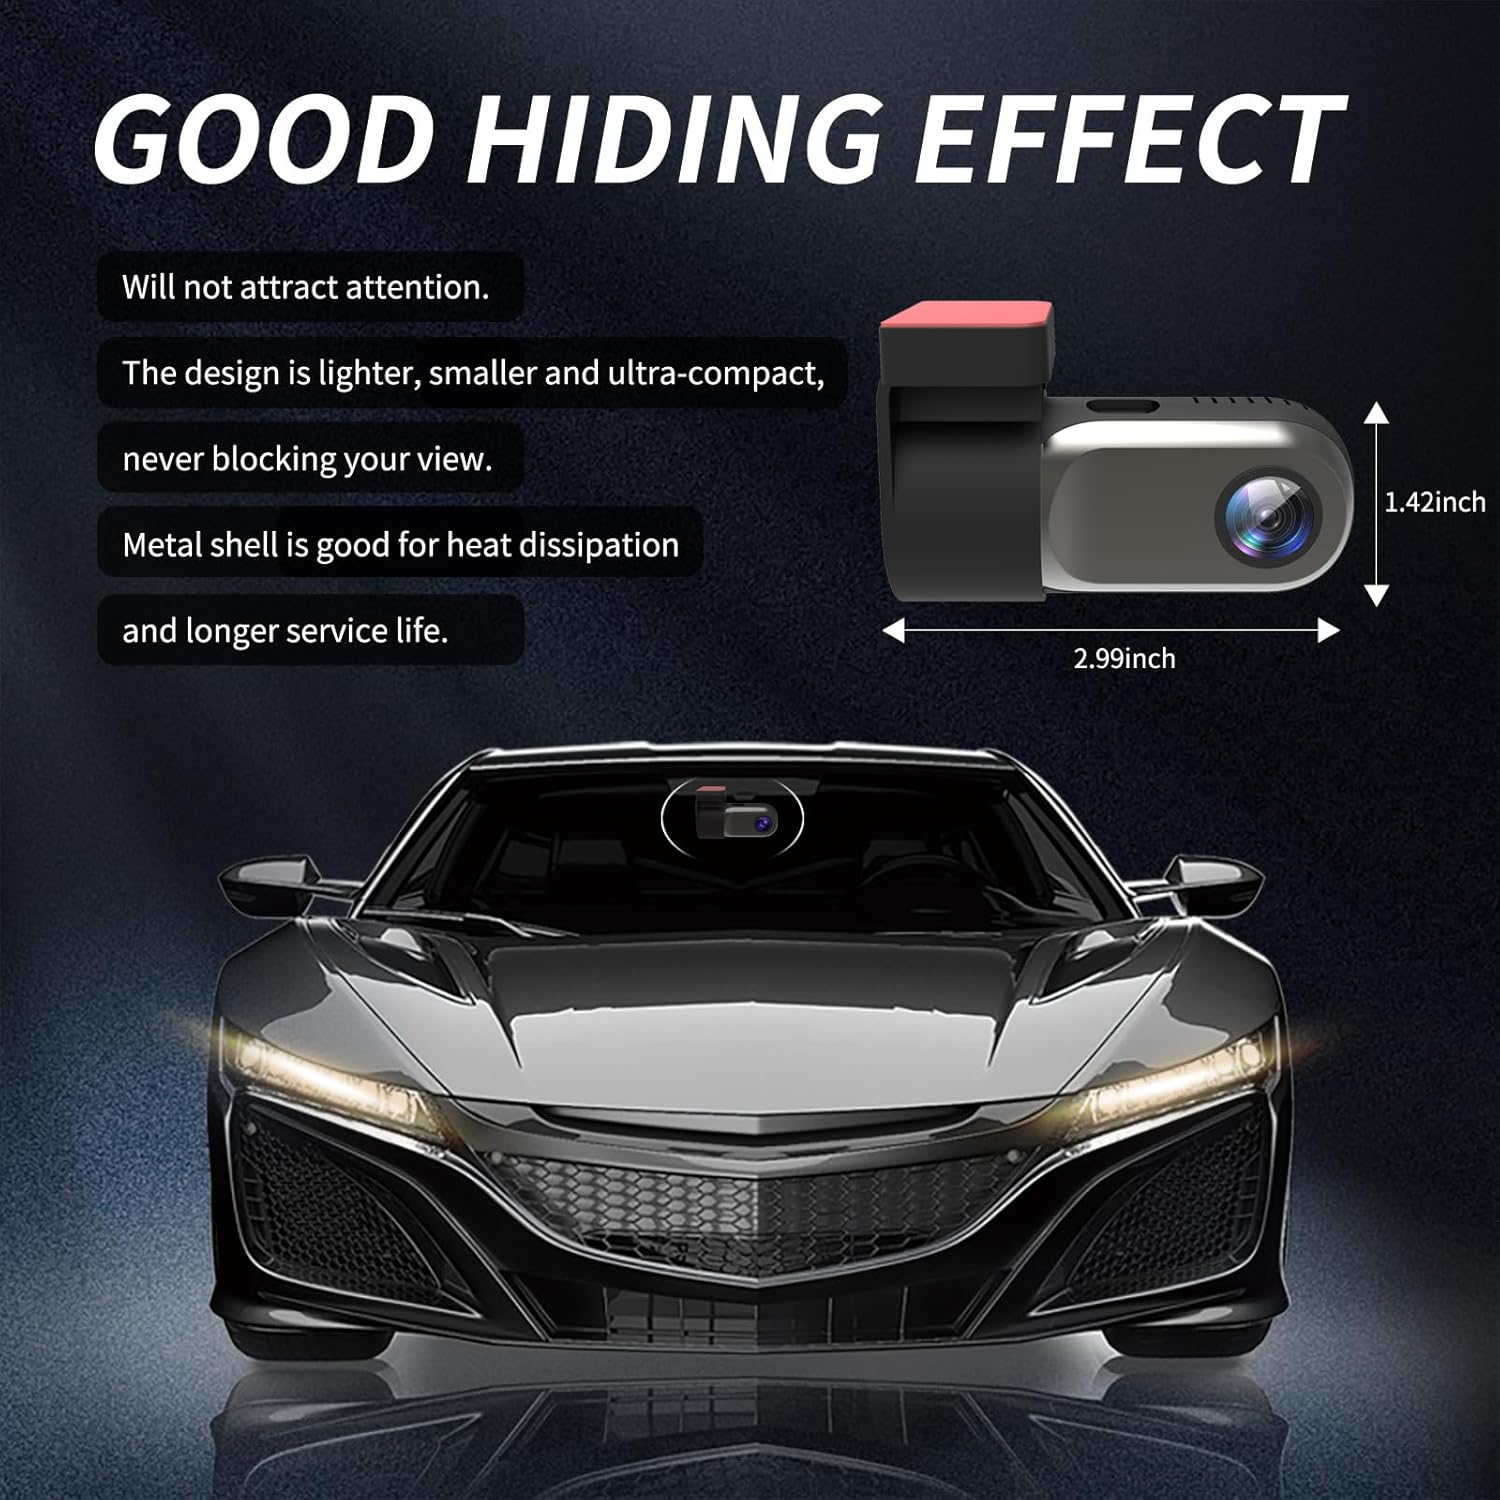
Figure 3.1: Compact Design. The image illustrates the small dimensions of the dash cam, highlighting its ability to be discreetly hidden.

Figure 3.2: Adjustable Lens. The camera lens can rotate 360 degrees, allowing for flexible recording angles.
4. Ntọala na nwụnye
4.1 Ntinye kaadi SD
- Chọta oghere kaadị microSD dị na dashcam.
- Insert the provided 64GB microSD card into the slot until it clicks into place. Ensure the card is inserted correctly.
- If using a different microSD card (up to 128GB supported), ensure it is a high-speed Class 10 or U3 card and format it within the app or on a computer before first use.
Video 4.1: Petokix V1 Dash Cam Overview and SD Card Insertion. This video demonstrates the physical features of the dash cam, including how to insert the microSD card, and provides a general overview nke ike ya.
4.2 Ịrịgo Dash Cam
- Hichaa ebe dị n'elu windo windo gị ebe ịchọrọ itinye dashcam. Hụ na ọ dịghị uzuzu na mmanụ.
- Peel off the protective film from the adhesive pad on the mounting bracket.
- Attach the dash cam to the windshield, ideally behind the rearview mirror, to avoid obstructing your view. Apply firm pressure for a few seconds to ensure a secure bond.
- Adjust the camera lens angle as needed. The lens can rotate 360 degrees for optimal recording coverage.
4.3 Njikọ ike
The Petokix V1 Dash Cam offers two power connection methods:
- USB Installation (Driving Mode): Connect the USB Charging Cable to the dash cam and plug the other end into a car USB port or cigarette lighter adapter. The camera will power on and record when the vehicle is running and turn off when the vehicle is off.
- ACC Hardwire Kit Installation (24/7 Parking Mode): Use the ACC Charging Cable to connect the dash cam directly to your car's fuse box. This enables the 24/7 parking monitoring feature. Consult a professional if you are unsure about hardwiring.
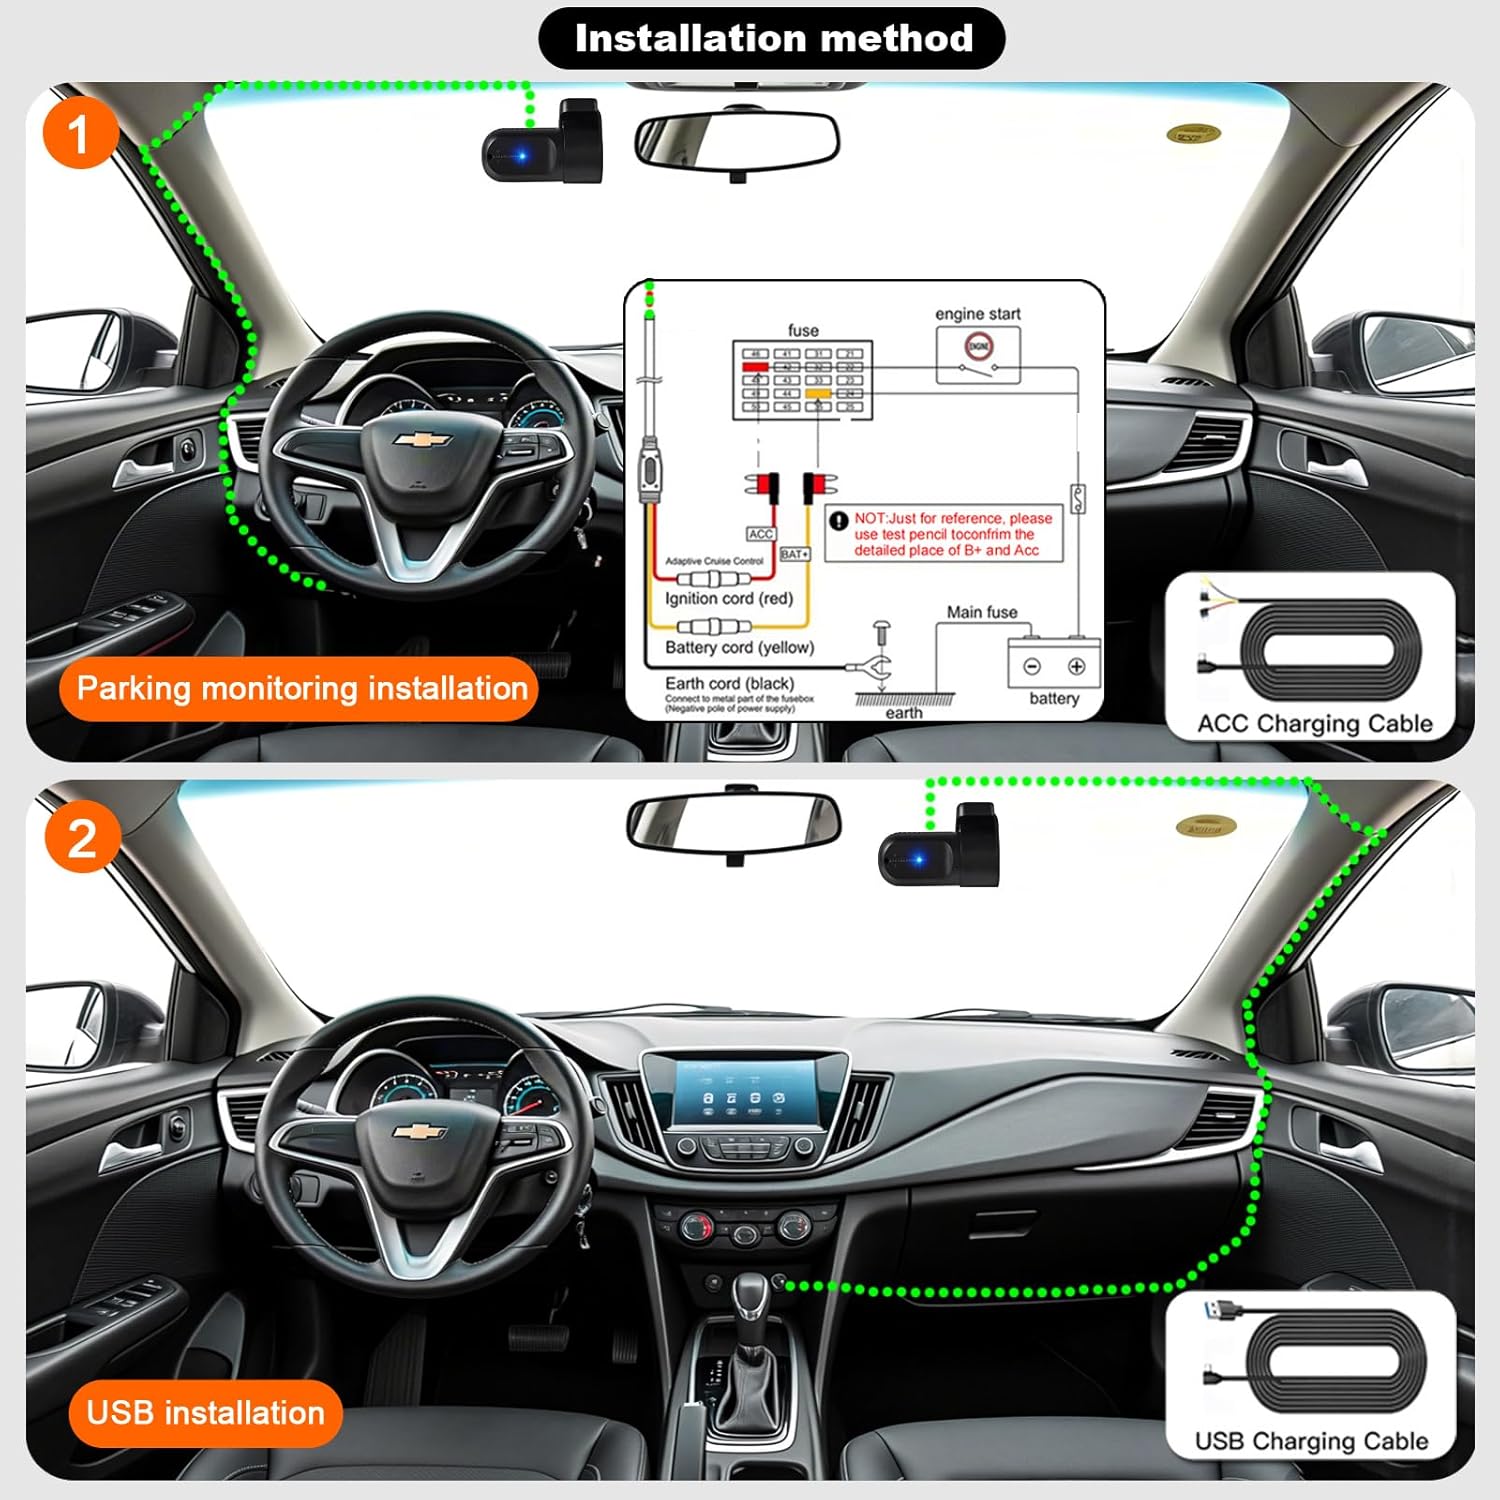
Figure 4.1: Installation Methods. This diagram illustrates how to install the dash cam using either the ACC hardwire kit for parking monitoring or the USB charging cable for standard operation.
5. App Installation and WiFi Connection
The Petokix V1 Dash Cam connects to your smartphone via WiFi for live viewing, video playback, and settings management.
5.1 Nbudata ngwa
Download the "CarDV" or "Vidure" app from your smartphone's app store (iOS App Store or Google Play Store).
5.2 Jikọọ site na WiFi
- Ensure the dash cam is powered on.
- On your smartphone, go to WiFi settings.
- Look for a WiFi network named "CarDV_XXXX" (where XXXX is a unique identifier) and connect to it.
- Open the downloaded app. The app should automatically detect and connect to the dash cam.
- Ozugbo ejikọrọ, ị nwere ike view ndu footage, nweta vidiyo ndị edekọtara, wee dozie ntọala igwefoto.

Figure 5.1: WiFi App Control. This image displays the smartphone app interface, demonstrating real-time viewing and control over the dash cam via WiFi.
Video 5.1: Petokix Dash Cam App Connection. This video demonstrates the process of connecting the dash cam to a smartphone via WiFi and accessing live footage site na ngwa.
6. Ntuziaka ọrụ
6.1 Akpaaka ndekọ
Once powered on, the dash cam will automatically begin recording. The recording will stop when the power is disconnected (e.g., when the car engine is turned off, unless 24/7 parking mode is active).
6.2 Ndekọ loop
The dash cam continuously records video in short segments (e.g., 1, 3, or 5 minutes). When the microSD card is full, the oldest unlocked video fileA ga-eji ndekọ ọhụrụ dochie s na akpaghị aka. Nke a na-eme ka ndekọ na-aga n'ihu na-enweghị ntinye aka.
6.3 G-Sensor (Emergency Lock)
Ihe mmetụta G arụnyere na-achọpụta mmetụta mberede ma ọ bụ ndakpọ. Mgbe akpalitere, ọ na-ekpochi akụkụ vidiyo dị ugbu a na-akpaghị aka, na-egbochi ịdekọ ya site na ndekọ loop. Ndị a akpọchiri files are stored in a separate folder on the microSD card.

Figure 6.1: G-Sensor Emergency Lock. This image visually represents how the G-sensor detects impacts and locks video footage to protect it from being overwritten.
6.4 24/7 Parking Mode
When the dash cam is connected using the ACC hardwire kit, it can monitor your vehicle even when parked. If motion is detected or an impact occurs, the camera will automatically start recording. This feature provides continuous surveillance for theft prevention and vandalism monitoring.

Figure 6.2: 24-Hour Parking Monitoring. This image illustrates the dash cam's ability to monitor the vehicle continuously while parked, accessible via the mobile app.
6.5 Night Vision and WDR
The dash cam is equipped with enhanced night vision capabilities and Wide Dynamic Range (WDR) technology. These features work together to improve video clarity and detail in low-light conditions, ensuring license plates and road signs are visible both day and night.

Figure 6.3: WDR Technology. This image demonstrates the improvement in video quality when Wide Dynamic Range (WDR) is enabled, providing better exposure balance in challenging lighting conditions.

Figure 6.4: 1080P Video Clarity. This image highlights the superior detail captured at 1080P resolution compared to 720P, particularly for identifying elements like license plates.
7. Nlekọta
7.1 Formatting the MicroSD Card
It is recommended to format the microSD card regularly (e.g., once a month) to maintain optimal recording performance and prevent data corruption. This can usually be done through the dash cam's mobile app settings.
7.2 Ihicha oghere
Gently wipe the camera lens with a soft, lint-free cloth to ensure clear video recordings. Avoid using abrasive materials or harsh chemicals.
8. Nchọpụta nsogbu
| Nsogbu | Ihe nwere ike ime | Ngwọta |
|---|---|---|
| Igwefoto dash anaghị agbanye. | No power supply; faulty cable. | Check power connection. Ensure the car's ignition is on if using USB power. Test with a different cable if available. |
| App fails to connect to the camera. | Outdated app; incorrect WiFi connection; interference. |
|
| Vidiyo footage adịghị acha ma ọ bụ na-edoghị anya. | Dirty lens; protective film still on lens; incorrect focus. | Clean the lens with a soft cloth. Remove any protective film. Ensure the lens is properly adjusted. |
| MicroSD card error or recording stops. | Card full; card not formatted; incompatible card; faulty card. | Format the microSD card via the app. Ensure the card is Class 10 or U3. Replace the card if the issue persists. |
| Ụdị ebe a na-adọba ụgbọala anaghị arụ ọrụ. | Incorrect wiring; feature not enabled. | Ensure the dash cam is connected using the ACC hardwire kit. Check app settings to confirm parking mode is enabled. |

Figure 8.1: App Connection Troubleshooting. This image provides a visual guide for updating the mobile application, a common solution for connection problems.
9. Nkọwapụta
| Njirimara | Nkọwa |
|---|---|
| Aha Nlereanya | V1 |
| Mkpebi ịse vidiyo | 1080p |
| Ngalaba nke View | 120 ogo |
| Teknụzụ Njikọta | Wi-Fi |
| Njirimara Pụrụ Iche | App Control, Night Vision, Loop Recording, G-Sensor, Parking Monitor |
| Ụdị nkwụnye | Windshield Mount (Adhesive) |
| Akụkụ ngwaahịa | 1.42 x 2.99 x 1.8 sentimita asatọ |
| Ibu Ibu | 0.12 ounces |
| Nkwado nchekwa | 64GB microSD included, supports up to 128GB |
| Nhọrọ ike | USB Charging Cable, ACC Charging Cable (Hardwire Kit) |
| Okpomọkụ na-arụ ọrụ | Ruo 176°F (80°C) |
10. Akwụkwọ ikike na nkwado
For warranty information and technical support, please refer to the contact details provided with your product packaging or visit the official Petokix websaịtị. Debe nnata nzụta gị dị ka ihe akaebe nke ịzụrụ maka nkwupụta ikike.