
Argon Audio TT MK2
Argon Audio TT MK2 Turntable User Manual
Model: TT MK2
Okwu mmalite
Daalụ maka ịzụrụasing the Argon Audio TT MK2 Turntable. This manual provides essential information for the safe and optimal operation, setup, and maintenance of your new turntable. Please read this manual thoroughly before using the product and retain it for future reference.
The Argon Audio TT MK2 is designed to deliver high-fidelity audio playback from your vinyl records, featuring a built-in phono pre-amplifier, an Audio Technica AT3600 cartridge, and dual-speed control for 33 and 45 RPM records.
Ntuziaka nchekwa dị mkpa
Iji belata ihe egwu nke ujo eletrik, ọkụ, ma ọ bụ mmebi nke unit ahụ, biko debe ihe nchekwa nchekwa ndị a:
- Ewepụla ngwa a na mmiri ozuzo ma ọ bụ mmiri.
- Edokwala ihe jupụtara na mmiri mmiri, dị ka vases, na ngwa.
- Akwụsịla oghere ikuku ikuku ọ bụla. Wụnye dị ka ntuziaka onye nrụpụta si dị.
- Awụnyela n'akụkụ ebe okpomọkụ ọ bụla dị ka radiators, ndekọ okpomọkụ, stovu, ma ọ bụ ngwa ndị ọzọ (gụnyere amplifiers) nke na-emepụta okpomọkụ.
- Chebe eriri ọkụ ka ị ghara ịbanye na ya ma ọ bụ tuo ya, ọkachasị na plọg, ebe nchekwa dị mma, na ebe ha si na ngwa ahụ pụta.
- Jiri naanị mgbakwunye / ngwa ndị nrụpụta akọwapụtara.
- Kwupu ngwa a n'oge oke mmiri ozuzo ma ọ bụ mgbe ejighi ya ogologo oge.
- Tụtụ aka n'aka ndị ọrụ ruru eru. A na-achọ ọrụ mgbe ngwa ahụ mebiri emebi n'ụzọ ọ bụla, dị ka eriri ọkụ ma ọ bụ plọg mebiri emebi, mmiri mmiri wụfuru ma ọ bụ ihe dabara n'ime ngwa ahụ, ekpughere ngwa ahụ na mmiri ozuzo ma ọ bụ mmiri, anaghị arụ ọrụ nke ọma. , ma ọ bụ ahapụla ya.
Kedu ihe dị na Igbe ahụ
Carefully unpack all components and ensure all items are present before discarding packaging materials:
- Argon Audio TT MK2 Turntable Unit
- Audio Technica AT3600 Cartridge (pre-mounted)
- Dust Lid
- USB RCA
- Ihe nkwụnye ọkụ
- Ibu ibu
- Ibu mgbochi skate
- Platter and Drive Belt
- Enwere m mmetụta

Image: The Argon Audio TT MK2 Turntable with its clear dust cover in place, showcasing its sleek black finish.
Ntuziaka nhazi
1. Ntinye
Place the turntable on a stable, level surface away from direct sunlight, heat sources, and strong vibrations. Ensure there is enough space around the unit for ventilation and operation.
2. Platter and Belt Installation
- Carefully place the metal platter onto the spindle.
- Locate the drive belt. Gently stretch the belt around the inner rim of the platter and hook it onto the motor pulley. Ensure the belt is not twisted.
- Debe ute ahụ nwere mmetụta n'elu efere ahụ.

Image: The Argon Audio TT MK2 Turntable with its dust cover removed, showing the platter and tonearm assembly.
3. Cartridge and Tonearm Setup
The Audio Technica AT3600 cartridge comes pre-mounted on the tonearm. Follow these steps to balance the tonearm and set the tracking force:
- Remove the stylus protector from the cartridge.
- Gently release the tonearm from its rest.
- Rotate the counterweight at the rear of the tonearm until the tonearm floats freely and is perfectly balanced horizontally.
- Once balanced, hold the counterweight steady and rotate the numbered ring on the front of the counterweight to "0".
- Rotate the entire counterweight (including the numbered ring) counter-clockwise until the desired tracking force is set. For the AT3600 cartridge, the recommended tracking force is typically 3.5 grams.

Foto: A nso nso view of the tonearm's counterweight and anti-skate mechanism, showing the numerical scale for adjustment.
4. Anti-Skate Adjustment
Attach the anti-skate weight to the small loop on the tonearm and hang it over the second groove of the anti-skate support rod. This helps prevent the stylus from skipping inwards.
5. Connecting to Audio System
The TT MK2 features a built-in phono pre-amplifier, allowing direct connection to powered speakers or an amplifier's line-level input. If your amplifier has a dedicated "Phono" input, you can bypass the internal pre-amp.
- Connect the supplied RCA cable from the "RCA OUT" jacks on the rear of the turntable to the corresponding input on your amplifier or powered speakers (e.g., "AUX", "LINE IN").
- Locate the "RIAA" switch on the rear of the turntable.
- Set the switch to "ON" if connecting to a line-level input (e.g., AUX, CD) on your amplifier or directly to powered speakers. This activates the internal phono pre-ampna -emegharị ihe.
- Set the switch to "OFF" if connecting to a dedicated "Phono" input on your amplifier. This bypasses the internal phono pre-amplifier, as your amplifier will provide the necessary RIAA equalization.

Image: The rear panel of the Argon Audio TT MK2 Turntable, showing the RCA output jacks, the RIAA (Phono/Line) switch, and the DC 12V power input.
6. Njikọ ike
Connect the supplied power adapter to the "DC IN 12V" port on the rear of the turntable, then plug the adapter into a wall outlet.
Ntuziaka ọrụ
1. Ịgbanye / gbanyụọ
Use the power switch located on the rear panel to turn the turntable ON or OFF.
2. Selecting Playback Speed
The TT MK2 supports two playback speeds: 33 1/3 RPM for LPs and 45 RPM for singles. Use the speed selection knob on the top right of the turntable to switch between "33" and "45".
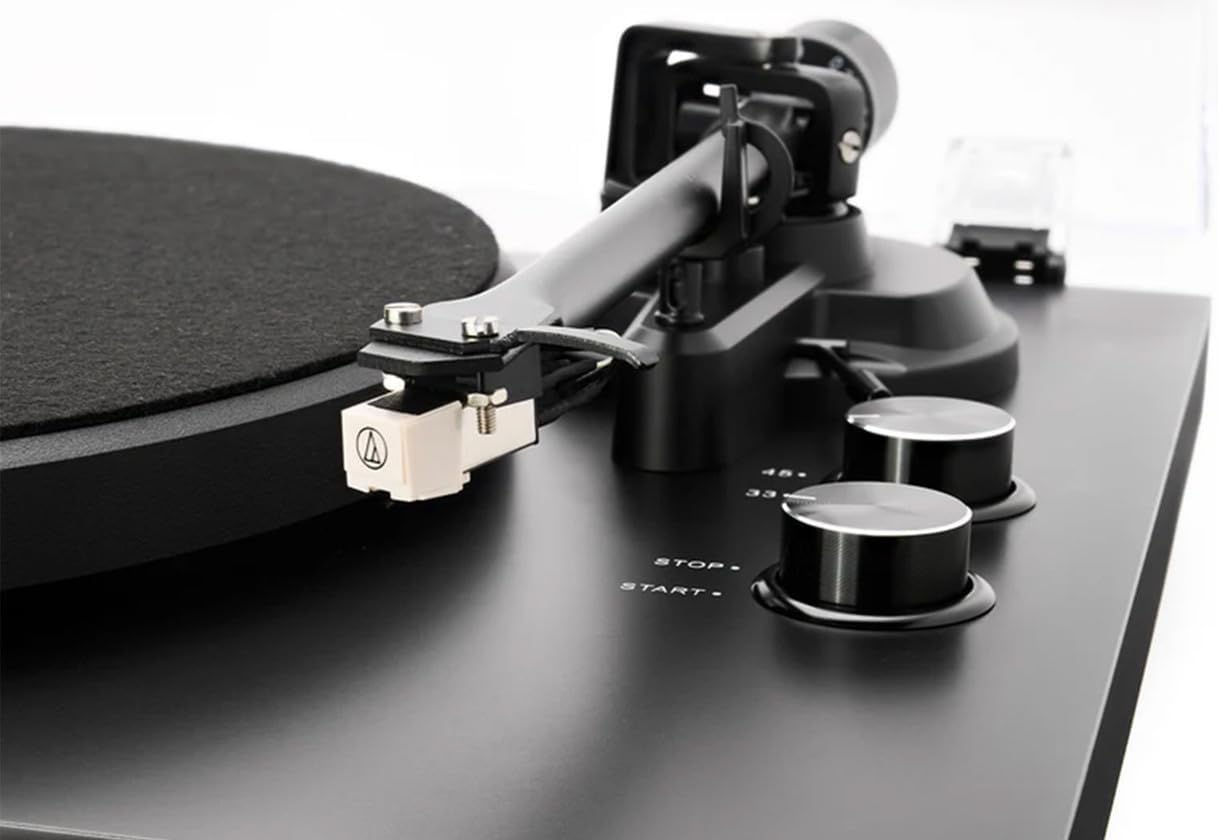
Image: A close-up of the Audio Technica AT3600 cartridge mounted on the tonearm, alongside the "STOP" and "START" buttons and the 33/45 RPM speed selection knob.
3. Ịkpọ ndekọ
- Place a record on the platter, ensuring it is centered.
- Select the correct speed (33 or 45 RPM) using the speed knob.
- Press the "START" button. The platter will begin to rotate.
- Jiri nwayọ bulie ogwe aka ahụ elu site na iji ihe na-eme ka ọ dị nro.
- Position the tonearm over the desired starting groove of the record.
- Slowly lower the cueing lever to gently drop the stylus onto the record.
4. Kwụsị playback
- At the end of a record, the tonearm will not automatically return. Gently lift the tonearm using the cueing lever.
- Return the tonearm to its rest and secure it with the tonearm clip.
- Press the "STOP" button to halt platter rotation.
- Carefully remove the record.
Nlekọta
1. Cleaning the Stylus
The stylus (needle) should be cleaned regularly to ensure optimal sound quality and prevent damage to your records. Use a soft brush designed for stylus cleaning, brushing gently from back to front (away from the cantilever).
2. Cleaning Records
Always handle records by their edges. Use a carbon fiber brush or a dedicated record cleaning solution and cloth to remove dust and debris before each play.
3. Cleaning the Turntable
Wipe the turntable chassis and dust cover with a soft, dry, lint-free cloth. For stubborn marks, a slightly damp cloth can be used, followed by a dry cloth. Avoid using harsh chemicals or abrasive cleaners.
4. Dust Cover Care
The dust cover protects your turntable from dust. When not in use, keep the dust cover closed. Clean it gently with a soft, damp cloth to avoid scratching the acrylic surface.
Nchọpụta nsogbu
If you experience issues with your Argon Audio TT MK2 Turntable, please consult the following table before contacting support:
| Nsogbu | Ihe nwere ike ime | Ngwọta |
|---|---|---|
| Enweghị ụda ma ọ bụ ụda dị ala nke ukwuu |
|
|
| Distorted or muffled sound |
|
|
| Platter not spinning |
|
|
| Speed issues (too fast/slow) |
|
|
Nkọwapụta
| Njirimara | Nkọwa |
|---|---|
| Aha Nlereanya | TT MK2 |
| Ụdị | Argon Audio |
| Akụkụ (W x D x H) | 42 x 35 x 12 cm |
| Ibu Ibu | 4.5 n'arọ |
| Ihe onwunwe | Engineered Wood, Aluminium |
| Agba | Nwa |
| Katrij | Audio Technica AT3600 (pre-fitted) |
| Phono tupu-amp | Built-in, switchable (RIAA ON/OFF) |
| Rotational Speeds | 33 1/3 RPM, 45 RPM (electronic speed selection) |
| Njikọta | Mmepụta RCA |
| Ngwa gụnyere | Turntable, Audio Technica AT3600 Cartridge, Dust Lid, RCA Cable, Power Adapter |
| Onye nrụpụta | Argon Audio |
| Mba onye si | Denmark |
Akwụkwọ ikike na nkwado
Argon Audio products are designed and manufactured to the highest quality standards. This product is covered by a manufacturer's warranty. Please refer to the warranty card included with your product or visit the official Argon Audio websaịtị maka nkọwa na usoro akwụkwọ ikike.
For technical support, troubleshooting assistance beyond this manual, or warranty claims, please contact your authorized Argon Audio dealer or Argon Audio customer service directly. Contact information can typically be found on the Argon Audio websaịtị.
Ask a question about this manual
Ask about setup, troubleshooting, compatibility, parts, safety, or missing instructions. Manuals+ will review the question and use this page’s manual context to help answer it.