
1. Okwu mmalite na gafereview
The RADIOMASTER MT12 is an advanced open-source surface radio controller, designed for a wide range of RC surface models including cars, trucks, and boats. It is officially supported by EdgeTX, ExpressLRS, and the Multi-module project, offering extensive customizability and versatile operation.
This manual provides essential information for setting up, operating, and maintaining your MT12 controller to ensure optimal performance and longevity.
2. Akụrụngwa Ngwaahịa
- Internal RF Modules: Available with built-in ExpressLRS or 4in1 Multi-Protocol (MPM) RF modules.
- Ihe nhazi: Features a powerful STM32F407VGT6 with 1MB Flash.
- Sistemụ nrụọrụ: Preinstalled with EdgeTX firmware for advanced mixing and programmability.
- Ịchaji: QC3.0 fast charging supporting 2.0A MAX via USB-C.
- Ergonomics: Compact design with excellent ergonomics for comfortable handling.
- Akụkụ batrị: Oversized compartment supports 2 x 18650 cells or a 2S 7.4V 5000mAh battery pack (batteries not included).
- Modul Bay: Standard Nano module compartment compatible with RadioMaster Ranger Nano Module, RadioMaster RM 4in1 module, and TBS Crossfire Nano module.
- Antenna: Rotatable antenna for optimized signal.
- Nhazi: Customizable base switches or 4-way joystick included.
- Ọwa njikwa: 16 channels as standard, expandable to 32 channels (4in1 only, requires additional 4in1 RF module and compatible receivers).
- Ngosipụta: 128x64 Monochrome LCD for clear information display.
- Ihe mmetụta: Hall-effect wheel and trigger sensors for precise control.
3. Ihe ngwugwu
- 1 x MT12 Surface Radio (4in1 Version)
- 1 x R85C Receiver
- 1 x Dual Switch Expansion module
- 1 x 4 Way Joystick Expansion module
- 1 x Nano Adapter
- 1 x eriri USB-C
- 1 x Leather Lanyard
- 1 x Custom RadioMaster signature carry case
- 1 x 18650 Battery Tray
- 1 x Ihe nchekwa ihuenyo
- 1 x akwụkwọ mmado
- 1 x Akwụkwọ ntuziaka

This image displays the MT12 Surface Radio Controller along with its accessories, including the R85C receiver, dual switch and 4-way joystick expansion modules, Nano adapter, USB-C cable, leather lanyard, custom carry case, 18650 battery tray, screen protector, stickers, and the instruction manual.
4. Ngwaahịa gafereview
4.1 Controller Components

This diagram illustrates the various parts of the MT12 controller, including the LCD screen, speaker, buttons (SYS, PAGE<, RTN, Power, PAGE>, MDL, TELE, SD), P1/P2 dials, T1/T2/T3/T4/T5 switches, SA/SB/SC buttons, handwheel, hand grip, lanyard loop, TYPE-C charge port, SD button, external module bay, antenna, throttle trigger, USB port, AUX port, 3.5mm headphone jack, DSC trainer port, trigger position adjustment, and trigger spring adjustment.

Ihe onyonyo a na-enye ihe doro anya view of the front and left side of the MT12 controller, showcasing the screen, main control buttons, and the steering wheel.
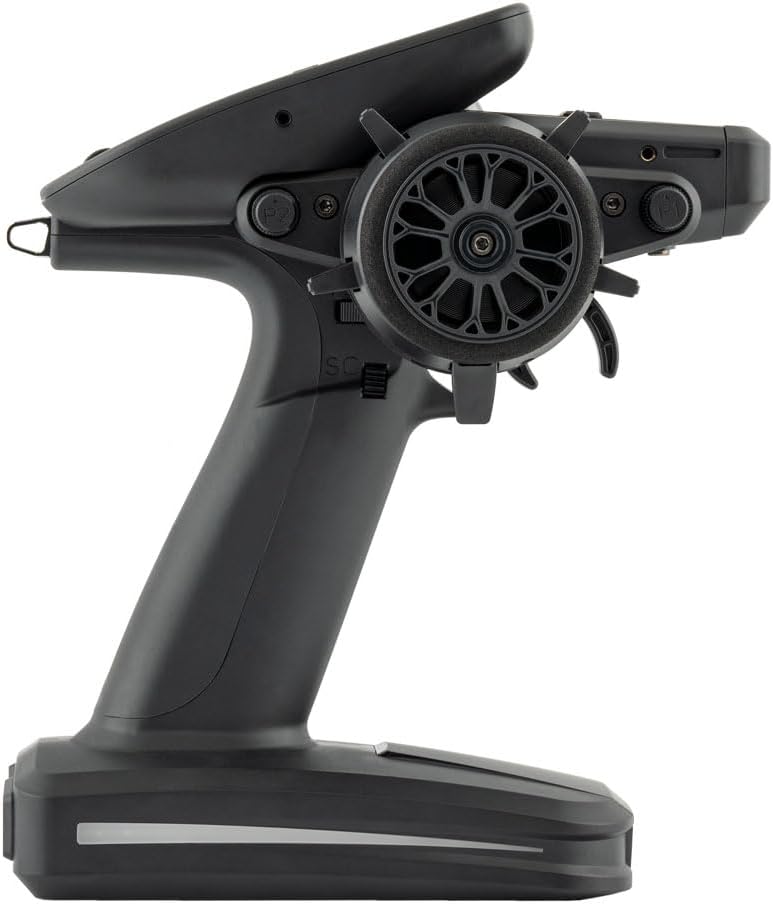
This image highlights the right side of the MT12 controller, focusing on the steering wheel, throttle trigger, and accessible switches.

Azu view of the MT12 controller shows the battery compartment cover and the USB-C charging port at the base.

This close-up image details the throttle trigger mechanism, including the screws for adjusting its position and spring tension.

Ihe onyonyo a na-enye nkọwa zuru ezu view of the MT12's monochrome LCD screen and the surrounding control buttons, which are used for menu navigation and settings adjustments.
4.2 Akụkụ anụ ahụ

The diagram shows the physical dimensions of the MT12 Surface Radio Controller: 177.8mm (height) x 118.4mm (width) x 207.8mm (depth).
5. Nkọwapụta
5.1 MT12 Surface Radio
- Akụkụ anụ ahụ: 177.8 x 118.4 x 207.8 mm
- Arọ: 480 grams
- Ugboro arụ ọrụ: 2.400GHz-2.480GHz
- Nhọrọ RF dị n'ime: 4-in-1 multi-protocol / ELRS 2.4GHz
- Usoro ogbugba akwadoro: Modul dabere
- Ugbu a na-arụ ọrụ: 160mA for 4in1 / 320mA for ELRS
- Nrụ ọrụ Voltage: DC 6.6-8.4V
- Sistemụ nrụọrụ: EdgeTX
- Ọwa njikwa: 16 standard, expandable to 32 (4in1 only)
- Ngosipụta: 128x64 Monochrome LCD
- Batrị: 2 x 18650 cells or a 2S 7.4V 5000mAh battery pack (not included)
- Ịchaji: Built-in USB-C Charging
- Femụwe ọjọọ: Site na kaadị SD ma ọ bụ USB
- Wheel and Trigger Sensor: Ụlọ-mmetụta
- Modul Bay: Nha Nano (RadioMaster Ranger Nano Module / RadioMaster RM 4in1 modul / TBS Crossfire Nano modul)
5.2 R85C Receiver (Included with 4in1 version)
- Ịnye ọkụ: DC 4.5 - 8.4V
- Oke ugboro: 2400-2483.5Mhz
- Protocol nkwado: D8/D16/SFHSS
- Ọwa mmepụta: 5CH PWM
- Ụdị antenna: High-sensitivity 2.4G antenna
- Ike Telemetry: 100mW / 20dBm
- Arọ: 5.7 grams
- Akụkụ: 31.0 x 18.5 x 13.0 mm
6. Nhazi
6.1 Ntinye batrị
The MT12 controller uses 2 x 18650 cells or a 2S 7.4V 5000mAh battery pack. Ensure correct polarity when inserting batteries into the provided tray or connecting a LiPo pack.
6.2 Binding the Receiver
To establish communication between the MT12 controller and the R85C receiver, a binding process is required. Refer to the detailed steps in the included manual for your specific receiver type (R85C or ER3C-i).
For receivers with built-in gyro functionality, ensure the gyro is activated and configured correctly after binding. The sensitivity of the gyro can often be adjusted via a potentiometer on the receiver or through the controller's menu.
This video illustrates how to activate and configure the gyro function on a compatible receiver. It covers switching the receiver to gyro mode, checking the gyro phase, and adjusting sensitivity. While the video features a Radiolink receiver, the principles for gyro setup are generally applicable to the MT12's R85C or ER3C-i receivers.
7. .rụ ọrụ
7.1 Basic Controls and Adjustments
The MT12 controller features a standardized button layout for intuitive operation. The LCD screen provides real-time information and access to various settings. Use the navigation buttons and dials to adjust parameters such as steering trim, throttle trim, dual rates, and exponential curves.
This video showcases the features and menu system of a similar advanced RC transmitter. It highlights aspects like internal battery design, USB-C interface, trainer mode support, and customizable UI. While not the MT12, it offers insights into the capabilities and user experience of modern RC controllers.
This video provides a visual demonstration of the MT12 Surface Radio Controller, showcasing its design, button layout, and key features like the EdgeTX operating system, internal RF modules, Hall sensors, and customizable inputs. It offers a good visual reference for the controller's capabilities.
7.2 Advanced Settings (EdgeTX)
The EdgeTX firmware allows for advanced programming, including:
- Ebe nchekwa ihe atụ: Store up to 30 different model configurations.
- Dual Rates (D/R): Adjust the maximum travel of steering and throttle channels.
- Exponential (EXP): Fine-tune the sensitivity around the center stick position for smoother control.
- ABS Braking: Program an Anti-lock Braking System to prevent wheel lock-up during hard braking, improving control.
- Channel Reversing: Reverse the direction of any channel to match your servo setup.
- End Points (EPA): Set the maximum travel limits for each servo.
- Telivishọn: Nyochaa batrị voltage, signal strength (RSSI), and other data from compatible receivers.
This video offers an in-depth look at the features and menu system of the Flysky FS-G11P transmitter. It covers aspects like design, controls, battery installation, and menu navigation for various settings such as reversing channels, adjusting end points, and setting up ABS braking. While a different brand, the demonstrated functionalities are common in advanced RC controllers like the MT12.
8. Nlekọta
- Nhicha: Regularly clean the controller with a soft, dry cloth. Avoid using harsh chemicals or solvents.
- Nchekwa: Store the controller in a cool, dry place away from direct sunlight and extreme temperatures. Remove batteries if storing for extended periods.
- Mmelite femụwe: Periodically check the RADIOMASTER website for firmware updates to ensure optimal performance and access to new features. Updates can be performed via USB or SD card.
- Nlekọta batrị: Follow proper charging and discharge procedures for your chosen battery type (18650 cells or LiPo pack) to maximize battery life and safety.
9. Nchọpụta nsogbu
- Enweghị ike: Check battery installation and charge level. Ensure the power switch is in the ON position.
- No Signal/Binding Issues: Re-perform the binding procedure. Ensure the receiver is powered on and within range. Check for interference.
- Mmegharị Servo Na-ezighi Ezi: Verify channel reversing and end point settings in the EdgeTX menu. Check servo connections.
- Gyro Malfunction: Ensure the gyro is correctly enabled and its phase is set according to the car's movement. Adjust gyro sensitivity as needed.
- Onye njikwa anaghị aza: Attempt a factory reset if persistent issues occur (refer to the full manual for factory reset procedures).
10. Akwụkwọ ikike na nkwado
Please refer to the instruction manual before use for detailed warranty information and support contacts. For technical assistance or warranty claims, contact RADIOMASTER customer support or your authorized dealer.