

1. Okwu mmalite
This manual provides comprehensive instructions for setting up, operating, and maintaining your EPOMAKER X Aula F65 PRO Wireless Mechanical Gaming Keyboard. Designed for peak performance and personalized perfection, the F65 PRO features hot-swappable pre-lubed switches, a sound-dampened Gasket structure, programmable keys, RGB lighting, and versatile tri-mode connectivity.
2. Kedu ihe dị na Igbe ahụ
Upon unboxing your EPOMAKER X Aula F65 PRO keyboard, please ensure all the following items are present:
- EPOMAKER X Aula F65 PRO Wireless Mechanical Gaming Keyboard
- 2-in-1 Keycap-and-Switch Puller
- Igwe USB (Ụdị-A ruo Ụdị-C)
- 2.4GHz ihe nnabata ikuku
- 3 Extra Switches
- Akwụkwọ ntuziaka (akwụkwọ a)
Video: EPOMAKER X Aula F65 PRO Unboxing & Showing & Typing Video. This video demonstrates the unboxing process and shows the contents of the package, including the keyboard and accessories.
Video: F65 PRO Wireless Mechanical Gaming Keyboard Unboxing Video. This video provides a quick overview of the unboxing experience for the F65 PRO keyboard.
3. Nhazi
3.1 Ụdị Njikọta
The F65 PRO keyboard supports three connectivity modes: Bluetooth (BT), 2.4GHz Wireless, and USB-C Wired.
- Bluetooth (BT) Mode: Ideal for connecting to multiple devices (up to 3) such as smartphones, tablets, and laptops. Switch the mode selector on the keyboard to 'BT'. Follow your device's Bluetooth pairing instructions.
- Ọnọdụ ikuku 2.4GHz: Provides a stable and low-latency connection for gaming. Insert the 2.4GHz USB receiver into your computer's USB port. Switch the mode selector on the keyboard to '2.4G'.
- Ụdị eriri USB-C: For a direct, zero-latency connection and charging. Connect the provided USB-C cable to the keyboard and your computer. Switch the mode selector on the keyboard to 'Wired'.

Image: Tri-Mode Connectivity. This image illustrates the various connectivity options available for the F65 PRO keyboard, highlighting its compatibility with multiple device types.
3.2 Nhazi anụ ahụ
Place the keyboard on a stable, flat surface. The keyboard features silicone stage-feet for stability and an ergonomic typing angle.

Image: Ergonomic Typing Angle. This image highlights the comfortable typing angle and stable feet of the F65 PRO keyboard.
4. Ntuziaka ọrụ
4.1 RGB njikwa ọkụ azụ
The F65 PRO features dynamic RGB backlighting with various effects and customization options.
- Gbanwuo/ Gbanyụọ ọkụ azụ: Pịa FN + Backspace.
- Gbanwee Mmetụta Ọkụ Azụ: Pịa FN + \ |.
- Gbanwee Agba nke Ọkụ Azụ: Pịa FN + Tinye.
- Gbanwee ọkụ azụ: Pịa FN + ↓ (welata) ma ọ bụ FN + ↑ (mmụba).
- Adjust Backlight Effect Speed: Pịa FN + ← (welata) ma ọ bụ FN + → (mmụba).
- Toggle Light Strip Effect: Pịa FN + R_SHIFT.
- Adjust Light Strip Brightness: Pịa FN + . > (welata) ma ọ bụ FN +/? (mmụba).
- Toggle Light Strip Color: Pịa FN +/? (while holding FN).
Video: EPOMAKER X Aula F65 PRO RGB Setting. This video demonstrates how to adjust the RGB lighting settings on the keyboard.
Video: EPOMAKER X Aula F65 PRO Lighting Effect Check. This video showcases various lighting effects and how to cycle through them.
4.2 Multi-functional Knob
The rotary knob on the F65 PRO provides intuitive control over volume and backlight settings.
- Pịa: Mechie/Mechie ụda.
- Tụgharịa: Adjust system volume (clockwise to increase, counter-clockwise to decrease).
- Toggle Knob Function: Pịa FN + akara to switch the knob's default function to the Home key. Press again to revert to volume control.
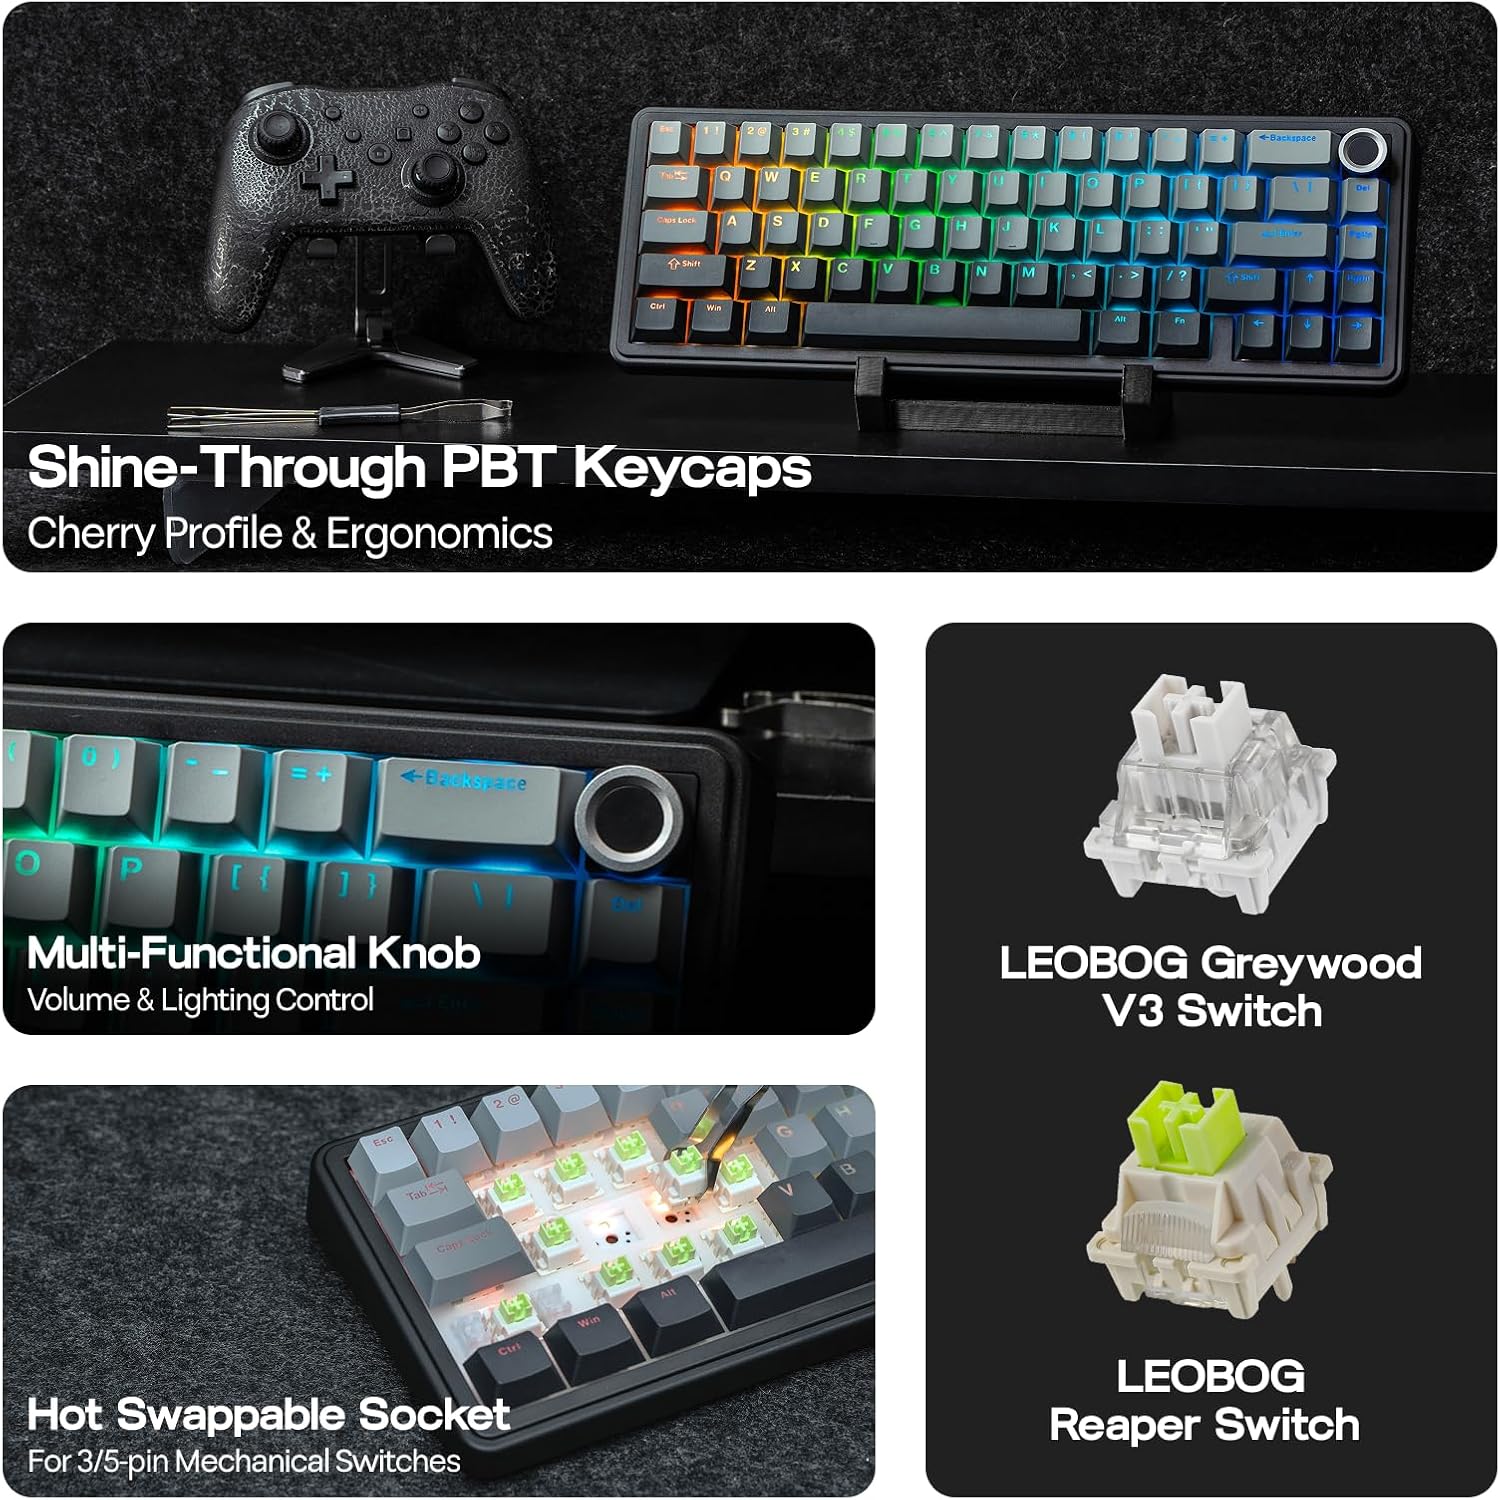
Image: Multi-Functional Knob. This image highlights the rotary knob and its functions for volume and lighting.
4.3 Game Mode and Office Mode
The keyboard can switch between Game Mode and Office Mode for optimized performance.
- Tinye Ụdị Egwuregwu: Press the knob for 3 seconds. The L_Win and Caps keys will flash blue.
- Enter Office Mode: Press the knob for 3 seconds again while in Game Mode. The L_Win and Caps keys will flash green.
4.4 Nhazi Ngwanrọ
Customize your keyboard's settings, key assignments, macros, and lighting effects using the dedicated software.
- Ntọala sistemụ: Adjust general keyboard parameters.
- Key Remap: Reassign functions to individual keys.
- Macro Record: Create and assign complex macro sequences.
- Ntọala ọkụ: Fine-tune RGB lighting effects and colors.
- Rhythm Egwu: Synchronize lighting with audio output.
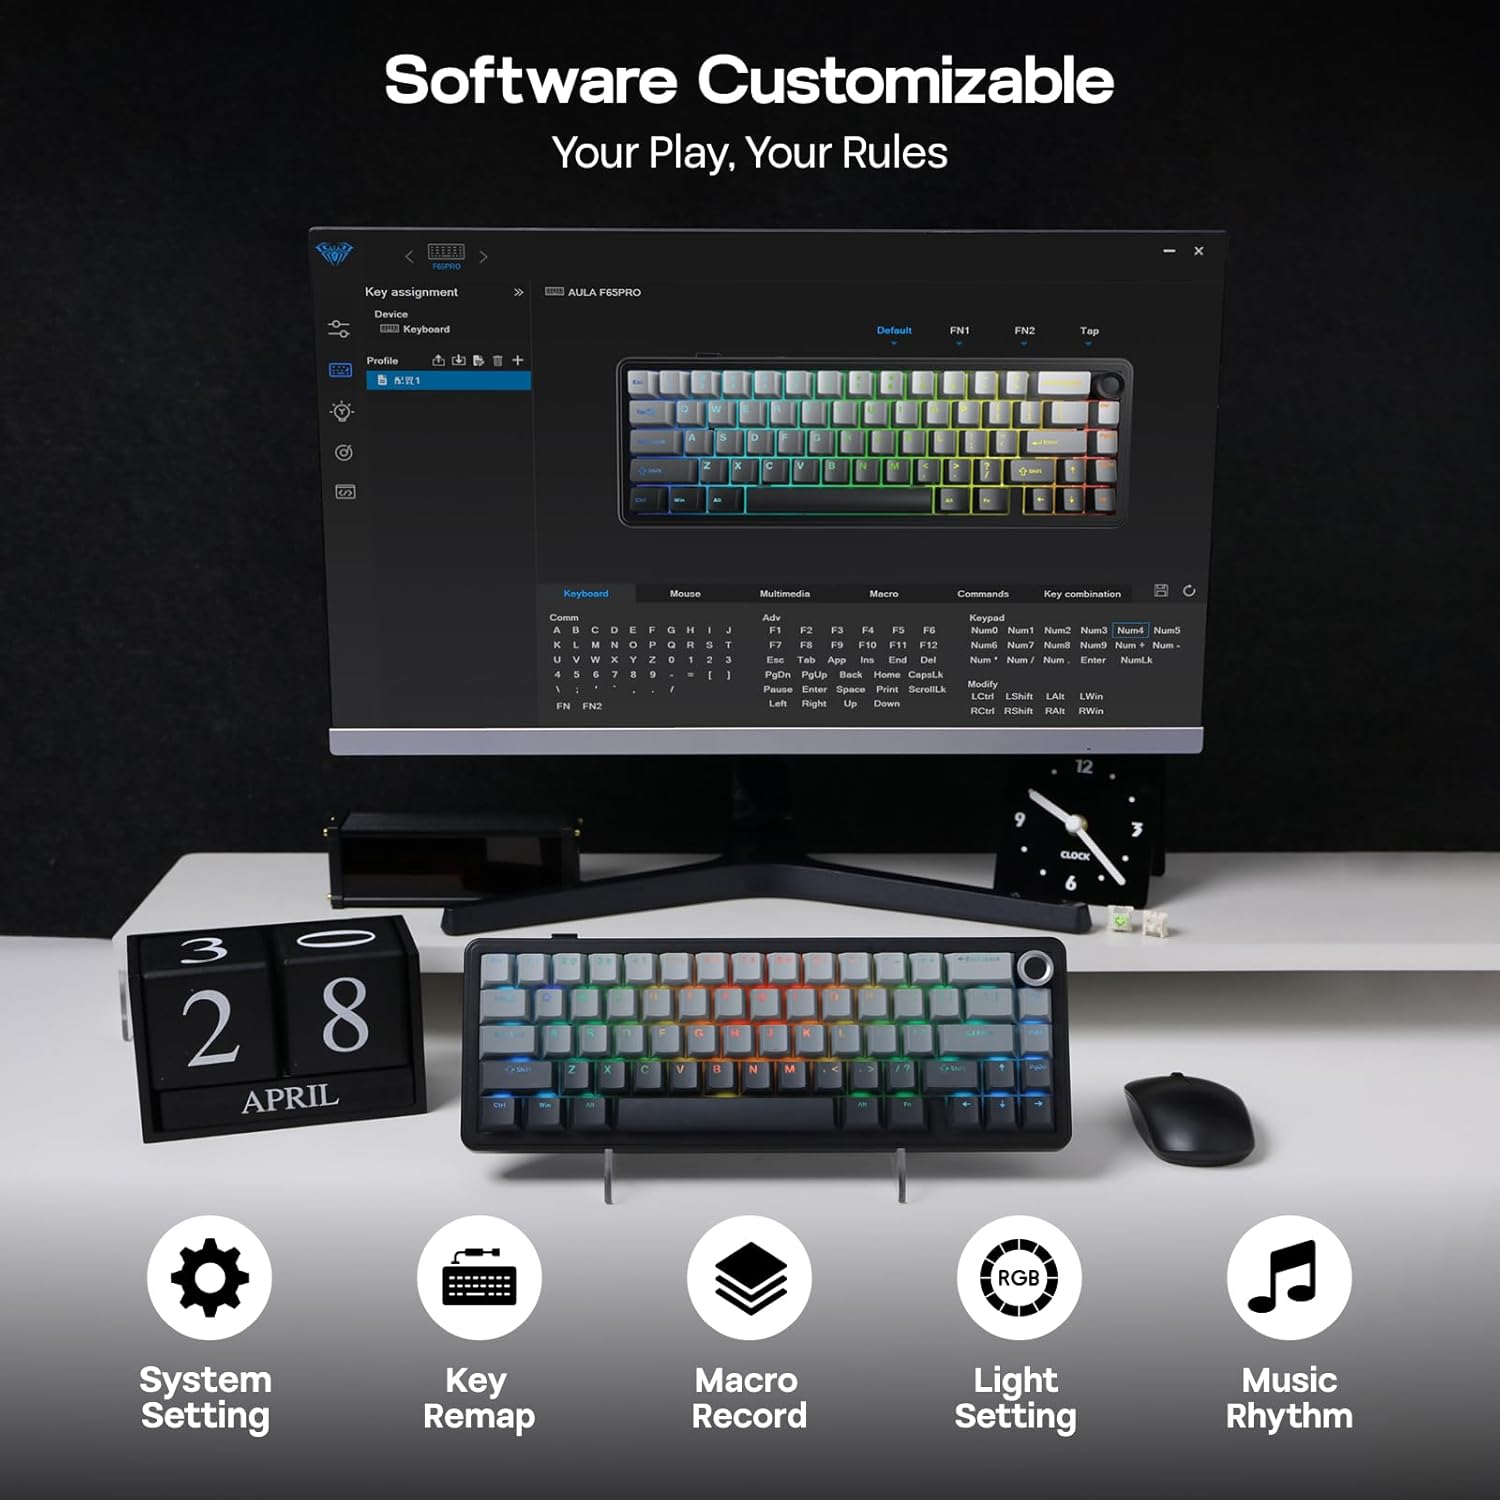
Image: Software Customizable. This image shows the keyboard's software interface for advanced customization.
5. Atụmatụ gafereview
The EPOMAKER X Aula F65 PRO is engineered with several advanced features for an enhanced user experience:
- Mgbanwe na-ekpo ọkụ nwere ike ịgbanwe: Easily change 3-pin or 5-pin mechanical switches without soldering, allowing for personalized typing feel.
- Creamy Gasket-Mount Structure: Features a 5-layer sound-dampening system for a satisfyingly muted thud and responsive feel with each keystroke.
- Shine-Through PBT Keycaps: Premium PBT keycaps with topographic lines and shine-through legends for durability and vibrant RGB illumination.
- Batrị 4000mAh: Offers extended wireless usage, with approximately 20 hours with RGB backlight on and 200 hours with RGB backlight off.
- Arụmọrụ adịghị ala ala: Achieves 1-3ms response time in USB-C wired and 2.4GHz wireless modes, and 8ms in BT 125Hz mode.
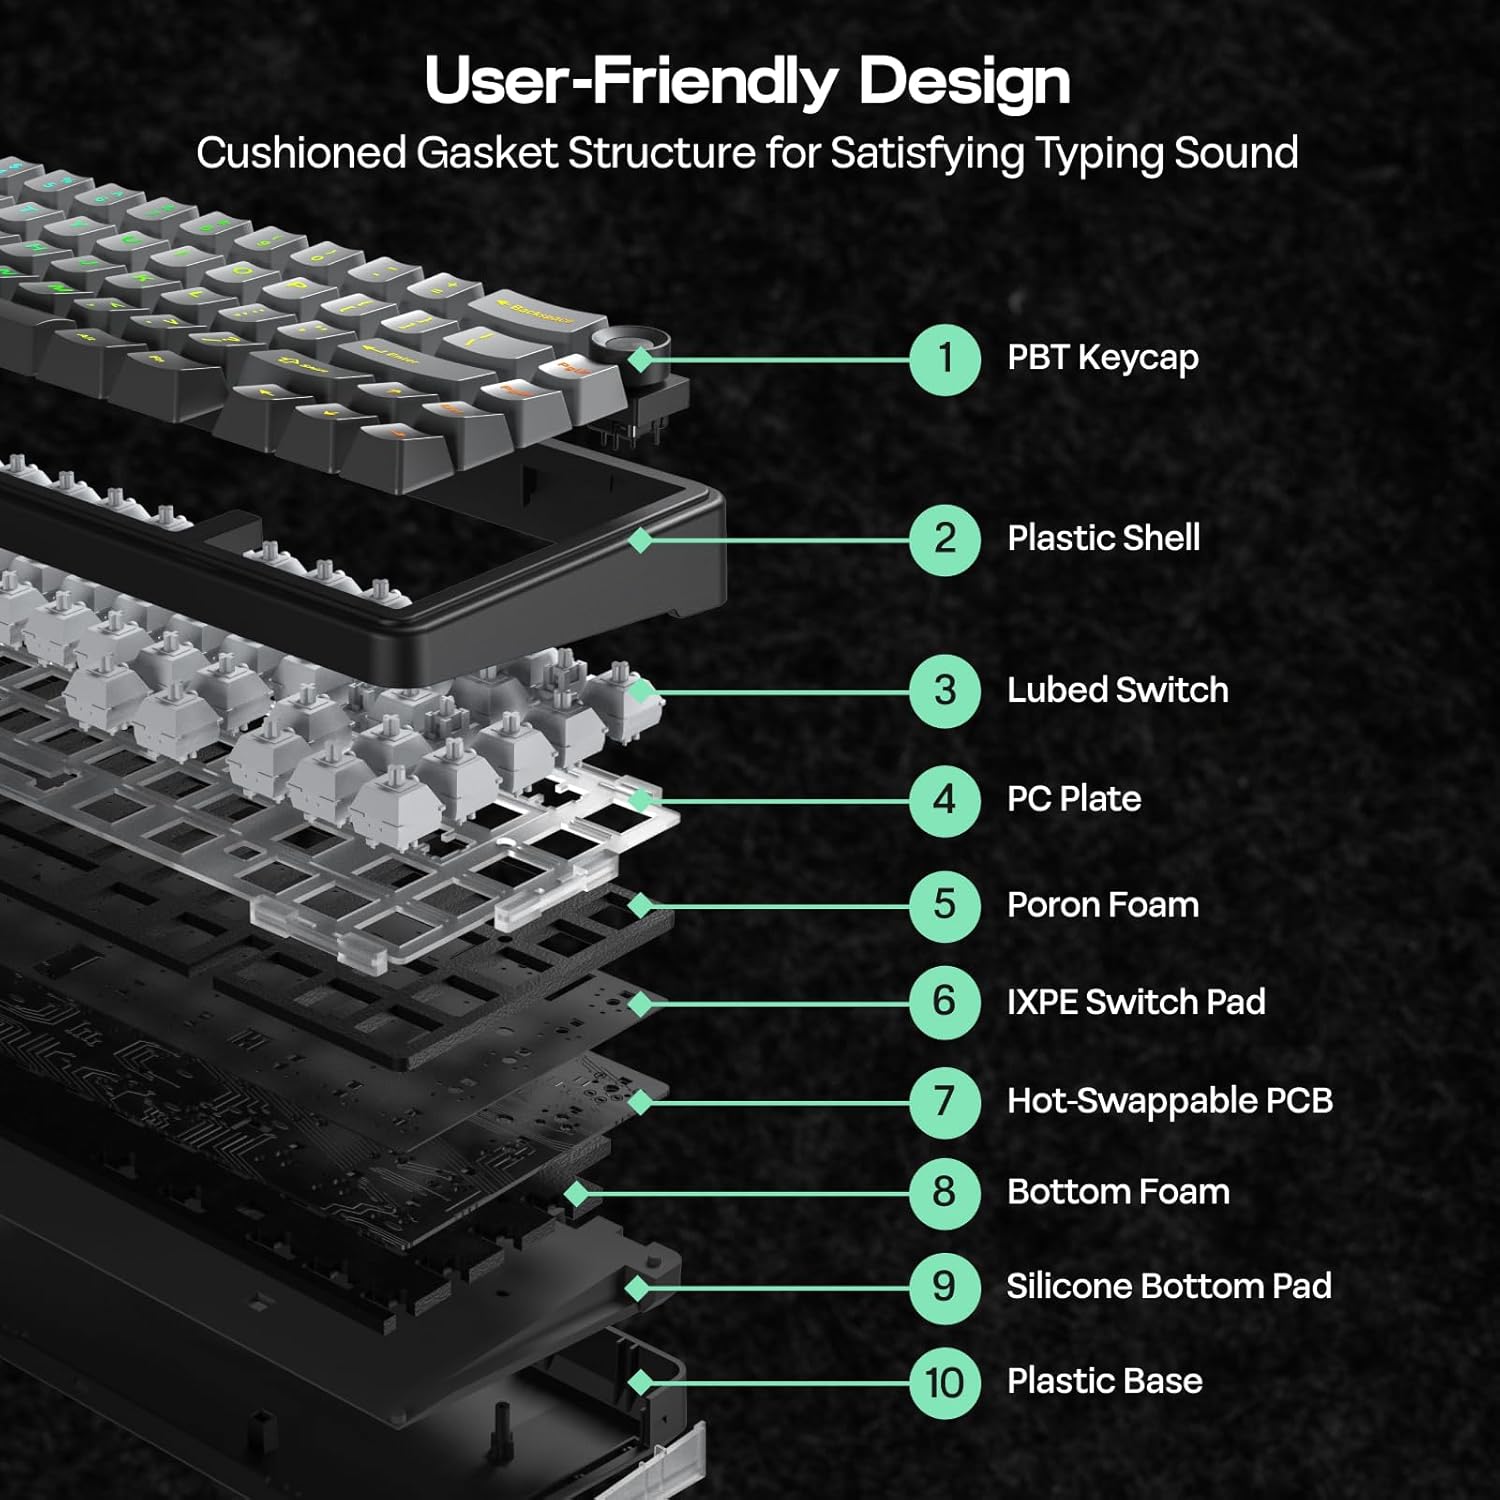
Image: User-Friendly Design (Cushioned Gasket Structure). This diagram illustrates the 5-layer sound-dampening gasket structure of the keyboard.
Image: Hot Swappable Socket. This image demonstrates the hot-swappable nature of the keyboard's switches.
Video: F65 PRO Wireless Mechanical Gaming Keyboard - Typing Sound. This video demonstrates the typing sound profile of the F65 PRO keyboard.
Video: EPOMAKER X Aula F65 PRO Typing ASMR. This video provides an ASMR-style demonstration of the keyboard's typing sound.
Video: EPOMAKER X Aula F65 PRO Typing Video. This video demonstrates the typing experience on the F65 PRO keyboard.
6. Nkọwapụta
| Njirimara | Nkọwa |
|---|---|
| Ụdị | EPOMAKER |
| Nọmba nlereanya | F65 PRO |
| Teknụzụ Njikọta | 2.4Ghz Wireless, BT, USB A to C Cable |
| Nkọwa ahụigodo | Mechanical |
| Atụmatụ pụrụ iche | 5-Layer Padding, Backlit, Gasket Structure, Hot-Swappable, Knob |
| Agba | Gradient isi awọ |
| Ahụigodo azụ azụ | RGB |
| Akụkụ ngwaahịa (L x W x H) | 4.4"L x 12.8"W x 1.2"H |
| Ihe onwunwe | Plastic |
| Isi Iyi Ike | Akwanyere batrị |
| Ngbanwe Ụdị | Linear (Graywood V3 Switch) |
| Nhazi ahụigodo | QWERTY |
| Ọnụọgụ igodo | 66 |
| Ngwa dakọtara | Egwuregwu egwuregwu, Laptọọpụ, PC, Smartphone, Mbadamba ụrọ |
| Minimum Required OS | Android 14.0, Windows 11 |
7. Nlekọta
To ensure the longevity and optimal performance of your EPOMAKER X Aula F65 PRO keyboard, follow these maintenance guidelines:
- Nhicha mgbe niile: Use a soft, dry cloth to wipe down the keycaps and chassis. For deeper cleaning, use a can of compressed air to remove dust and debris from between the keys.
- Keycap and Switch Removal: Use the provided 2-in-1 keycap-and-switch puller for safe removal of keycaps and switches. Avoid using excessive force to prevent damage.
- Zenarị Mkpughe Mmiri: Keep liquids away from the keyboard to prevent internal damage. In case of spills, immediately disconnect the keyboard and allow it to dry completely before reconnecting.
- Nlekọta batrị: For optimal battery life, avoid fully discharging the keyboard frequently. Charge it regularly using the provided USB-C cable.
8. Nchọpụta nsogbu
If you encounter any issues with your EPOMAKER X Aula F65 PRO keyboard, please refer to the following common troubleshooting steps:
- Ahụigodo Anaghị aza:
- Gbaa mbọ hụ na agbagoro ahụigodo.
- Check the connectivity mode switch (BT, 2.4G, Wired) matches your connection method.
- For 2.4GHz, ensure the USB receiver is properly inserted and recognized by your device.
- Maka Bluetooth, hụ na ejikọtara ahụigodo nke ọma yana n'ime oke. Gbalịa imegharị ọzọ ma ọ bụrụ na ọ dị mkpa.
- For wired mode, ensure the USB-C cable is securely connected to both the keyboard and your device.
- RGB Backlight Not Working:
- Pịa FN + Backspace ka ịgbanwuo / gbanyụọ ọkụ azụ.
- Gbanwee nchapụta site na iji FN + ↑/↓.
- Gbaa mbọ hụ na ahụigodo anọghị na ọnọdụ ike dị obere.
- Igodo anaghị edebanye aha:
- Check for any physical obstructions under the keycap.
- If a specific switch is faulty, use the provided switch puller to replace it with one of the extra switches.
- Connectivity Issues (Lag/Disconnections):
- Ensure the keyboard is close to the receiver/device for wireless connections.
- Zenarị nnyonye anya site na ngwaọrụ ikuku ndị ọzọ.
- Update keyboard firmware if available through the customization software.
9. Akwụkwọ ikike na nkwado
The EPOMAKER X Aula F65 PRO Wireless Mechanical Gaming Keyboard comes with a Akwụkwọ ikike afọ 1 site na ụbọchị ịzụrụ.
For technical support, warranty claims, or further assistance, please visit the official EPOMAKER store or contact their customer service directly. You can find more information and support resources at the EPOMAKER Store on Amazon.