
1. Okwu mmalite
This manual provides detailed instructions for the installation, operation, and maintenance of your PGST A107F-EU-A Wireless Home Alarm System. This intelligent security system offers comprehensive protection for your home or property, featuring 4G connectivity, Tuya App integration, and compatibility with smart assistants like Alexa and Google Assistant. Please read this manual thoroughly before using the system to ensure proper functionality and safety.
2. Ihe ngwugwu
Carefully unpack the box and verify that all the following components are included:
- 1 x PGST A107F Main Control Panel
- 1 x Adapta Ike (5V 2A)
- 2 x Njikwa anya
- 2 x RFID Tags
- 1 x Wireless Door/Window Sensor
- 1 x Wireless PIR Motion Sensor
- 1 x Wireless Siren
- Akụrụngwa mgbago (skru, arịlịka)
- Akwụkwọ ntuziaka (akwụkwọ a)
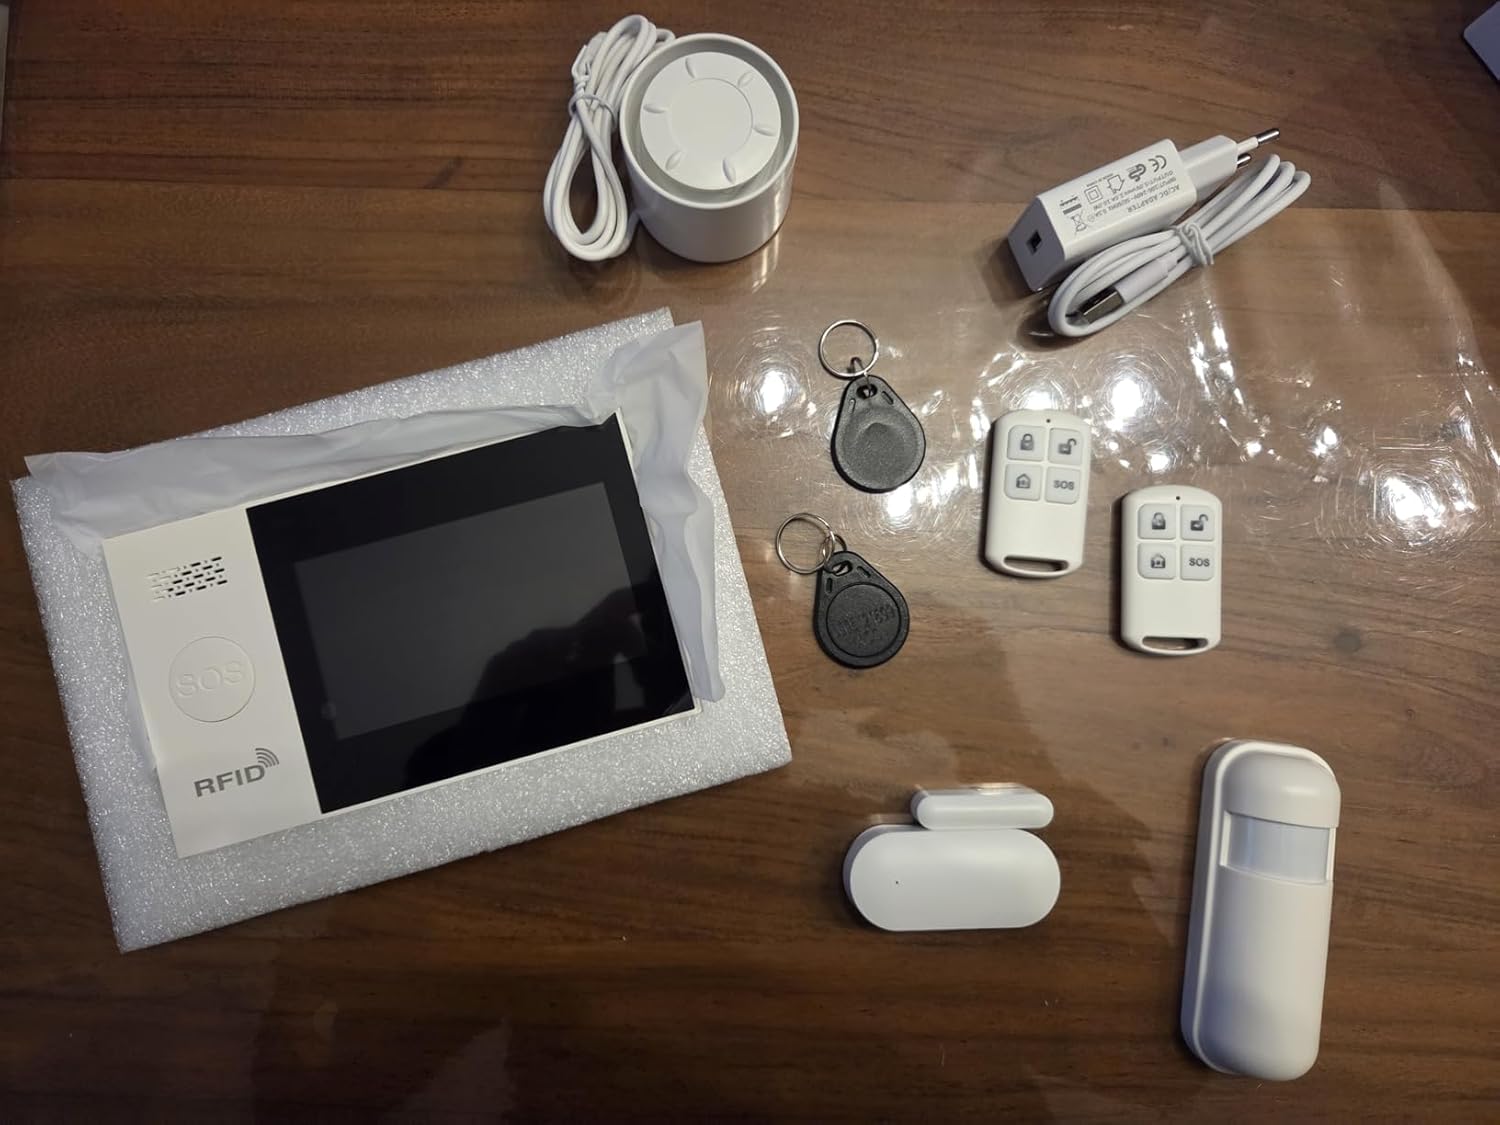
Foto 2.1: Ofeview of the PGST A107F-EU-A Wireless Home Alarm System components, including the main panel, remote controls, RFID tags, siren, power adapter, door/window sensor, and motion sensor.
3. Ngwaahịa gafereview
The PGST A107F-EU-A system consists of a central control panel and various wireless sensors and accessories. The main panel acts as the brain of the system, processing signals from sensors and communicating alerts via 4G, SMS, or the Tuya App.
3.1 Ogwe njikwa isi
The main control panel features a display, touch keypad, SOS button, and RFID reader. It houses the SIM card slot for 4G communication and connects to your home Wi-Fi network for app control.

Foto 3.1: N'ihu view of the PGST A107F-EU-A Main Control Panel, showing the display, keypad, SOS button, and RFID reader.

Foto 3.2: Akụkụ view of the PGST A107F-EU-A Main Control Panel, illustrating its slim profile.
3.2 SIM Card Slot and Connections
The back of the main panel provides access to the SIM card slot and power input. Ensure the SIM card is inserted correctly for 4G functionality.

Foto nke atọ: Azụ view of the PGST A107F-EU-A Main Control Panel with the cover removed, showing the SIM card slot and internal components. The IMEI number is visible: 863957076386736.
4. Nhazi
4.1 Ike mbu
- Connect the provided power adapter to the main control panel and plug it into a power outlet.
- The panel will power on and initiate its startup sequence.
4.2 SIM Card Installation (for 4G functionality)
- Ensure the main panel is powered off.
- Locate the SIM card slot on the back of the main panel (refer to Image 3.3).
- Insert a standard 4G SIM card into the slot, ensuring correct orientation.
- Replace the cover and power on the panel. The system will attempt to connect to the 4G network.
4.3 Tuya App Integration
- Budata ngwa "Tuya Smart" ma ọ bụ "Smart Life" site na ụlọ ahịa ngwa ekwentị gị (iOS ma ọ bụ gam akporo).
- Debanye aha maka akaụntụ ọhụrụ ma ọ bụ banye ma ọ bụrụ na ị nwere otu.
- On the app, tap "Add Device" or the "+" icon.
- Select "Security & Video Surveillance" > "Alarm (Wi-Fi)" or search for "Alarm System".
- Follow the on-screen instructions to connect the alarm panel to your home Wi-Fi network. This typically involves putting the panel into pairing mode (refer to the panel's display for instructions) and entering your Wi-Fi credentials in the app.
Njikọ Sensọ 4.4
The system comes with pre-paired sensors. If you need to add new sensors or re-pair existing ones:
- On the main panel, navigate to the "Sensor Management" or "Add Sensor" menu.
- Select the type of sensor you wish to add (e.g., Door Sensor, Motion Sensor).
- Activate the sensor (e.g., separate the two parts of a door sensor, or trigger a motion sensor). The panel will detect the sensor and prompt you to confirm pairing.
- Assign the sensor to a specific zone (e.g., "Main Door," "Living Room").
4.5 Remote Control and RFID Tag Ijikọta
Remote controls and RFID tags are typically pre-paired. To add new ones:
- On the main panel, navigate to the "Remote Control Management" or "RFID Tag Management" menu.
- Follow the on-screen instructions to put the panel into pairing mode.
- For remote controls, press any button on the remote. For RFID tags, kpatụ tag against the RFID reader on the main panel.
- Confirm the pairing on the panel.
5. Na-arụ ọrụ Sistemu
5.1 Na-eji ngwa agha na mwepu
The system can be armed or disarmed using the main panel, remote controls, RFID tags, or the Tuya App.
- Ogwe aka (Ụdị Apụ): Activates all sensors. Any triggered sensor will set off the alarm.
- Home Arm (Stay Mode): Activates perimeter sensors (e.g., door/window sensors) while allowing free movement within the property (e.g., motion sensors are disarmed).
- Wepu ngwa agha: Deactivates all sensors, allowing free entry and exit without triggering the alarm.
5.2 Ọrụ SOS
In an emergency, press the SOS button on the main panel or the remote control. The system will immediately trigger the alarm and send emergency notifications to pre-configured contacts via 4G call, SMS, and Tuya App alerts.
5.3 Mpaghara njikwa
Each sensor is assigned to a zone. You can customize zone types (e.g., 24-hour zone, delay zone, home arm zone) through the main panel settings or the Tuya App to suit your security needs.
5.4 Voice Control with Alexa & Google Assistant
After integrating the Tuya App with Amazon Alexa or Google Assistant, you can use voice commands to control your alarm system. Examples gụnyere:
- "Alexa, arm the alarm."
- "Hey Google, disarm the alarm."
- "Alexa, what is the status of the alarm?"
Refer to the Tuya App's integration guide for specific voice commands and setup instructions.
5.5 Instant Notifications
Upon an alarm trigger, the system will send instant alerts:
- 4G Call: Dials pre-set emergency numbers.
- SMS: Sends text messages to pre-set numbers.
- Tuya App: Pushes real-time notifications to your smartphone.
6. Nlekọta
6.1 nnọchi batrị
Wireless sensors (door/window, motion) are powered by batteries. The main panel will indicate low battery status for individual sensors. Replace batteries promptly to ensure continuous protection.
- Ndụ batrị sensọ: Approximately 2 years (varies with usage).
- Refer to the specific sensor's compartment for battery type (e.g., CR2032 for small sensors, AA/AAA for larger ones).
6.2 Nhicha
Wipe the main panel and sensors with a soft, dry cloth. Avoid using abrasive cleaners or solvents, as they may damage the surfaces.
7. Nchọpụta nsogbu
- Sistemụ anaghị arụ ọrụ: Ensure the power adapter is securely connected to both the panel and a working power outlet.
- No 4G signal: Check if the SIM card is correctly inserted and activated. Verify that your area has 4G coverage.
- Sensọ anaghị akpalite mkpu: Check sensor battery levels. Ensure sensors are within range of the main panel and correctly paired. Verify zone settings in the app or on the panel.
- Tuya App connection issues: Ensure the main panel is connected to your Wi-Fi network. Check your Wi-Fi signal strength. Restart the app and the main panel.
- Mkpu ụgha: Check sensor placement to avoid environmental triggers (e.g., direct sunlight on motion sensors, loose doors/windows). Adjust sensor sensitivity if applicable.
8. Nkọwapụta
| Njirimara | Nkọwapụta |
|---|---|
| Nọmba nlereanya | A107F |
| Ụdị | PGST |
| Teknụzụ Njikọta | Wireless, 4G, Wi-Fi |
| Ngwa dakọtara | Smartphone (Tuya App), Alexa, Google Assistant |
| Power Source (Main Panel) | AC Power Adapter (5V 2A) |
| Akụkụ ihe (LxWxH) | 22 x 15 x 10 cm |
| Typedị Oti mkpu | Ntinye |
| Average Battery Life (Sensors) | Afọ 2 |
| Usoro ntinye | Ịbanye |
| UPC / GTIN | 704444493779 |
9. Akwụkwọ ikike na nkwado
9.1 Akwụkwọ ikike nke onye nrụpụta
The PGST A107F-EU-A Wireless Home Alarm System is covered by a Akwụkwọ ikike onye nrụpụta afọ 1 site na ụbọchị ịzụrụ. Akwụkwọ ikike a na-ekpuchi ntụpọ dị na ngwa na arụ ọrụ n'okpuru ojiji nkịtị.
9.2 Nkwado ndị ahịa
For any questions, technical assistance, or warranty claims, please contact PGST customer support. Refer to the product packaging or the PGST official websaịtị maka ozi kọntaktị.