
Okwu mmalite
This manual provides essential instructions for the safe and effective assembly, operation, and maintenance of your Tangkula 10x20 Ft Canopy Tent. Please read all instructions carefully before setup and retain this manual for future reference. This canopy tent is designed for temporary outdoor use, providing shelter for social gatherings, parties, and events.
Ozi nchekwa
Ọkwa nchekwa dị mkpa:
- This party tent is intended for temporary use only.
- Do not leave the tent set up overnight or under adverse weather conditions, including strong winds, heavy rain, or snow.
- Always secure the tent properly with all provided wind ropes and ground stakes to ensure stability.
- Gbaa mbọ hụ na mpaghara ntọala ewepụghị ihe mgbochi dị n'elu yana ala na-ezighi ezi.
- Debe ire ọkụ niile na ebe ikpo ọkụ na akwa ụlọikwuu.
Ihe ngwugwu
Nyochaa na akụrụngwa niile dị tupu ịmalite mgbakọ:
- Canopy Cover (PE material)
- Frame Poles (Alloy Steel, various lengths)
- Connectors/Joints
- 4 Removable Sidewalls with Transparent Windows
- Ụdọ ikuku
- Akara ala
- Carrying Bag (for storage)
Ntuziaka Mgbakọ
Assembly requires at least two people to ensure stability and ease of setup. No additional tools are required as tubes feature buckles for connection.
Step 1: Unpack and Organize Components
Carefully unpack all parts and lay them out. Group similar poles and connectors together. Refer to the included diagram for component identification.
Nzọụkwụ 2: Chịkọta Frame Roof
Connect the shorter frame poles using the appropriate connectors to form the rectangular roof structure. Ensure all buckles are securely fastened. It is crucial to keep the frame steady during this process.
Step 3: Attach the Canopy Cover
Drape the canopy cover over the assembled roof frame. Ensure it is centered and aligned correctly. Secure the canopy to the frame using any integrated ties or fasteners.
Step 4: Install Leg Poles
Attach the longer leg poles to the roof frame connectors. With assistance, carefully lift the frame and insert the leg poles into their respective connectors. Ensure all connections are firm.
Nzọụkwụ 5: Chekwaa ụlọikwuu ahụ
Once the frame is fully assembled and standing, secure it to the ground. Use the provided ground stakes to anchor each leg. Attach the wind ropes to the designated points on the canopy and stake them firmly into the ground at an angle, away from the tent base, to provide maximum stability against wind.

Image: Proper securing of the canopy tent using wind ropes and ground stakes (included).
Step 6: Attach Sidewalls (Optional)
If desired, attach the 4 removable sidewalls to the tent frame. The sidewalls feature transparent windows to allow light and visibility. They can be easily attached or removed based on weather conditions or preference for air circulation.

Image: The canopy tent with all four sidewalls attached, highlighting the transparent windows for brightness and the option for removal for air circulation.
Ọrụ
Your Tangkula canopy tent provides a spacious area for various outdoor activities. The 10' x 20' dimensions offer ample room for guests and furniture.
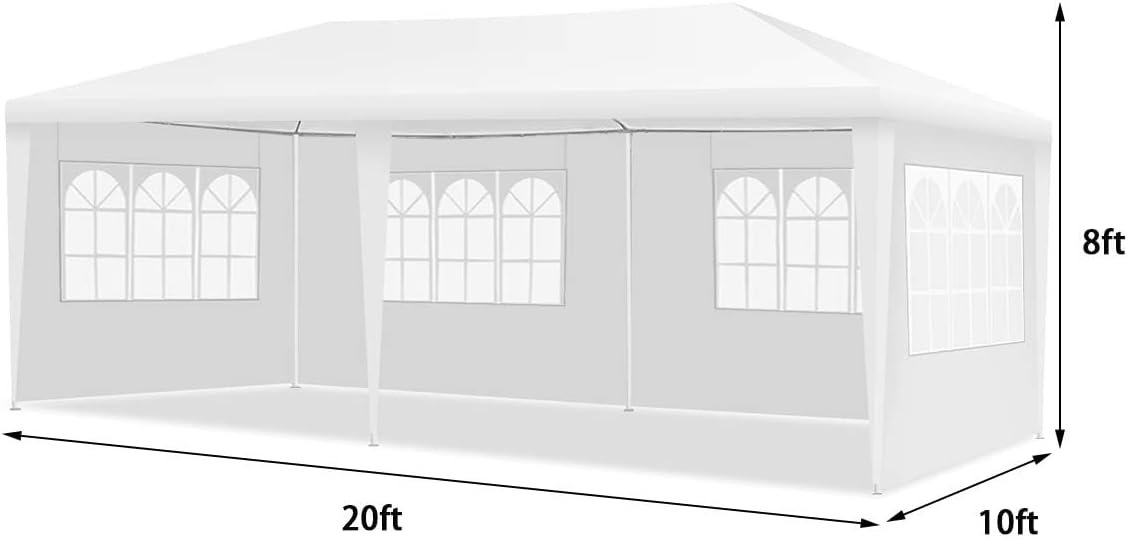
Image: Diagram illustrating the dimensions of the 10x20 Ft canopy tent, with an 8ft peak height.
Ojiji Akụkụ Mgbidi
The 4 removable sidewalls can be used to provide additional warmth, privacy, or protection from light wind and sun. The transparent windows allow natural light into the tent. For improved air ventilation, the sidewalls can be easily removed.

Image: The canopy tent shown with and without its sidewalls, demonstrating its versatility.
Nguzogide ihu igwe
The canopy cover is made from PE fabric, which is water-resistant and designed to withstand sunlight for long-term outdoor use. However, it is not designed for extreme weather conditions.

Image: Visual representation of the all-weather PE fabric, highlighting its waterproof and sunlight resistant properties.
Nlekọta na nlekọta
Nhicha
Clean the canopy cover and sidewalls with a mild soap solution and water. Do not use harsh chemicals or abrasive cleaners, as these can damage the fabric. Rinse thoroughly and allow to air dry completely before storage.
Nchekwa
When not in use, disassemble the canopy tent and store all components in the provided carrying bag. Store the bag in a cool, dry place, away from direct sunlight and extreme temperatures, to prolong the life of the product.

Image: The canopy tent components neatly packed into the convenient storage bag for effortless transport and storage.
Nchọpụta nsogbu
- Akwụsịghị ụlọ ntu: Ensure all frame poles are securely buckled and connected. Verify that all ground stakes are fully inserted into the ground and wind ropes are taut and properly anchored. In windy conditions, additional weights (e.g., sandbags, not included) may be necessary for enhanced stability.
- Ọdọ mmiri n'elu ụlọ: If water collects on the canopy, gently push up from underneath to release the water. Ensure the canopy is stretched tightly over the frame during assembly to minimize sagging.
- Ihe isi ike na Mgbakọ: Ensure all parts are correctly identified and oriented according to the diagrams. Assembly is easier with at least two people. Do not force connections.
Nkọwapụta
| Njirimara | Nkọwa |
|---|---|
| Ụdị | Tangkula |
| Nọmba nlereanya | AM10381HM |
| Ihe onwunwe | Alloy Steel (Frame), Polyethylene (PE) (Canopy/Sidewalls) |
| Agba | Ọcha |
| Akụkụ ngwaahịa (L x W x H) | 240"L x 120"W x 96"H (10' x 20' x 8') |
| Mpaghara ala | 200 square ụkwụ |
| Akụkụ akụkụ | 4 Removable, with Transparent Windows |
| Ọkwa Nguzogide mmiri | Mmiri na-eguzogide |
| Nchekwa ìhè ultraviolet | Ee |
| Ụdị mmechi | Buckle (for frame connections) |
Akwụkwọ ikike na nkwado
For warranty information, replacement parts, or technical support, please contact Tangkula customer service directly. Refer to your purchase documentation for specific contact details.