Sekey 4-Tier Mini Greenhouse
Sekey 4-Tier Mini Greenhouse Instruction Manual
Model: 4-Tier Mini Greenhouse
1. Okwu mmalite
Thank you for choosing the Sekey 4-Tier Mini Greenhouse. This manual provides essential information for the safe assembly, operation, and maintenance of your new greenhouse. Please read these instructions thoroughly before use and retain them for future reference.
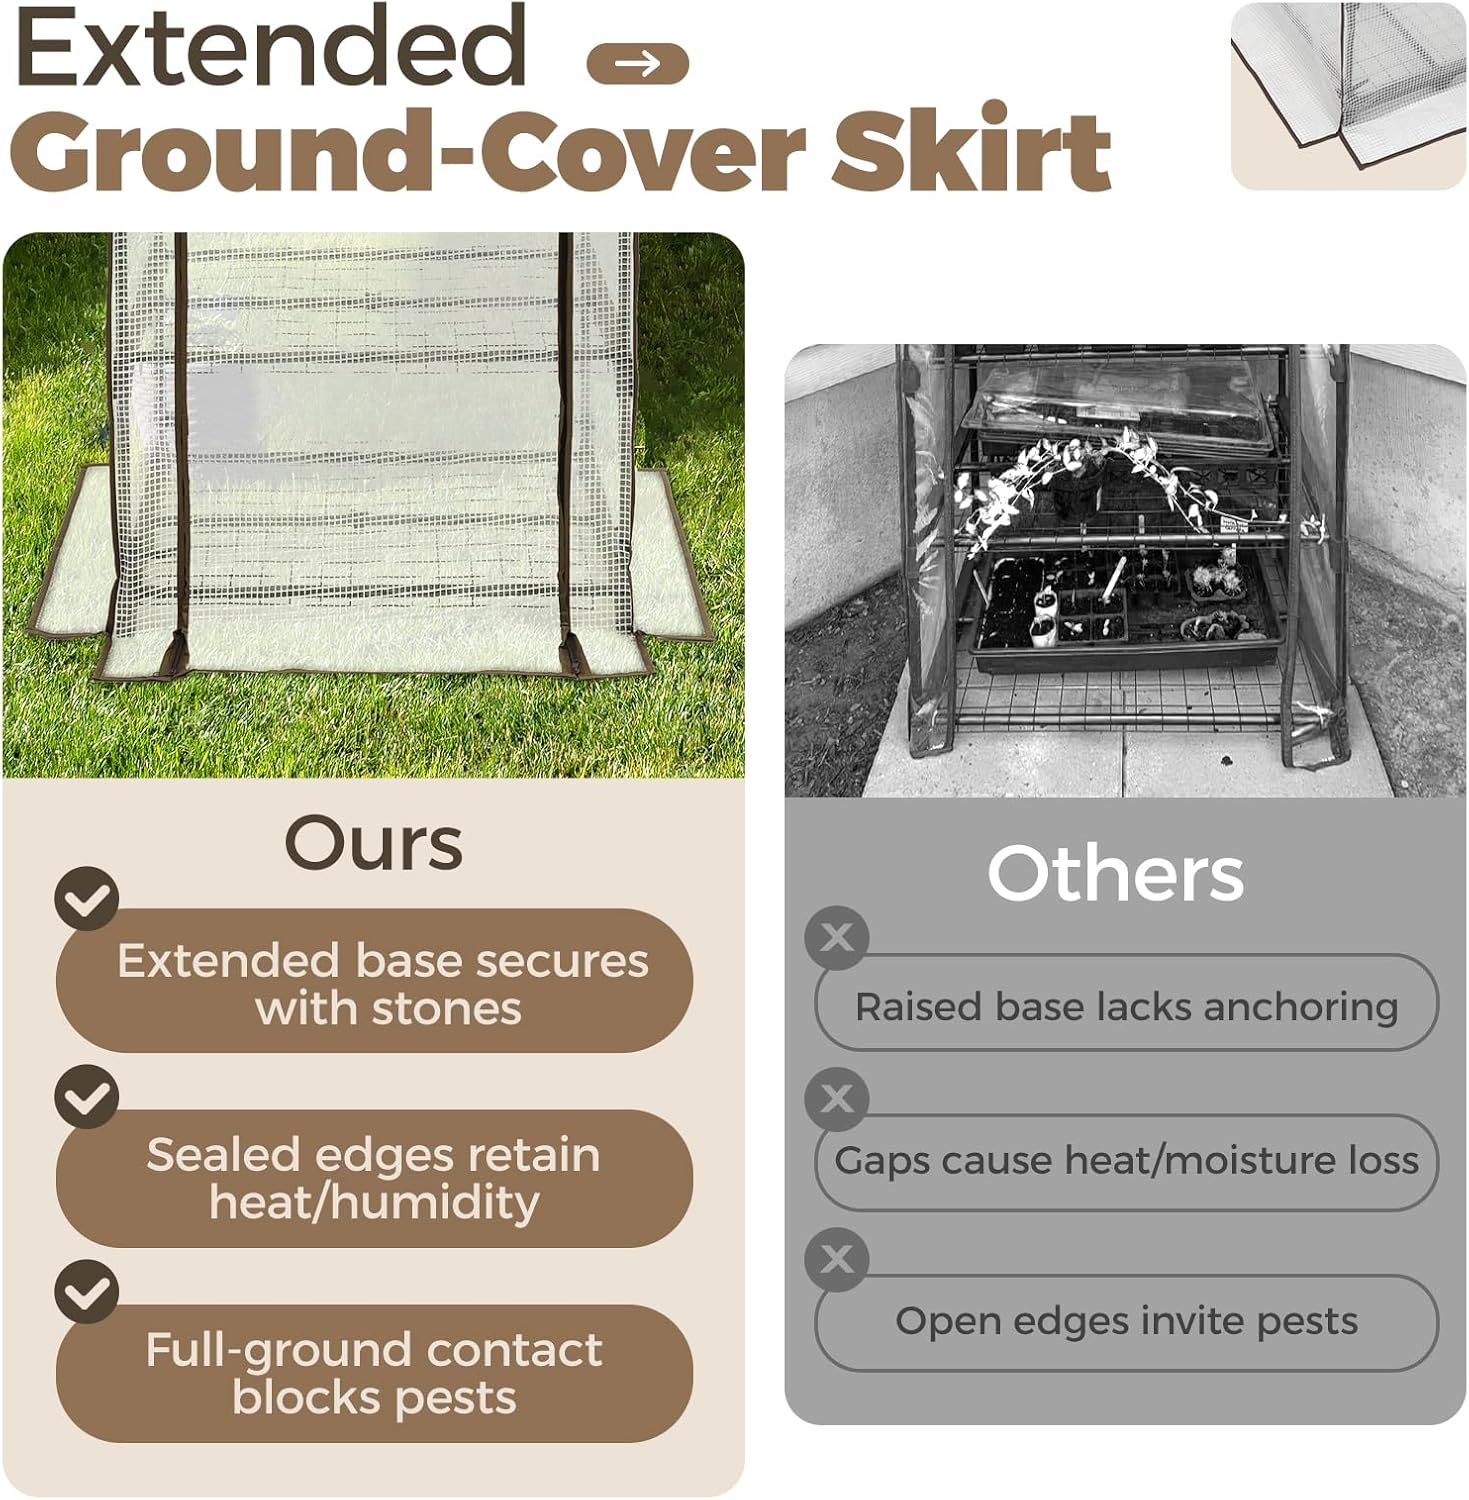
Image 1.1: Fully assembled Sekey 4-Tier Mini Greenhouse, showcasing its compact design and capacity for various plants.
2. Ozi nchekwa
ỊDỌ AKA NA NTỊ: Ọdịda iso ntuziaka nchekwa ndị a nwere ike bute mmerụ ahụ ma ọ bụ mebie ngwaahịa a.
- Always assemble and disassemble with care to avoid injury from sharp edges and heavy components.
- Ensure the greenhouse is properly anchored to prevent it from being blown over in strong winds. Use the integrated adjustable straps and weighted skirt for ground seal.
- Keep children and pets away from the greenhouse when in use, especially during assembly or when handling plants and tools.
- Always follow local regulations and building codes for greenhouse installation and maintenance.
- Do not overload shelves. Each shelf can hold up to 22 pounds (10 kg).
3. Ihe ngwugwu
Before assembly, verify that all components listed below are present and undamaged. If any parts are missing or damaged, please contact Sekey customer support.

Foto nke abụọ: gbawara view of the greenhouse components, including frame tubes, connectors, shelves, and the transparent cover.
Ndepụta akụrụngwa:
- Top Frame Arches (x2)
- Horizontal Tubes (x10)
- Vertical Tubes (x16)
- Base Frame Pieces (x4)
- Plastic Connectors (various types, x12)
- Wire Shelves (x4)
- Waterproof PE Cover (x1)
4. Ntuziaka Mgbakọ
The Sekey Mini Greenhouse is designed for easy assembly without the need for additional tools. Follow these steps:
- Kwadebe Mpaghara: Choose a flat, stable surface for assembly. Ensure adequate space around the greenhouse for access.
- Chịkọta Frame Base: Connect the base frame pieces using the appropriate plastic connectors.
- Wụnye nkwado kwụ ọtọ: Insert the vertical tubes into the base frame connectors.
- Add Shelves: Slide the wire shelves onto the vertical supports at desired heights. Ensure they are level and secure.
- Construct Upper Frame: Attach the remaining horizontal and vertical tubes, forming the upper structure and roof arches.
- Kpuchie mkpuchi ahụ: Carefully place the waterproof PE cover over the assembled frame. Ensure the zippers are aligned with the front opening.
- Chekwaa mkpuchi ahụ: Fasten the integrated adjustable straps to the frame for a snug fit. Ensure the extended ground-cover skirt is spread out around the base.
- Ịkwanye Greenhouse n'ime: Place heavy objects (e.g., stones, bricks) on the extended ground-cover skirt to secure the greenhouse against wind and drafts. This also helps retain heat and humidity and blocks pests.

Image 4.1: Detail of the extended ground-cover skirt, designed to be secured with weights for stability and improved insulation.

Image 4.2: Illustration of the sturdy design features, including reinforced coated steel tubes and secure plastic-to-steel joints.
5. Ntuziaka ọrụ
5.1 Plant Placement and Shelf Adjustment
The 4-tier design allows for organized plant placement. Shelves can be adjusted or removed to accommodate plants of varying heights as they grow.

Foto 5.1: Ọpụamples of shelf configurations to support plant growth at different stages.
5.2 Njikwa ikuku na okpomọkụ
The roll-up door provides essential ventilation. Open the door during warmer periods to prevent overheating and ensure air circulation. Close it to retain heat and humidity, especially during cooler temperatures or at night.
Image 5.2: The roll-up door can be secured open for ventilation or zipped closed for warmth.
5.3 Seasonal Use
The greenhouse offers protection for plants across seasons. It can provide shade from intense summer heat and shield plants from frost during colder months.

Image 5.3: The greenhouse adapts to different weather conditions, offering protection from both heat and frost.

Image 5.4: The greenhouse can be used indoors to protect plants during colder seasons.
6. Nlekọta
- Na-ehicha mkpuchi: Regularly wipe down the PE cover with a damp cloth to remove dust, dirt, and algae buildup. Avoid abrasive cleaners that could damage the material.
- Nyochaa etiti: Periodically check the metal frame and plastic connectors for any signs of wear, rust, or damage. Replace any compromised parts to maintain structural integrity.
- Nlekọta Zipper: Debe zipa ahụ ọcha na ihe mkpori adịghị. Were ihe na-esi na silicone gbanye mmanụ ma ọ bụrụ na ọ na-esi ike.
- Nyochaa anchoring: Ensure the greenhouse remains securely anchored, especially after strong winds or heavy rain. Re-adjust weights on the ground-cover skirt as needed.
- Nchekwa oge: If storing the greenhouse for an extended period, clean all components thoroughly, disassemble if desired, and store in a dry, protected area away from direct sunlight.

Image 6.1: The durable PE cover is designed to be UV-resistant and tear-proof, requiring minimal maintenance.
7. Nchọpụta nsogbu
- Enweghị ike ịrụ ọrụ na griin haus: If the greenhouse feels unstable, ensure it is placed on a level surface and that the ground-cover skirt is fully extended and weighted down with sufficient heavy objects. Check all frame connections for tightness.
- Mkpuchi Na-adịghị Adaba nke Ọma: Ensure the frame is assembled correctly according to the instructions. The cover should be draped evenly. If the cover is too tight or loose, re-check frame dimensions and connections.
- Okwu zipa: If the zipper is stiff or stuck, clean any debris from the teeth and apply a small amount of zipper lubricant. Avoid forcing the zipper, as this can cause damage.
- Mkpokọta mmiri: Ensure the cover is taut to prevent water pooling. Check for any tears or punctures in the cover and repair them promptly to maintain waterproofing.
- Ntugharị shelf: Ensure shelves are correctly seated on the frame. Do not exceed the maximum weight capacity of 22 pounds (10 kg) per shelf. Distribute weight evenly.
8. Nkọwapụta
| Njirimara | Nkọwa |
|---|---|
| Nlereanya | 4-Tier Mini Greenhouse |
| Ụdị | Sekey |
| Akụkụ ngwaahịa (L x W x H) | 27.16 x 19.29 x 62.99 sentimita (ihe dịka 69 x 49 x 160 cm) |
| Ibu Ibu | 10.68 pound (ihe dị ka 4.84 n'arọ) |
| Frame Ihe | Reinforced Coated Steel Tube |
| Ihe mkpuchi | Polyethylene (PE) |
| Number of Tiers/Shelves | 4 |
| Max. Shelf Capacity | 22 pounds (10 kg) per shelf |
| Agba | Ọcha (Mkpuchi) |

Image 8.1: Detailed dimensions and individual shelf weight capacity of the greenhouse.
9. Akwụkwọ ikike na nkwado
For warranty information, replacement parts, or technical support, please contact Sekey customer service directly. Refer to your purchase documentation for specific contact details or visit the official Sekey websaịtị.
Please note: This manual is for informational purposes only. The manufacturer reserves the right to make changes to the product without prior notice.
Akwụkwọ ndị emetụtara - 4-Tier Mini Greenhouse
 |
Sekey Umbrella Assembly, Use, and Care Guide Official guide for Sekey umbrellas, covering assembly, safety precautions, intended use, cleaning, storage, and contact information. Ensure proper setup and maintenance for optimal performance. |
 |
The Root Warrior: Easy-to-Use Root Aeration for Healthier Container Plants Discover how The Root Warrior enhances plant root development by improving oxygen flow in containers. This guide covers its features, benefits, compatibility, and simple installation steps for healthier, thriving plants. |
 |
White 3-Piece Corner Shelves - Wall Mounted Decorative Shelving with Installation Guide Instructions and details for installing a set of three white corner shelves. Features pre-assembled brackets, widened metal supports, and a decorative design for wall mounting. Includes dimensions and visual descriptions. |
 |
HOMEIJU 4-Tier Book Shelf Installation Guide Step-by-step instructions for assembling the HOMEIJU 4-Tier Book Shelf, including a detailed parts list and assembly diagrams described textually. Learn how to build your stylish and functional bookcase for living room, kitchen, or office. |
 |
SMIBUY 4-Tier Bamboo Wine Rack Assembly Instructions Detailed assembly instructions for the SMIBUY 4-Tier Bamboo Wine Rack, a 16-bottle freestanding storage shelf suitable for kitchens, pantries, cellars, and bars. Includes parts list and step-by-step guidance. |
 |
ASPAREN Plant Box Cover Assembly Instructions - IKEA Detailed, step-by-step assembly instructions for the IKEA ASPAREN plant box cover. This guide provides clear, textual descriptions for each assembly stage, replacing visual diagrams. |
Ask a question about this manual
Ask about setup, troubleshooting, compatibility, parts, safety, or missing instructions. Manuals+ will review the question and use this page’s manual context to help answer it.