
Okwu mmalite
This manual provides detailed instructions for the safe and efficient operation of your CREWORKS 40x50 cm Heat Press Machine. This machine is designed for transferring designs onto various materials such as T-shirts, pillowcases, mouse pads, tote bags, masks, and backpacks using heat and pressure. Please read this manual thoroughly before use and keep it for future reference.
Ntuziaka nchekwa
- Na-arụ ọrụ mgbe niile na igwe ọkụ na-arụ ọrụ n'elu ebe siri ike, nke na-anaghị eguzogide okpomọkụ.
- Keep hands and body clear of the heating platen during operation to prevent burns.
- Ensure proper ventilation in the work area to dissipate any fumes from materials.
- Ahapụla igwe ahụ ka ọ ghara ịnọ n'okpuru ọkụ ma ọ bụ na-ekpo ọkụ.
- Unplug the machine from the power outlet when not in use or before cleaning/maintenance.
- Do not use the machine near water or in damp ọnọdụ.
- The machine features an automatic shut-off after 30 minutes of inactivity for safety.
- The rubber-coated handle helps prevent accidental burns. Always use caution.
Ngwaahịa gafereview
Familiarize yourself with the components of your heat press machine.
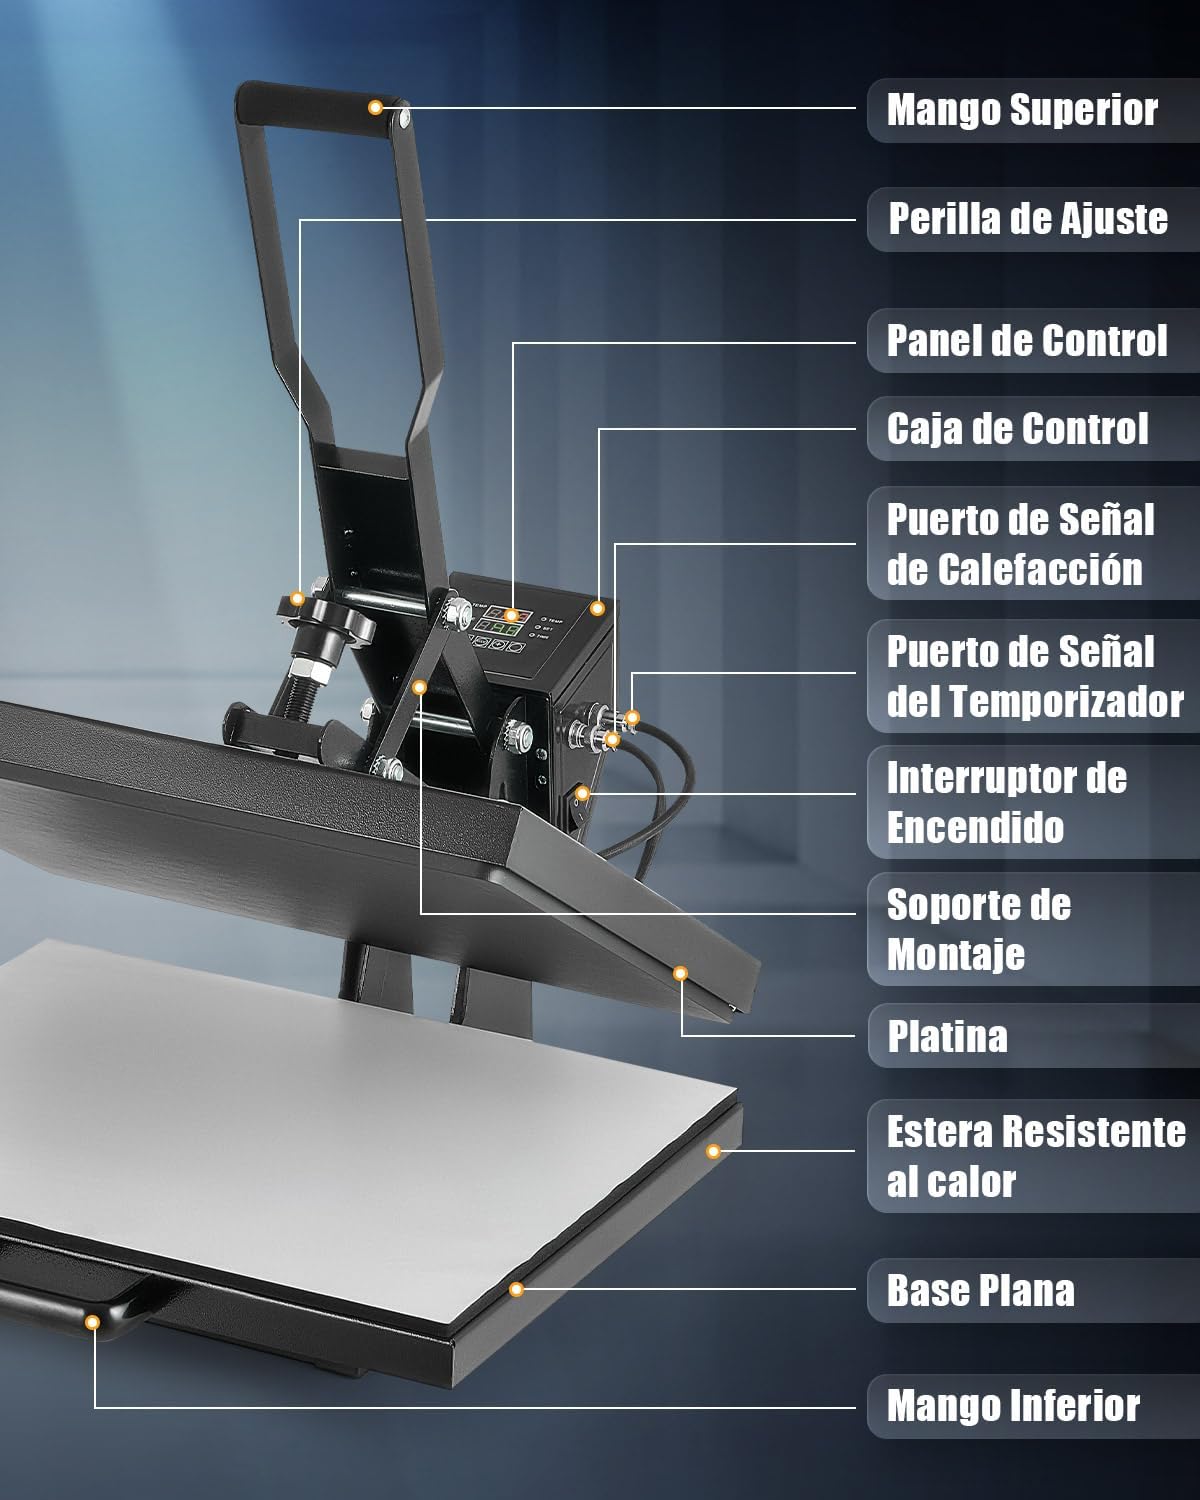
The machine features a top handle for operation, an adjustment knob for pressure, a digital control panel for temperature and time, and a sliding flat base for easy material placement.
Melite
- Unpack the heat press machine and all its components.
- Place the machine on a sturdy, level, and heat-resistant surface. Ensure there is adequate space around the machine for safe operation.
- Jikọọ eriri ọkụ na oghere eletrik gbadoro ụkwụ.
- Gbaa mbọ hụ na mgba ọkụ ọkụ nọ n'ọkwa gbanyụrụ tupu itinye ya.
Ntuziaka ọrụ
1. Power On and Initial Settings
Turn on the machine using the power switch. The digital control panel will illuminate.
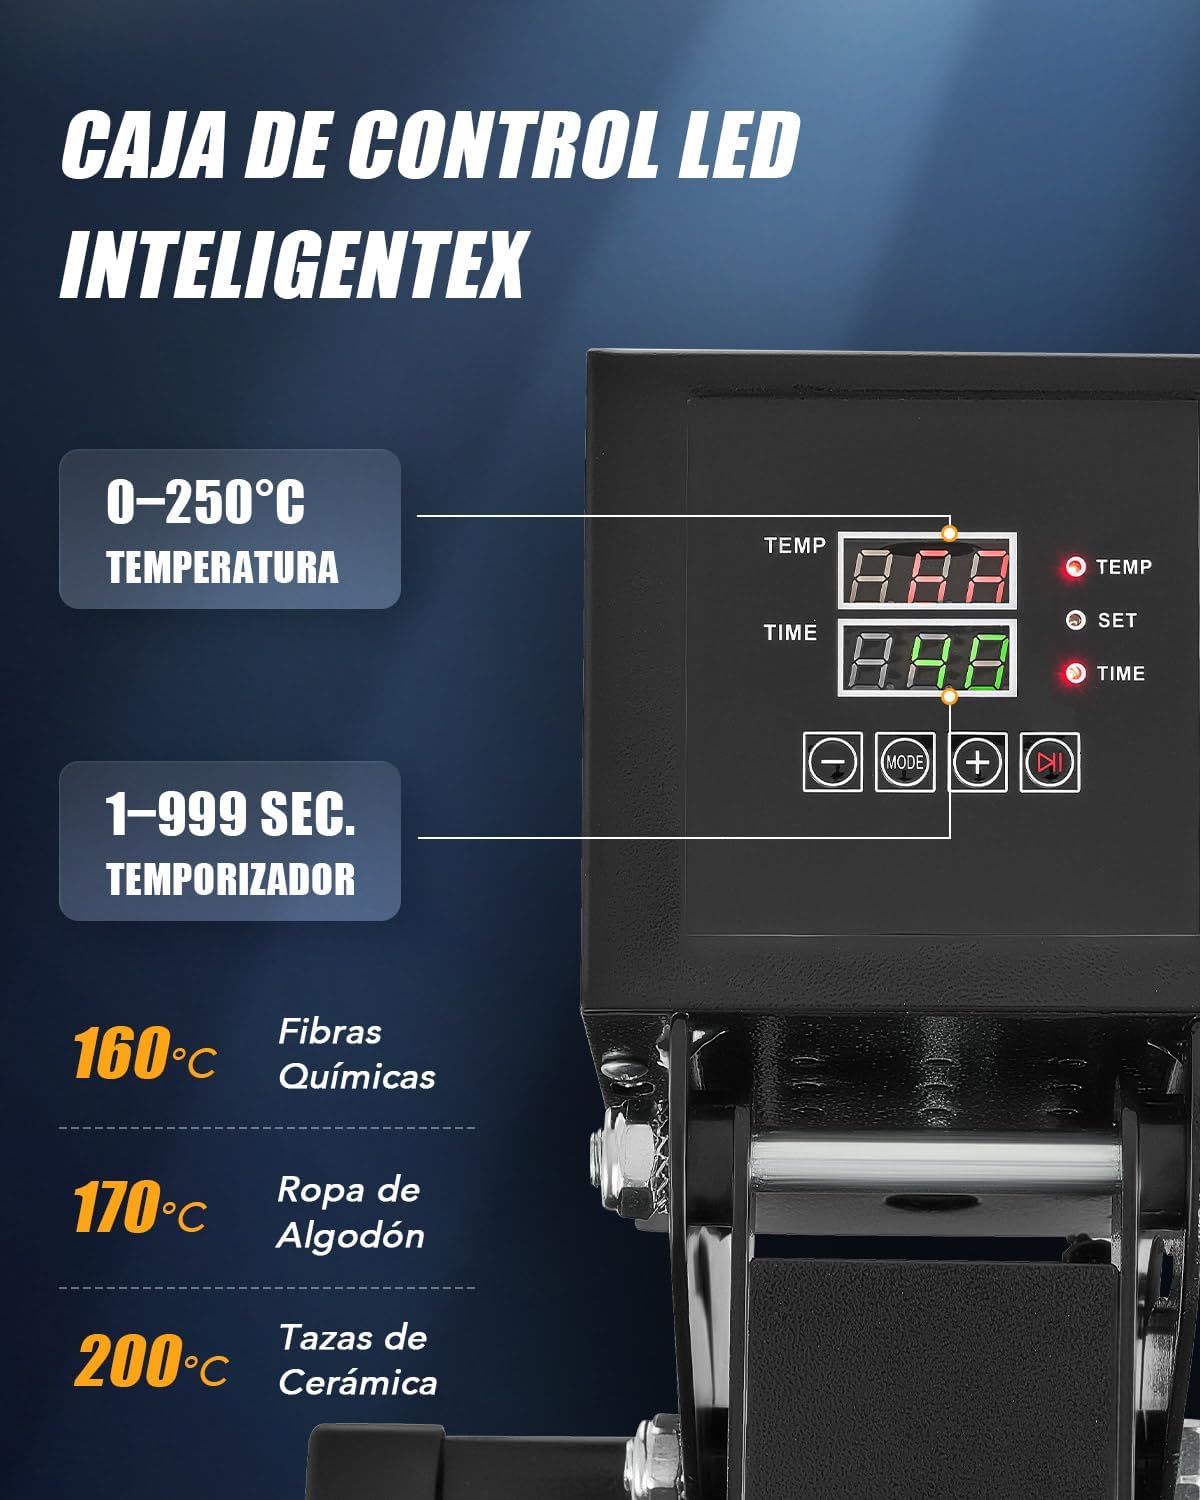
- Ndozi okpomọkụ: Press the "SET" button, then use the "+" and "-" buttons to set the desired temperature (up to 250°C / 480°F). Press "SET" again to confirm.
- Ndozi oge: Press the "MODE" button, then use the "+" and "-" buttons to set the desired time (up to 999 seconds). Press "MODE" again to confirm.
- The machine will begin heating to the set temperature.
2. Na-edozi Nrụgide
The pressure can be adjusted using the knob located on top of the heating platen assembly.

- Turn the adjustment knob clockwise for more pressure and counter-clockwise for less pressure.
- Test the pressure on a scrap piece of material before applying your final design.
3. Usoro Mbufe Okpomọkụ
- Once the machine reaches the set temperature, pull out the flat base using the bottom handle.
- Place your material (e.g., T-shirt) onto the heat-resistant mat on the flat base. Ensure it is smooth and free of wrinkles.
- Position your transfer design (e.g., DTF, sublimation paper) onto the material.
- Slide the flat base back into position under the heating platen.
- Lower the top handle to bring the heating platen down onto the material. The timer will start automatically.
- When the timer alarms, lift the top handle to release the pressure.
- Pull out the flat base and carefully remove the transferred item. Allow it to cool before handling further, especially for "cold peel" transfers.

The dual heating tubes ensure uniform heat distribution across the platen for consistent transfer results.

Ngwa dị iche iche
This heat press machine is suitable for a wide range of items beyond just T-shirts.

Nlekọta
- Mgbe niile, kwụpụ ihe mkpuchi ahụ ma hapụ ya ka ọ jụọ oyi kpamkpam tupu e hichaa ya.
- Wipe the heating platen with a soft, dry cloth. For stubborn residue, use a specialized platen cleaner.
- Keep the control panel clean and free of dust.
- Regularly check all connections and moving parts for wear and tear.
- Store the machine in a dry, dust-free environment.
Nchọpụta nsogbu
| Nsogbu | Ihe nwere ike ime | Ngwọta |
|---|---|---|
| Igwe anaghị agba ọkụ. | Power cord not properly connected; Power switch off; No power from outlet. | Check power cord connection; Ensure power switch is ON; Test outlet with another device. |
| Mbufe okpomọkụ na-adịghị mma. | Uneven pressure; Material not flat; Heating element issue. | Adjust pressure knob; Ensure material is smooth; Contact support if heating element is suspected. |
| Design not adhering properly. | Incorrect temperature; Insufficient time; Insufficient pressure; Wrong transfer material. | Verify temperature and time settings; Increase pressure; Ensure correct transfer material for fabric. |
| Igwe na-ada ụda mgbe niile. | Timer alarm; Error code. | Acknowledge timer alarm; Refer to control panel display for error codes and consult support if needed. |
Nkọwapụta
- Nọmba nlereanya: HPMES2024
- Akara: ỌRỤ
- Platen Size: 40 x 50 cm
- Ike: 2000 Watt
- Okpomọkụ kachasị: 250°C (480°F)
- Ogologo oge: 1-999 sekọnd
- Ụdị ikpo oku: Dual Heating Tubes
- Nwepu akpaaka: Mgbe nkeji 30 nke arụghị ọrụ
Vidiyo ngwaahịa ngwaahịa
Watch these official videos for visual guidance on using your CREWORKS Heat Press Machine.
Ngwaahịa gafereview and Operation (0:36)
Vidiyo a na-egosi etu esi eme ya ngwa ngwaview of the CREWORKS Heat Press Machine and demonstrates basic operational steps.
Heat Transfer Demonstration (1:04)
A detailed demonstration of the heat transfer process, showing how to place materials and apply designs.
Features and Benefits (0:54)
This video highlights the key features of the heat press, including the digital control and dual heating elements.
Akwụkwọ ikike na nkwado
For warranty information and customer support, please refer to the documentation included with your purchase or contact CREWORKS customer service directly. Keep your purchase receipt as proof of purchase.
For further assistance, please visit the official CREWORKS website or contact their support team through the contact information provided in your product packaging.