1. Okwu mmalite
This manual provides essential information for the safe and efficient operation of your TOPBULL 40A MPPT Solar Charge Controller. This device is designed to optimize power harvesting from your solar panels and efficiently charge various battery types in 12V or 24V systems. It features advanced Maximum Power Point Tracking (MPPT) technology, comprehensive protection functions, and a user-friendly LCD interface.

Foto 1: N'ihu view of the TOPBULL 40A MPPT Solar Charge Controller, showing the LCD display and control buttons.
2. Ntuziaka nchekwa
Please read all safety instructions carefully before installation and operation. Failure to follow these instructions may result in personal injury or damage to the controller or other components.
- Hụ na njikọ niile ziri ezi ma dịkwa nchebe tupu i jiri ike.
- Do not disassemble or attempt to repair the controller. Refer to qualified personnel for service.
- Install the controller in a well-ventilated area, away from flammable materials and moisture.
- Jikọọ batrị ahụ na ihe njikwa mbụ, wee jikọọ panel anyanwụ, wee jikọọ ibu ahụ n'ikpeazụ. Kwụsị ya n'usoro azụ.
- Wear appropriate personal protective equipment, including eye protection, when working with batteries and electrical systems.
- The controller includes multiple electronic protections such as reverse polarity, overcharge, over-discharge, overload, short-circuiting, TVS lightning, overpower, reverse current, and overtemperature protection. However, proper installation is crucial for optimal safety.
3. Ihe ngwugwu
Chọpụta na ihe niile dị na ngwugwu:
- TOPBULL 40A MPPT Solar Charge Controller
- Ịkwanye kposara
- Akwụkwọ ntuziaka (akwụkwọ a)

Image 2: Contents of the product package, showing the controller, user manual, and mounting hardware.
4. Ngwaahịa gafereview
The TOPBULL 40A MPPT Solar Charge Controller features a clear LCD display and intuitive buttons for monitoring and configuration. It is equipped with terminals for solar panel input, battery connection, DC load output, and dual USB ports.
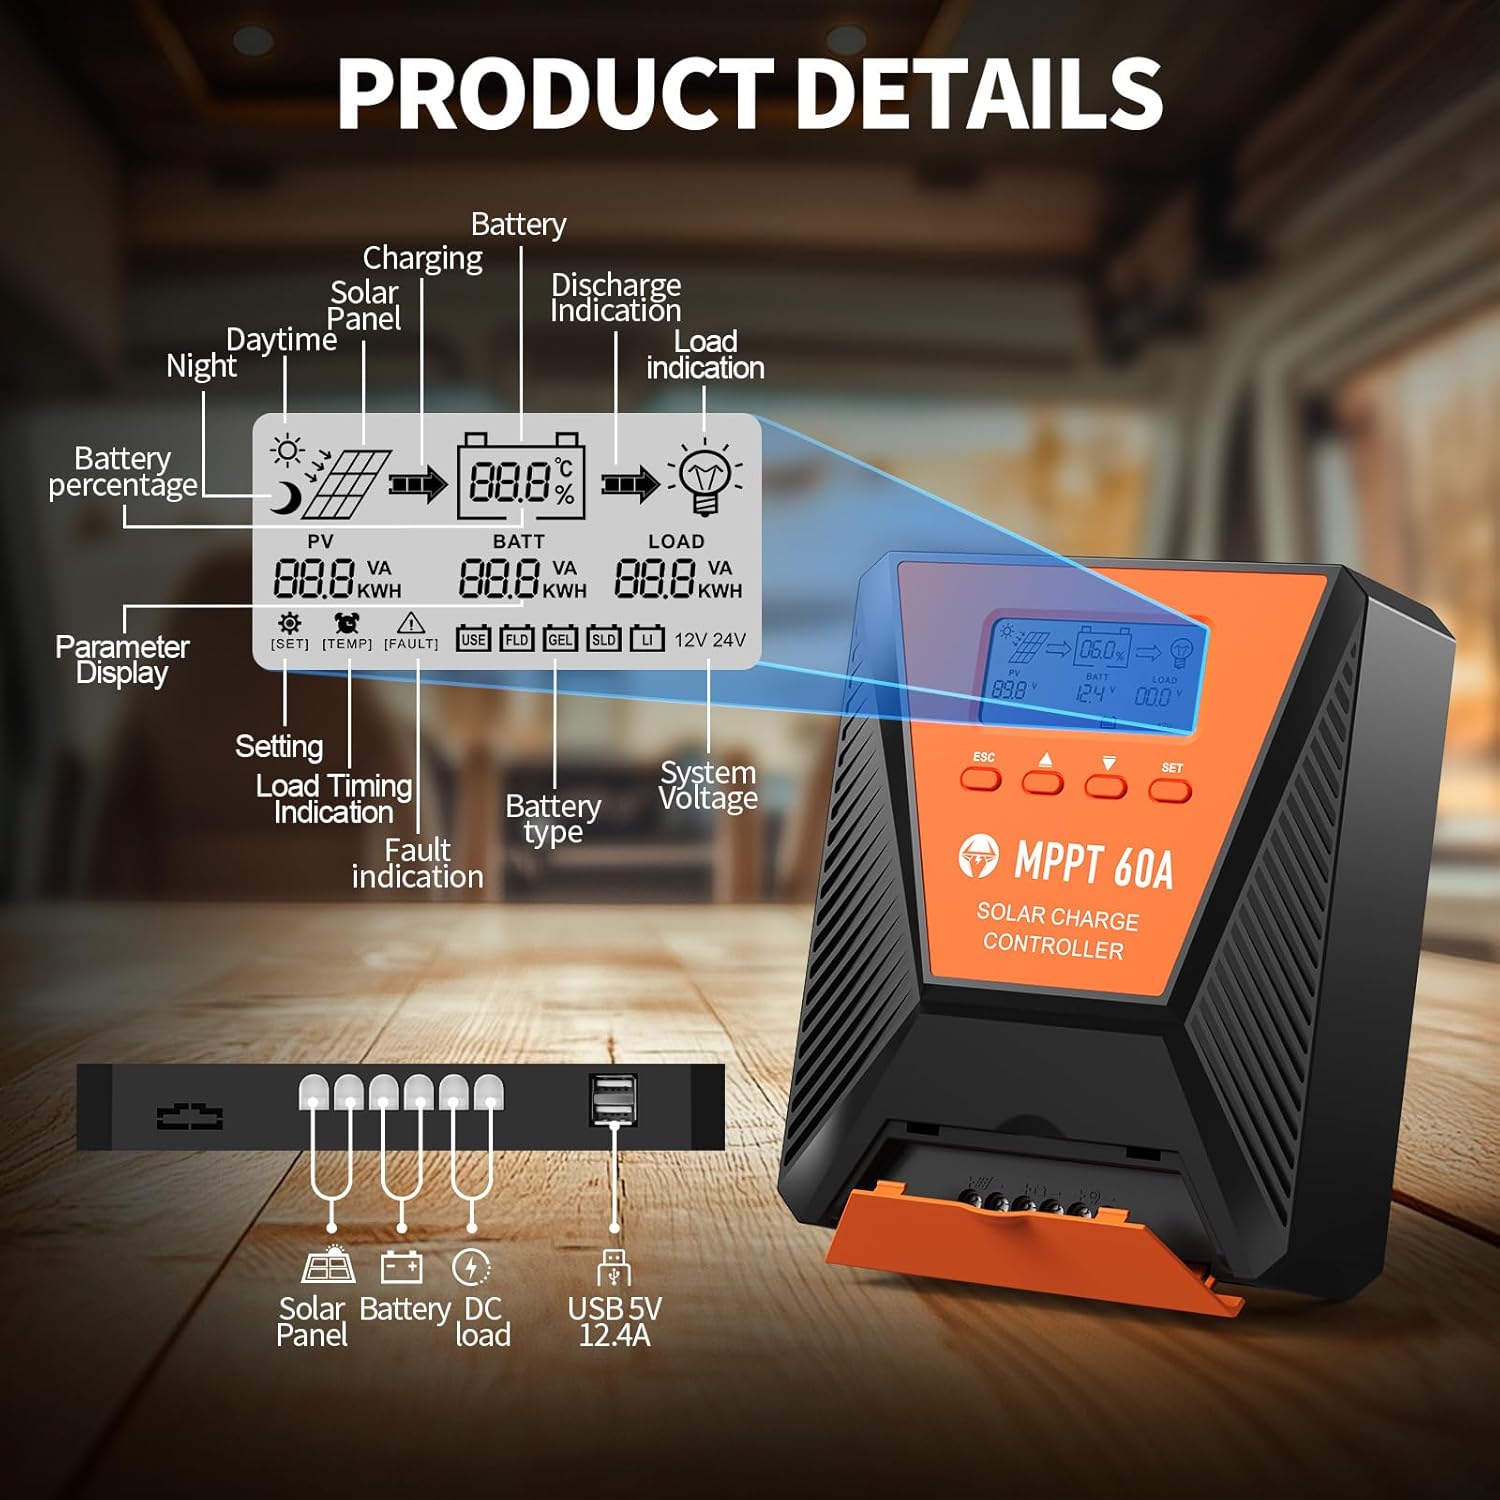
Foto 3: Zuru ezu view of the controller's LCD display, showing various indicators and parameters, along with the connection ports at the bottom.
LCD Display Indicators:
- Onye nta akụkọ: Igwe anyanwụ voltage na ike.
- BATT: Batrị voltage, charge status, and type.
- Ibu: Load status and power.
- Batrị Percentage: Current battery charge level.
- Charging/Discharge Indication: Arrows indicating power flow.
- Ngosipụta mmejọ: Error codes displayed if issues occur.
- Sistemụ Voltage: Automatically detected 12V or 24V.
bọtịnụ njikwa:
- ESC: Exit menu or cancel setting.
- Akụ Elu/Ada: Navigate menus or adjust values.
- WEP :TARA: Enter menu or confirm setting.
5. Ntọala na nwụnye
Soro usoro ndị a maka nrụnye nke njikwa chaja anyanwụ gị nke ọma:
- Ịkwanye: Choose a suitable location for the controller, ensuring adequate ventilation and protection from direct sunlight, high temperatures, and moisture. Use the provided mounting screws to secure the controller.
- Njikọ batrị: Connect the battery to the controller's battery terminals first. Ensure correct polarity (positive to positive, negative to negative). The controller will automatically detect the 12V or 24V system voltage.
- Njikọ anyanwụ panel: Connect the solar panel to the controller's solar input terminals. Ensure correct polarity. The controller will begin charging the battery.
- DC Load Connection (Optional): Connect your DC loads to the load terminals. Ensure correct polarity.

Image 4: Connection diagram illustrating how to connect the solar panel, battery bank, inverter (for AC load), and DC load to the MPPT controller.
The controller supports various deep cycle battery types, including FLD, LiFePO4, SLD, GEL, and AGM. It also supports 0V lithium battery charging (lithium battery activation function).

Image 5: The controller is compatible with various 12V/24V battery types, automatically identifying voltage and supporting custom parameters and 0V lithium battery charging.
6. Ntuziaka ọrụ
LCD Display and Parameter Settings:
The LCD display provides real-time information about your solar charging system. Use the four buttons (ESC, UP, DOWN, SET) to navigate menus and adjust parameters.
- Pịa SET ịbanye na isi menu.
- Jiri Elu/ala to scroll through options such as battery type, load timer settings, and other customizable parameters.
- Pịa SET again to select an option and then use Elu/ala ịgbanwe ụkpụrụ.
- Pịa SET to confirm changes, or ESC ịpụ apụ na-echekwaghị.
Usoro nchaji:
The controller utilizes a smart 4-stage charging process to optimize battery health and longevity:
- Nnukwu ego: Rapid charging to bring the battery to approximately 80% capacity.
- Ụgwọ mmịpụta: Charging at a constant voltage to bring the battery to 100% capacity.
- N'elu mmiri n'Aka: Maintaining the battery at full charge with a lower voltage.
- Equalization Charge (for specific battery types): Periodically overcharging to balance cell voltages.
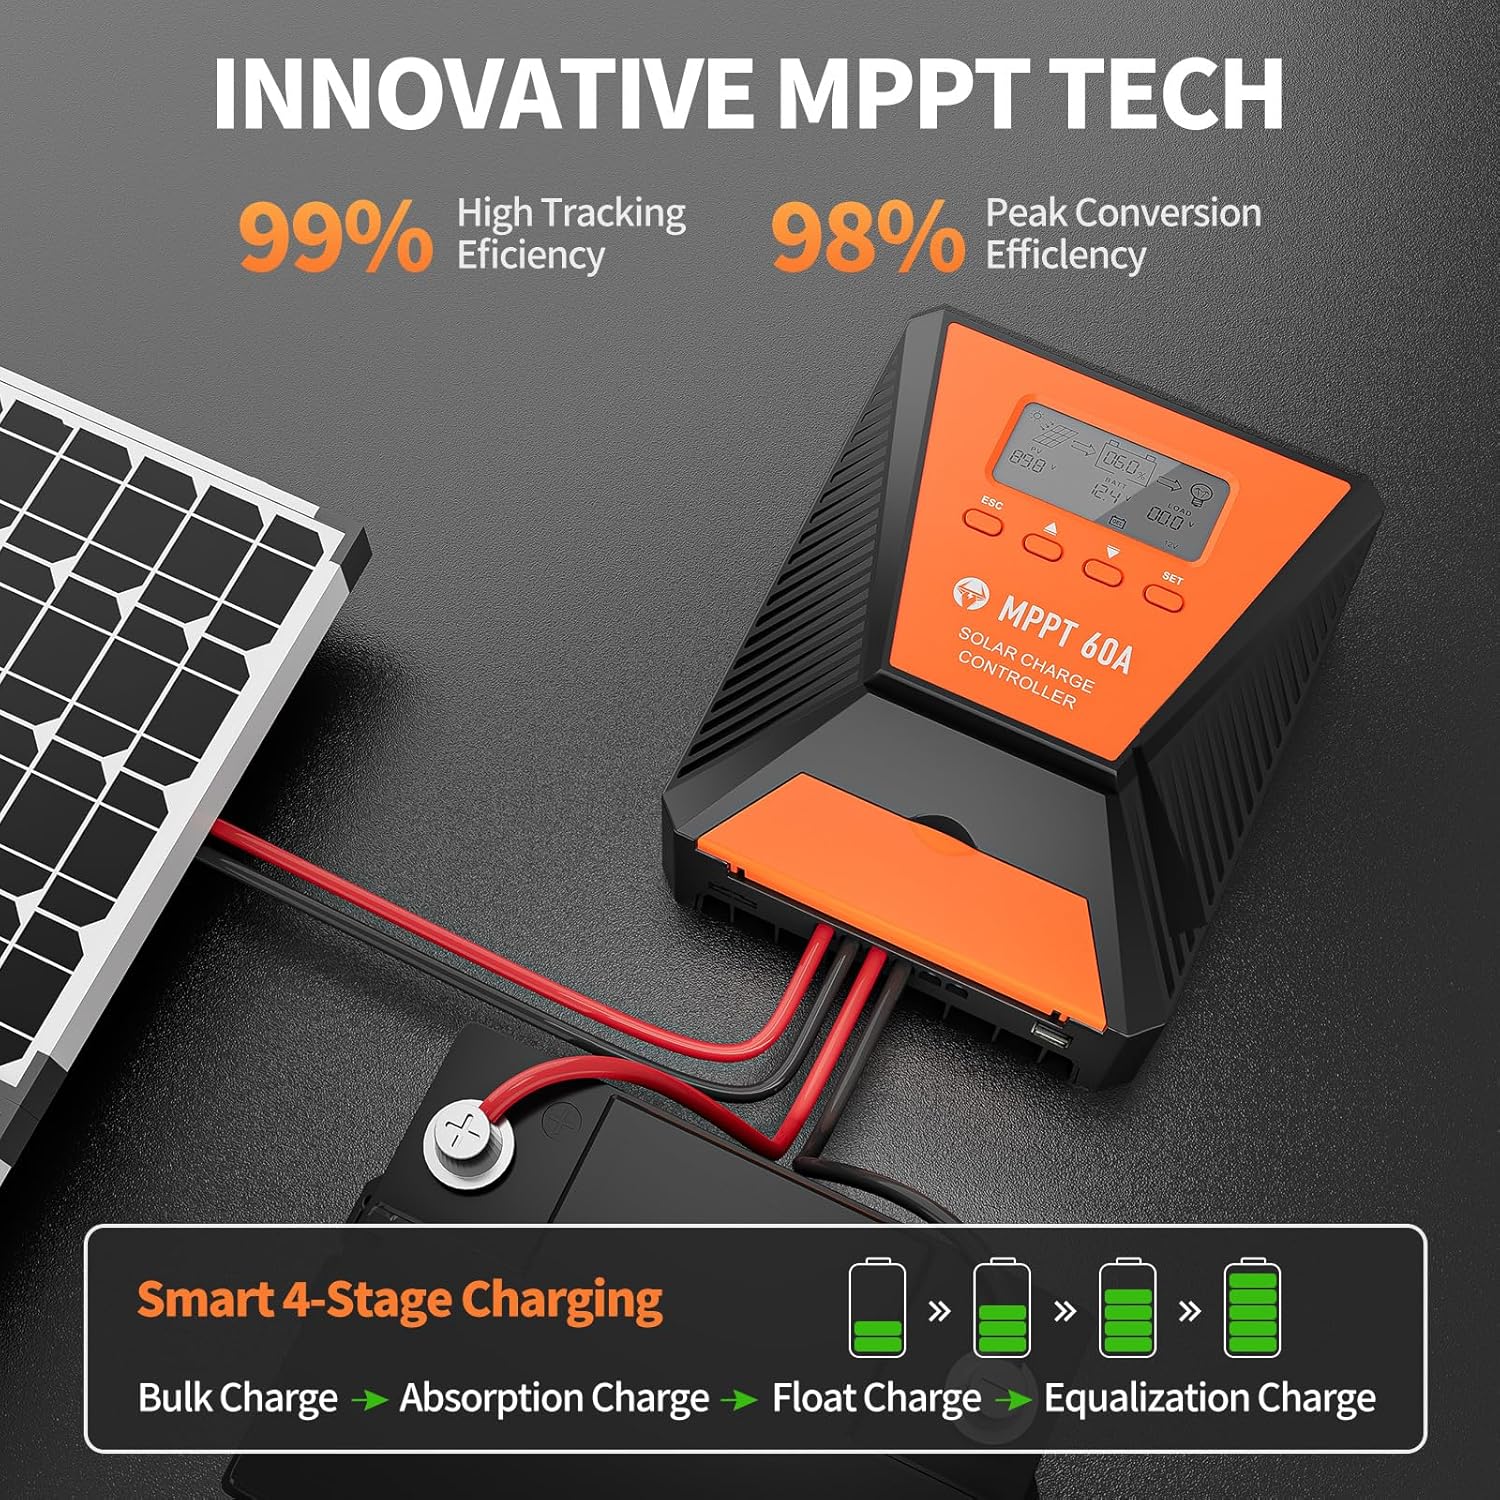
Image 6: The controller features 99% high tracking efficiency and 98% peak conversion efficiency, along with a smart 4-stagusoro nchaji.
Nchaji USB:
The controller includes dual USB ports for charging electronic devices. These ports provide 5V DC output.
7. Nlekọta
Regular maintenance ensures optimal performance and extends the lifespan of your solar charge controller and battery system.
- Lelee njikọ: Periodically inspect all wiring connections for tightness and corrosion.
- Onye njikwa dị ọcha: Keep the controller clean and free from dust and debris. Use a dry cloth for cleaning.
- Igwe ikuku: Ensure the installation area remains well-ventilated to prevent overheating. The controller is designed with a metal case and dual high-speed intelligent fans for enhanced heat dissipation.
- Nyocha batrị: Soro ntuziaka mmezi nke onye nrụpụta maka ụdị batrị gị kpọmkwem.
- Nkwụghachi okpomọkụ: The controller features a temperature compensation function that automatically adjusts charging and discharging parameters to prolong battery life.
8. Nchọpụta nsogbu
If you encounter issues with your controller, refer to the LCD display for error codes and consult the following common troubleshooting steps:
- Enweghị Ngosipụta: Check battery connections and ensure the battery has sufficient voltage.
- Enweghị chaja: Verify solar panel connections and ensure adequate sunlight. Check for any fault indications on the LCD.
- Ibu Anaghị arụ ọrụ: Check load connections and ensure the load is within the controller's rated capacity. Verify load timer settings.
- Koodu mperi: The LCD display will show specific error codes for various issues (e.g., overvoltage, na -agbadatage, overtemperature, short circuit). Refer to the controller's internal error code list (if provided in a separate document) for detailed explanations and solutions.
The controller incorporates 9 intelligent protection features to safeguard your system:
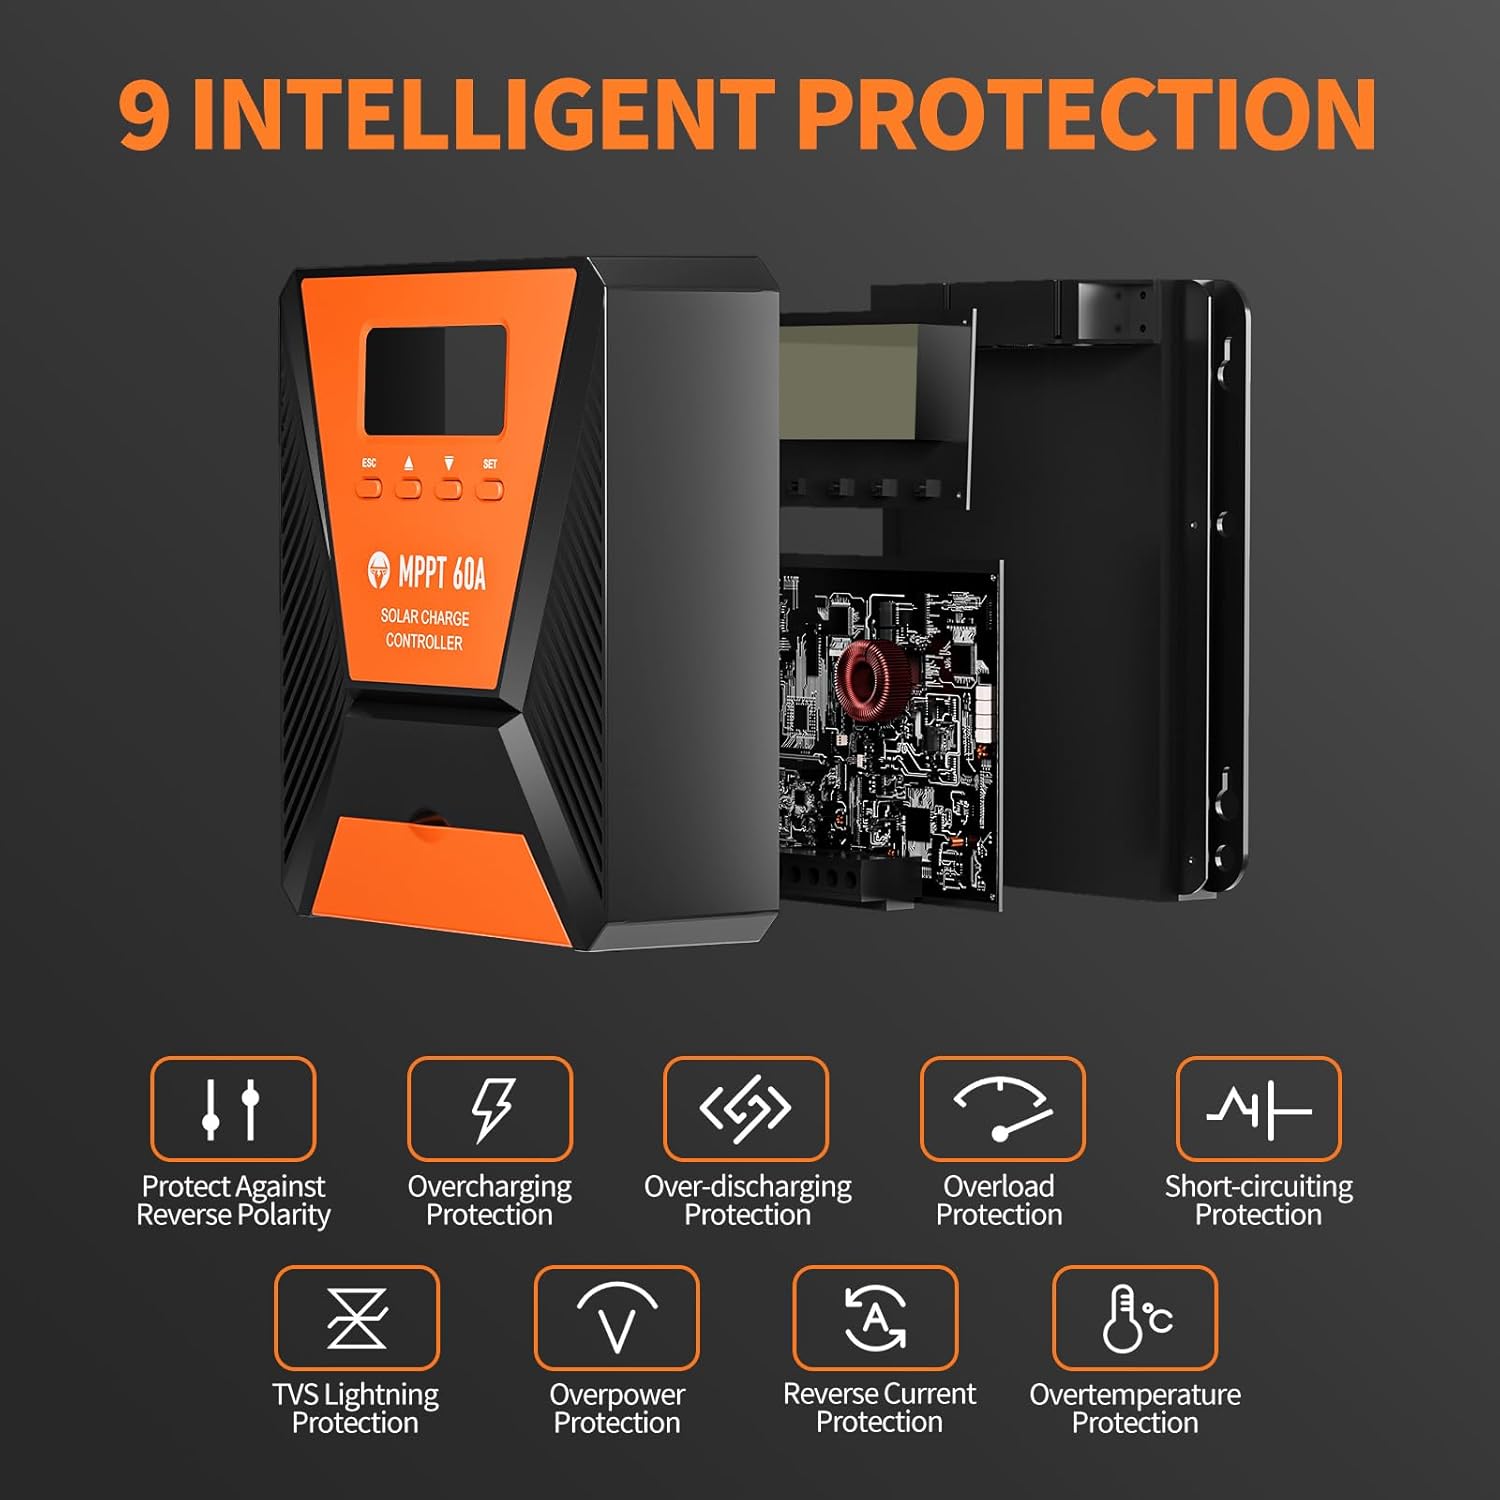
Image 7: The controller provides 9 intelligent protection features, including protection against reverse polarity, overcharging, over-discharging, overload, short-circuiting, TVS lightning, overpower, reverse current, and overtemperature.
9. Nkọwapụta
| Njirimara | Nkọwapụta |
|---|---|
| Nlereanya | 40A |
| Ụdị | TOPBULL |
| Sistemụ Voltage | 12V/24V Automatic Recognition |
| Ịrụpụta arụmọrụ | > 99% |
| Arụmọrụ Mgbanwe Kasị Elu | Kachasị 98% |
| Ụdị batrị dakọtara | FLD, LiFePO4, SLD, GEL, AGM |
| Ihe ntinye kacha PV Voltage | 100V DC |
| Max Solar Input Power (12V System) | 720W |
| Max Solar Input Power (24V System) | 1440W |
| USB mmepụta | Dual USB Ports, 5V DC |
| Ụdị ngosi | LCD |
| Akụkụ (Ngwugwu) | 23.6 x 22.1 x 10.59 cm |
| Ibu (Ngwugwu) | 1.25 n'arọ |
| Ngwa gụnyere | Ịkwanye kposara |
10. Akwụkwọ ikike na nkwado
TOPBULL is committed to providing professional technical support. If you have any questions or require assistance with your MPPT solar charge controller, please contact our customer service. We strive to meet your needs and provide the best possible support.