
1. Ozi nchekwa dị mkpa
Please read all instructions carefully before using the Inventum Mini Oven. Retain this manual for future reference.
- Always place the appliance on a stable, heat-resistant surface, away from walls and other appliances to ensure proper ventilation.
- Do not touch hot surfaces. Use oven mitts or gloves when handling hot components or food.
- Hụ na eriri ọkụ eletrik ahụ emebighị ma ọ dị mfe ịpụ n'ebe ọkụ na-ekpo ọkụ.
- Ejila ngwa, eriri, ma ọ bụ nkwụnye n'ime mmiri ma ọ bụ ihe mmiri ndị ọzọ.
- Nleba anya dị mkpa mgbe ụmụaka na-eji ngwa ọ bụla ma ọ bụ nso.
- Kpupu na ntinye mgbe ejighị ya na tupu ihicha. Kwe ka ọ dị jụụ tupu ịtinye ma ọ bụ wepụ akụkụ.
- Ejila ngwa ọ bụla nwere eriri ma ọ bụ plọg mebiri emebi rụọ ọrụ, ma ọ bụ mgbe ngwa ahụ dara ma ọ bụ mebie n'ụzọ ọ bụla.
- Do not use accessories or attachments not recommended by the manufacturer, as this may cause injuries.
- Do not place any of the following materials in the oven: paper, cardboard, plastic, or similar flammable materials.
- Exercise extreme caution when removing trays or disposing of hot grease.
2. Ngwaahịa gafereview na akụrụngwa
The Inventum Mini Oven is designed for versatile cooking, including baking, frying, and roasting. Familiarize yourself with its components for optimal use.

Foto 2.1: The Inventum Mini Oven with its door open, displaying chicken pieces, sliced vegetables, and french fries on its internal trays.

Foto 2.2: N'ihu view of the Inventum Mini Oven, showcasing its compact design and the food items arranged on the internal racks.
Ngwa gụnyere:
- Isi ngalaba: The primary oven body with a 12-liter capacity, touch control panel, and viewwindow.

Foto 2.3: Akụkụ view of the Inventum Mini Oven, highlighting its sleek black and stainless steel exterior.
- Ogwe njikwa: Touch-sensitive interface for setting temperature, time, and selecting cooking programs.
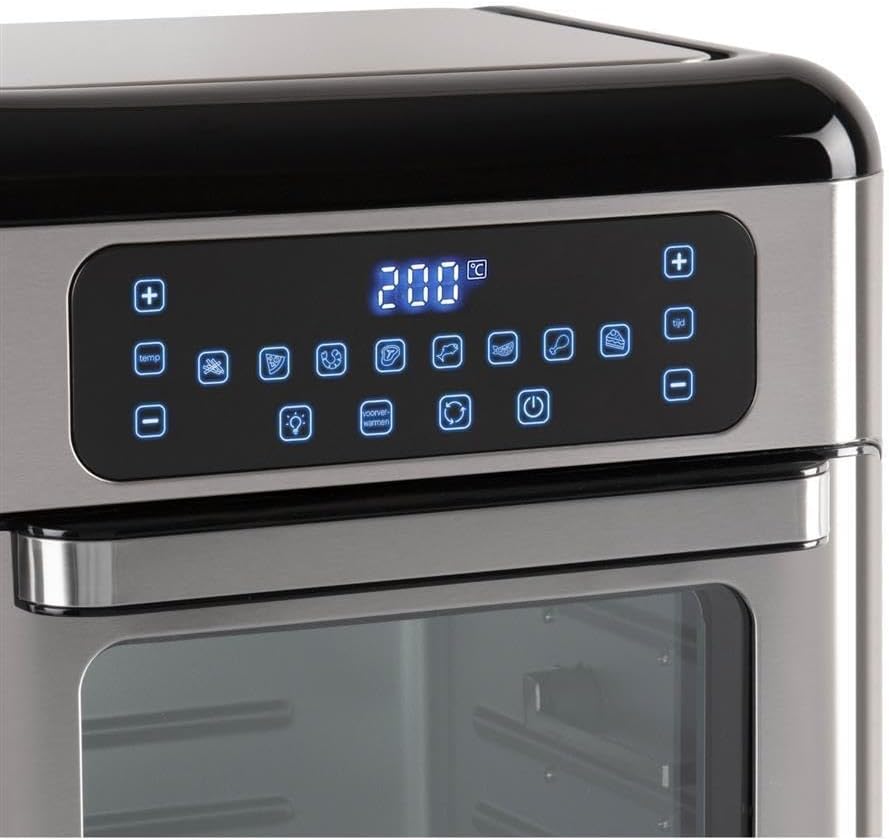
Foto 2.4: Zuru ezu view of the touch control panel with digital display and various function icons.
- Baking Shelves (Perforated Trays): Two perforated trays for air frying and baking, allowing for even heat circulation.

Foto 2.5: Two perforated baking trays, ideal for air frying and ensuring crispy results.
- Crumb Tray (Solid Baking Tray): A solid tray designed to catch crumbs and drips, also suitable for baking.

Foto 2.6: A solid baking tray, which also functions as a crumb tray to collect food debris.
- Rotisserie Basket: A mesh basket for tumbling smaller items like fries or nuts during rotisserie cooking.

Foto 2.7: The rotisserie mesh basket, designed for even cooking of smaller food items.
- Rotisserie Spit and Handle: Maka ịgba ọkụkọ dum ma ọ bụ anụ ka ukwuu.

Foto 2.8: The rotisserie spit with forks and the removal handle for safe handling.
- Akwụkwọ ntuziaka onye ọrụ: Akwụkwọ a.
3. Ntọala na ojiji mbụ
3.1 Nwepu
- Wepu ihe nkwakọ ngwaahịa niile, akwụkwọ mmado, na akara n'ime ngwa ahụ.
- Check that all listed components are present and undamaged.
3.2 Ntinye
- Place the mini oven on a flat, stable, and heat-resistant surface.
- Ensure there is at least 10 cm (4 inches) of clear space on all sides of the oven for proper ventilation.
- Do not place the oven near flammable materials or under wall cabinets.
3.3 Nhicha tupu ojiji mbụ
- Jiri mgbasa ozi hichaa mpụta ovenamp akwa .
- Wash all removable accessories (baking shelves, crumb tray, rotisserie basket, spit) in warm, soapy water. Rinse thoroughly and dry completely.
- Insert the crumb tray at the very bottom of the oven.
3.4 Ọkụ mbụ
Before cooking food, it is recommended to run the oven empty for approximately 15 minutes to burn off any manufacturing residues.
- Tinye eriri ọkụ n'ime oghere eletrik gbadoro ụkwụ.
- Set the temperature to 200°C (390°F) and the timer to 15 minutes.
- A slight odor or smoke may be present during this initial use; this is normal. Ensure the area is well-ventilated.
- After 15 minutes, turn off the oven and unplug it. Allow it to cool completely before proceeding.
4. Ntuziaka ọrụ
4.1 Ogwe njikwa gafereview
The Inventum Mini Oven features an intuitive touch control panel. Refer to Figure 2.4 for a visual guide.
- Bọtịnụ ike: Na-agbanyụ/gbanyụọ oven ahụ.
- Njikwa Okpomọkụ (+/-): Na-edozi okpomọkụ nri.
- Njikwa Oge (+/-): Adjusts the cooking duration.
- Nhọrọ mmemme: Icons representing 8 pre-set cooking programs (e.g., fries, chicken, fish, steak, cake, pizza, toast, dehydrate).
- Bọtịnụ ọkụ: Turns the internal oven light on/off.
- Convection Fan Button: Activates/deactivates the convection fan for even cooking.
- Bọtịnụ Rotisserie: Activates/deactivates the rotisserie function.
4.2 Basic Arụmọrụ
- Kwadebe nri: Place your food on the appropriate accessory (baking shelf, crumb tray, rotisserie basket, or spit).
- Fanye ngwa: Carefully slide the accessory with food into the desired rack position inside the oven. Ensure the crumb tray is always at the bottom.
- Ọnụ ụzọ mechie: Mechie ọnụ ụzọ oven nke ọma.
- Ike Na: Pịa bọtịnụ Ike. Ngosipụta ahụ ga-enwu.
- Select Program or Manual Settings:
- Pre-set Program: Touch one of the 8 program icons. The oven will automatically set a recommended temperature and time.
- Ntọala akwụkwọ ntuziaka: Use the Temperature (+/-) buttons to set the desired temperature and the Time (+/-) buttons to set the cooking duration.
- Malite isi nri: The oven will typically start automatically after a few seconds of setting the time/temperature or selecting a program. Some models may require pressing the Power button again to start.
- Nyochaa isi nri: Use the internal light button to check on your food without opening the door.
- Ọgwụgwụ isi nri: The oven will beep when the timer expires and automatically turn off the heating elements.
- Wepu nri: Carefully open the oven door. Using oven mitts, remove the cooked food and accessories. Be aware of hot steam.
- Gbanyụọ: Press the Power button to turn off the oven completely, then unplug it from the wall outlet.
4.3 Using the Rotisserie Function
The rotisserie function is ideal for even cooking of whole chickens or other roasts using the rotisserie spit, or for items like fries using the rotisserie basket.
- Kwadebe nri:
- For Spit: Skewer the food (e.g., whole chicken) onto the rotisserie spit, securing it with the forks. Ensure the food is centered and balanced.
- For Basket: Place smaller items like fries or vegetables into the rotisserie basket and secure the lid.
- Insert Rotisserie: Carefully insert the rotisserie spit or basket into the designated rotisserie slots inside the oven. Ensure it is properly seated and can rotate freely.
- Nhazi Usoro Nri: Tọọ okpomọkụ na oge achọrọ site na iji njikwa njikwa.
- Activate Rotisserie: Press the Rotisserie button on the control panel. The rotisserie mechanism will begin to rotate.
- Malite isi nri: Begin the cooking cycle as described in "4.2 Basic Operation".
- Wepu nri: Once cooking is complete, use the rotisserie handle (Figure 2.8) to carefully lift and remove the hot rotisserie assembly from the oven. Place it on a heat-resistant surface before removing the food.
5. Nlekọta na nhicha
Regular cleaning and maintenance will ensure the longevity and optimal performance of your Inventum Mini Oven.
5.1 Nhicha izugbe
- Mgbe niile, gbanyụọ oven ahụ ma hapụ ya ka ọ jụọ oyi kpamkpam tupu e hichaa ya.
- Do not use abrasive cleaners, scouring pads, or harsh chemicals, as these can damage surfaces.
5.2 Na-ehicha ime ime
- The oven features a stainless steel interior, which is durable and easy to clean.
- Remove the crumb tray and all other accessories. Wash them in warm, soapy water, rinse, and dry.
- Jiri mgbasa ozi hichaa mgbidi dị n'imeamp cloth and a mild detergent. For stubborn stains, a non-abrasive oven cleaner designed for stainless steel can be used, following the product instructions.
- Jiri akwa dị ọcha hichaa nkụ.
5.3 Na-ehicha Mpụga
- Jiri nwayọ hichaa elu mpụta, damp akwa .
- For the control panel, use a slightly damp cloth and wipe gently. Do not spray water directly onto the control panel.
- Kpọọ nke ọma.
5.4 Mpekere crumb
- A ga-ekwocha ma hichaa tray iberibe ahụ mgbe niile iji gbochie mmụba nke mmanụ na ihe egwu ọkụ nwere ike ime.
- Slide out the crumb tray from the bottom of the oven, discard crumbs, and wash as described above.
6. Nchọpụta nsogbu
If you encounter issues with your Inventum Mini Oven, consult the following table before contacting customer support.
| Nsogbu | Ihe nwere ike ime | Ngwọta |
|---|---|---|
| Igwe ọkụ anaghị agbanwu. | A naghị etinye ya; ike gitage; ezighi ezi ntinye. | Hụ na e tinyere eriri ọkụ eletrik n'ime oghere na-arụ ọrụ nke ọma. Lelee ihe mgbochi sekit gị. |
| A naghị esi nri nke ọma. | Overcrowding; incorrect temperature/time; convection fan off. | Do not overcrowd the oven. Adjust temperature and time as needed. Ensure the convection fan is active for even cooking. Rotate food halfway through cooking. |
| Anwụrụ ọkụ ma ọ bụ isi ọkụ mgbe a na-arụ ọrụ. | Food residue on heating elements; crumb tray not cleaned; excessive grease. | Unplug and allow to cool. Clean the interior and crumb tray thoroughly. Ensure food is not touching heating elements. |
| Ọrụ Rotisserie anaghị arụ ọrụ. | Rotisserie not properly seated; function not activated. | Ensure the rotisserie spit/basket is correctly inserted into the drive slots. Press the Rotisserie button on the control panel to activate. |
| Ogwe njikwa anaghị anabata. | Igwe ọkụ eletrik na-adịru nwa oge; okwu ike. | Unplug the oven for 5 minutes, then plug it back in. If the issue persists, contact customer support. |
7. Nkọwapụta ngwaahịa
| Njirimara | Nkọwa |
|---|---|
| Ụdị | Ihe omume |
| Aha Nlereanya | GF1200HLD |
| Njirimara Pụrụ Iche | Oke kọmpat |
| Ụdị njikwa | Njikwa aka |
| Ngwa gụnyere | Baking shelves, crumb tray, user manual |
| Isi Iyi Ike | Eletriki |
| Mpụta ike | 1500W |
| Ike | 12 lita |
| Ngwa ime ime | Igwe anaghị agba nchara |
| Ibu Ibu | 2.2 pound |
| GTIN | 08712876094305 |
8. Akwụkwọ ikike na nkwado ndị ahịa
8.1 Ozi akwụkwọ ikike
Inventum products are manufactured to high-quality standards. For specific warranty details regarding your Inventum Mini Oven (Model GF1200HLD), please refer to the warranty card included with your purchase or visit the official Inventum websaịtị. Debe ihe akaebe nke ịzụrụ maka akwụkwọ ikike.
8.2 Nkwado ndị ahịa
If you have any questions, require technical assistance, or need to report a problem with your appliance, please contact Inventum customer support. Contact information can typically be found on the official Inventum websaịtị ma ọ bụ na nkwakọ ngwaahịa.
When contacting support, please have your product model number (GF1200HLD) and purchase date available.