
Splenssy Intelligent Soil Detector
Splenssy 6-in-1 Soil Tester User Manual
Ụdị: Ihe nchọpụta ala nwere ọgụgụ isi
Akara: mara mma
Okwu mmalite
The Splenssy 6-in-1 Soil Tester is a versatile tool designed to help you monitor the health of your soil and optimize plant growth. This device provides accurate readings for six key parameters: soil moisture, fertility, pH level, temperature, ambient humidity, and light intensity. Its 90-degree rotatable display and backlit LCD ensure clear readability in various conditions.
Understanding these soil conditions is crucial for effective gardening, whether for indoor plants, outdoor gardens, lawns, or farms. This manual provides detailed instructions for setting up, operating, and maintaining your soil tester to ensure accurate and reliable results.

Image: The Splenssy 6-in-1 Soil Tester, illustrating its multi-functional capabilities and rotatable display for easy viewing.
Ozi nchekwa na akpachapụ anya
- Do not insert the metal probe into very hard soil or other hard objects to prevent damage to the probe.
- This product is designed exclusively for testing soil. Do not use it for testing pure water or other liquids.
- Avoid leaving the probe inserted in soil for extended periods to prevent corrosion and maintain data accuracy.
- Always clean the probe thoroughly after each use to ensure it remains in a clean state.
- Soil test data may vary at different depths. For best results, take multiple readings and average the data.
- When testing soil fertility or pH, ensure the soil is moist.
Ihe ngwugwu
Biko lelee ngwungwu maka ihe ndị a:
- 1 x Splenssy 6-in-1 Soil Tester
- Akwụkwọ ntuziaka onye ọrụ 1 x (akwụkwọ a)
Note: 2 x AAA batteries are required and are not included in the package.
Ngwaahịa gafereview
Familiarize yourself with the components of your Splenssy 6-in-1 Soil Tester:
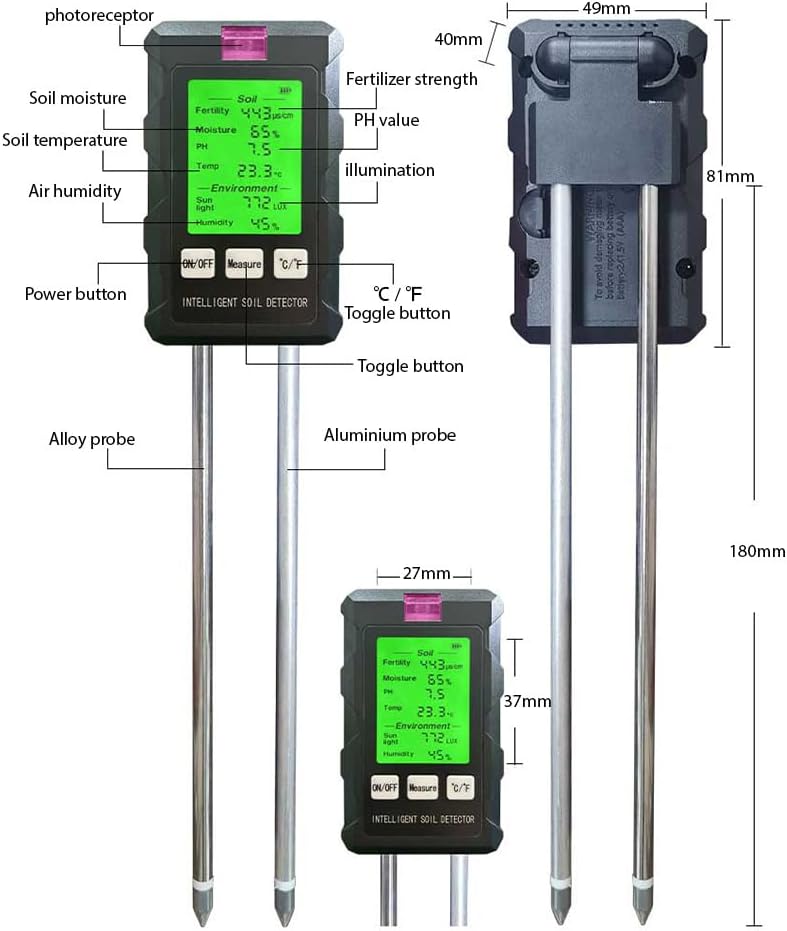
Image: Detailed diagram of the soil tester, indicating the location and function of its various parts, including probes, display, and buttons.
- Ngosipụta ihuenyo: Backlit LCD for clear readings of all parameters.
- Bọtịnụ ngbanwu/ Gbanyụọ: Na-agbanye ngwaọrụ ahụ ma ọ bụ gbanyụọ.
- Measure Button: Initiates a measurement cycle.
- bọtịnụ Celsius C/F: Toggles temperature units between Celsius and Fahrenheit.
- Photoreceptor: Sensor for detecting light intensity.
- Alloy Probe: Used for various soil measurements.
- Aluminium Probe: Used for various soil measurements.
- Akụkụ batrị: Located at the back, requires 2 AAA batteries.
Melite
1. Ntinye batrị
- Chọta ebe batrị dị n'azụ ngwaọrụ.
- Mepee mkpuchi batrị.
- Fanye batrị AAA 2, na-ahụ polarity ziri ezi (+/-).
- Mechie mkpuchi batrị nke ọma.

Image: The battery compartment of the soil tester, illustrating where to insert the AAA batteries.
2. Initial pH Calibration (Optional but Recommended)
For optimal pH accuracy, perform a 0-point calibration:
- Thoroughly clean the probe.
- Press and hold the "Measure" button until the soil indicator light illuminates.
- Once the flashing stops, release the "Measure" button to complete the pH 0 calibration.
Ntuziaka ọrụ
General Measurement Steps:
- Ike Na: Press the "ON/OFF" button to turn on the device. The backlit LCD will illuminate.
- Kwadebe Ala: Ensure the soil is moist enough for accurate readings, especially for pH and fertility tests. Remove any large debris or rocks from the testing area.
- Fanye nyocha: Gently insert the metal probes vertically into the soil to the desired depth (approximately 7.1 inches or 180mm, up to the base of the plastic housing). Avoid forcing the probes into hard soil.
- Take Reading: Press the "Measure" button. The device will display readings for all six parameters within approximately 3 seconds.
- Gụọ data: Observe the values on the backlit display. The display can be rotated 90 degrees for easier viewing.
- Wepu Nyocha: Carefully withdraw the probes from the soil.
- Nyocha dị ọcha: Immediately clean the probes after use (see Maintenance section).
- Gbanyụọ: Press the "ON/OFF" button to turn off the device, or it will automatically power off after a period of inactivity to conserve battery.
Specific Parameter Guidance:
Ntụle mmiri mmiri
The device displays soil moisture as a percentage (0-99%). Refer to the general measurement steps. Different plants have varying moisture requirements. The display provides a clear indication of current moisture levels.
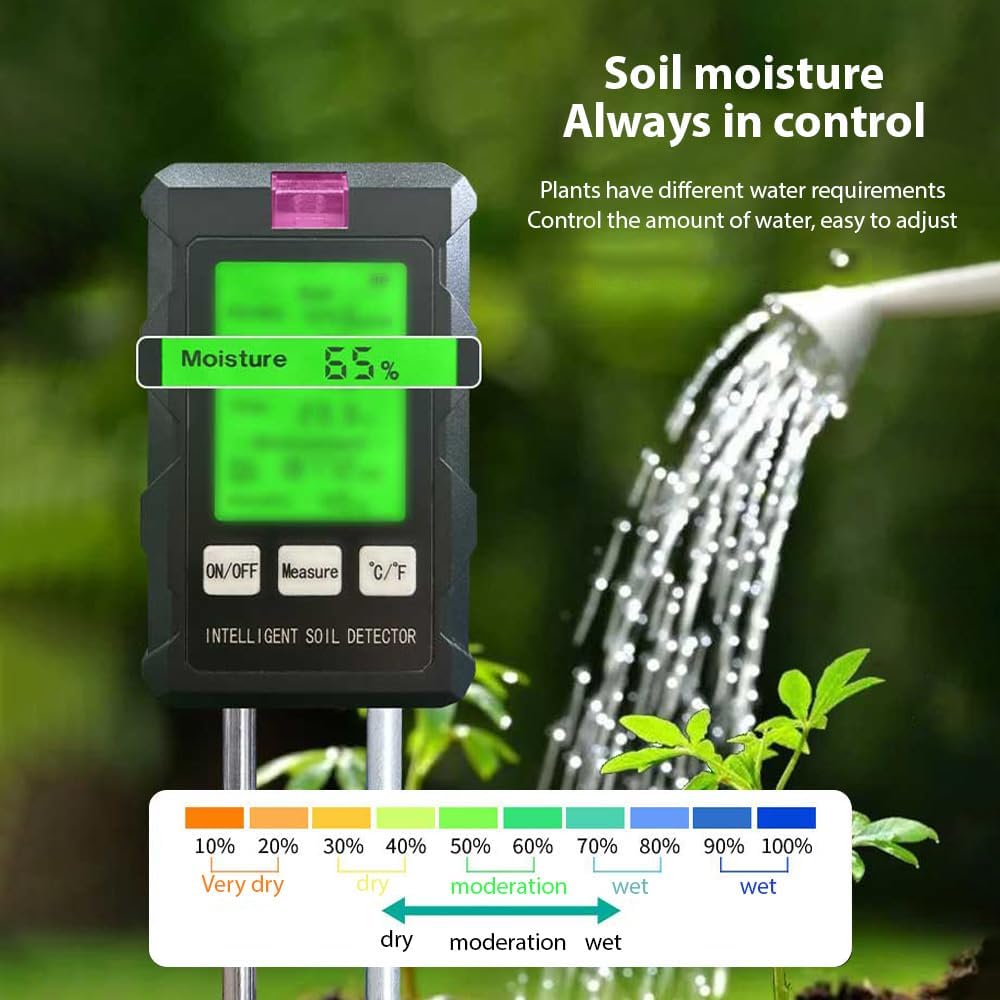
Image: The soil tester showing a moisture reading of 65%, accompanied by a color-coded scale indicating different moisture levels from dry to wet.
Fertility Measurement
The fertility reading helps assess nutrient levels in the soil. Ensure the soil is adequately moist for accurate fertility readings. Adjust fertilization based on the results to promote healthy plant growth.

Image: Comparison illustrating the impact of soil fertility on plant health, with the tester indicating optimal conditions for growth.
Ntụle pH
The pH value (3.5-9) indicates the acidity or alkalinity of the soil. Ensure the soil is moist for accurate pH readings. If you performed the optional pH calibration during setup, your readings will be more precise.
Nleba okpomọkụ
The device measures soil temperature (0-50°C / 32-122°F). Use the "°C/°F" button to switch between Celsius and Fahrenheit units as preferred.
Ntụle iru mmiri
This refers to the ambient humidity around the device, displayed as a percentage (0-99%).
Ntụle ọkụ
The photoreceptor on the device measures ambient light intensity (0-100000 LUX). Position the device to ensure the photoreceptor is exposed to the light conditions you wish to measure.
Nlekọta
Cleaning the Probes:
- After each use, gently wipe the metal probes with a clean, damp cloth to remove any soil residue.
- Ensure the probes are completely dry before storing the device.
- Do not use abrasive cleaners or immerse the main body of the device in water.
Nchekwa:
- Store the soil tester in a cool, dry place, away from direct sunlight and extreme temperatures.
- Ọ bụrụ na a gaghị eji ngwaọrụ ahụ ruo ogologo oge, wepụ batrị ndị ahụ iji gbochie mmiri ịpụpụta.
Nchọpụta nsogbu
| Nsogbu | Ihe nwere ike ime | Ngwọta |
|---|---|---|
| Ngwaọrụ anaghị agbanwu ọkụ. | Batrị anwụọla ma ọ bụ etinyeghị ya nke ọma. | Lelee polarity batrị; dochie ya na batrị AAA ọhụrụ. |
| Inaccurate or fluctuating readings. | Probes are dirty; soil is too dry; probe damaged; multiple readings not averaged. | Clean probes thoroughly; moisten soil before testing; ensure probes are not damaged; take multiple readings and average. |
| Probe difficult to insert into soil. | Soil is too hard or compacted. | Do not force the probe. Loosen the soil gently before insertion, or choose a softer testing spot. |
| Ngosipụta adịchaghị njọ ma ọ bụ enweghị ọgụgụ. | Low battery; extreme lighting conditions. | Replace batteries; use the backlit feature in low light; avoid direct harsh sunlight on the display. |
Nkọwapụta
| Oke | Oke |
|---|---|
| Mmiri | 0-99% |
| pH | 3.5-9 |
| Okpomọkụ | 0-50 Celsius C / 32-122 °F |
| Sunlight (Illumination) | 0-100000 Lux |
| Humidity (Ambient) | 0-99% |
| Batrị | Batrị 2 x AAA (agunyeghi ya) |
| Nha ngwaahịa | 49 x 40 x 81 mm (1.9 x 1.6 x 3.2 inch) |
| Ogologo nyocha | 180 mm (7.1 sentimita asatọ) |
| Ibu Ibu | 5.1 ounces |
Akwụkwọ ikike na nkwado
For warranty information or technical support, please refer to the documentation provided with your purchase or contact Splenssy customer service directly. Contact details can typically be found on the product packaging or the official Splenssy websaịtị.
Ask a question about this manual
Ask about setup, troubleshooting, compatibility, parts, safety, or missing instructions. Manuals+ will review the question and use this page’s manual context to help answer it.