
Okwu mmalite
This manual provides essential information for the installation, operation, and maintenance of your KICKER CXA400.1 Mono Class D Car Amplifier and CXARC Remote Bass Control. Please read this manual thoroughly to ensure proper use and to achieve optimal performance from your audio system.

Foto: Top view of the KICKER CXA400.1 Mono Class D Car Ampna -emegharị ihe.
The KICKER CXA400.1 amplifier is designed for efficient power delivery to subwoofers, featuring a Class-D power plant and a compact design. The KICKER CXARC remote control allows for convenient adjustment of bass levels.
Ozi nchekwa
Always observe the following safety precautions when installing and operating your ampntughari:
- Disconnect the vehicle's battery negative terminal before making any electrical connections.
- Gbaa mbọ hụ na agbajichara wiwi niile nke ọma ma chekwaa ya ka ọ gbochie mmebi ma ọ bụ sekit dị mkpụmkpụ.
- Jiri waya ndị kwesịrị ekwesị maka nha nha na waya ala dịka akọwapụtara na ngalaba nrụnye.
- Zere ịkwanye ihe amplifier in locations exposed to excessive heat, moisture, or vibration.
- Arụla ọrụ ahụ amplifier if it is damaged or malfunctioning. Refer to the troubleshooting section or contact KICKER support.
- Prolonged exposure to high sound pressure levels can cause permanent hearing loss. Use caution when adjusting volume levels.
Ihe ngwugwu
Chọpụta na ihe niile dị na ngwugwu gị:
- KICKER CXA400.1 Mono Class D Car Ampna -emegharị ihe
- KICKER CXARC Remote Bass Control
- Mounting Hardware (screws, vertical mounting brackets)
- Akwụkwọ ntuziaka onye nwe (akwụkwọ a)
Ntọala na nwụnye
Proper installation is crucial for optimal performance and safety. If you are unsure about any part of the installation process, consult a professional installer.
Ịkwanye ahụ Ampna -emegharị ihe
The CXA400.1 amplifier features a compact design and includes vertical mounting hardware for flexible installation options. Choose a location that is dry, well-ventilated, and protected from direct sunlight or excessive heat. Ensure there is sufficient space around the amplifier maka ikuku mgbasa.
Njikọ waya
All wiring should be done with the vehicle's battery disconnected. Use high-quality power, ground, and speaker wires of appropriate gauge.

Foto: View of the KICKER CXA400.1 amplifier showing RCA input/output and control panel.
- Njikọ ike: Connect the main power wire from the battery (with an inline fuse) to the amplifier's +12V terminal.
- Njikọ ala: Connect a short, heavy-gauge ground wire from the amplifier's GND terminal to a clean, bare metal point on the vehicle's chassis.
- Gbanwuo ime anya: Jikọọ amplifier's REM terminal to the remote turn-on output of your head unit.
- Ihe nrịbama ntinye: The CXA400.1 accepts both low-level (RCA) and high-level (speaker wire) input signals. It can accept up to 40 volts of speaker-level input, eliminating the need for line-out converters in many cases. Connect your head unit's RCA outputs to the amplifier's INPUT terminals for low-level input, or use the high-level input if your head unit does not have RCA outputs.
- Mpụta okwu: Jikọọ subwoofer(s) gị na amplifier's speaker output terminals. Ensure correct polarity.

Foto: Akụkụ view of the KICKER CXA400.1 amplifier showing power, ground, remote, and speaker terminals.
Ntọala mbụ
After all connections are made, reconnect the vehicle's battery. Before playing audio, set the amplifier's gain control to its minimum position. Adjust other settings like crossover and bass boost as needed for your specific audio setup.
Na-arụ ọrụ Amplifier and Bass Knob
The KICKER CXA400.1 amplifier offers several adjustable features to fine-tune your audio experience. The CXARC remote bass control provides convenient real-time adjustments.
Nweta njikwa
Njikwa uru dabara na amplifier's input sensitivity to the output level of your head unit. Start with the gain at minimum and slowly increase it until you hear distortion, then back off slightly. This ensures maximum clean signal from your head unit.
Ntọala crossover
Nke amplifier features a variable 12dB low-pass crossover (50Hz–200Hz). This filter allows only frequencies below the set point to pass to the subwoofer, preventing higher frequencies from reaching it and improving overall sound clarity. Adjust this to blend smoothly with your main speakers.
Subsonic Myọcha
A 24dB/octave subsonic filter set at 25Hz helps protect your subwoofer by removing extremely low, inaudible frequencies that can cause excessive cone excursion and potential damage. It also improves efficiency by preventing the amplifier from wasting power on these frequencies.
KickEQ Bass Boost
The KickEQ offers a variable 0-6dB bass boost centered at 40Hz. Use this feature to enhance low-frequency response. Adjust carefully to avoid distortion and speaker damage.
CXARC Remote Bass Control
The CXARC remote bass control connects to your CXA400.1 amplifier and allows you to adjust the bass level conveniently from the driver's seat. This provides on-the-fly control over your subwoofer's output without needing to access the amplifier ozugbo.
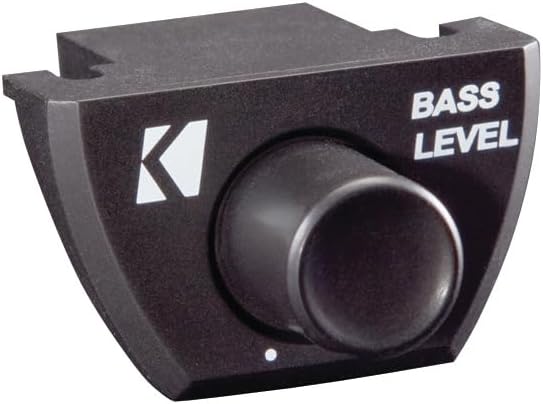
Image: The KICKER CXARC Remote Bass Control knob.
Nlekọta
Your KICKER amplifier and bass knob require minimal maintenance to ensure long-lasting performance.
- Nhicha: Na-ehichapụkwa oge ụfọdụ amplifier and remote with a soft, dry cloth to remove dust and dirt. Do not use harsh chemicals or abrasive cleaners.
- Njikọ: Occasionally check all wiring connections to ensure they are secure and free from corrosion. Loose connections can lead to poor performance or damage.
- Igwe ikuku: Gbaa mbọ hụ na amplifier's cooling fins are not obstructed to allow for proper heat dissipation.
Nchọpụta nsogbu
If you experience issues with your KICKER amplifier, rụtụ aka na nsogbu na azịza ndị a na-ahụkarị:
- Enweghị ike: Check the inline fuse on the power wire, ensure the ground connection is solid, and verify the remote turn-on wire is receiving 12V when the head unit is on.
- Enweghị ụda: Check all input and output connections. Ensure the gain is not set to minimum. Verify the head unit is sending an audio signal. Check speaker wires for shorts or open circuits.
- Ụda agbagọ: Reduce the gain setting. Check for proper crossover and bass boost settings. Ensure the input signal is not overdriven.
- Amplifa Ịkpo oke ọkụ: Gbaa mbọ hụ na ikuku ikuku zuru oke gburugburu amplifier. Check the impedance of your speakers; ensure it matches the ampike lifier.
- Remote Bass Knob Not Working: Check the connection cable between the CXARC and the amponye ndu. Gbaa mbọ hụ na ampa na-agbanye ọkụ.
If problems persist after checking these points, contact KICKER customer support.
Nkọwapụta
| Njirimara | Nkọwapụta |
|---|---|
| Mpụta ike (RMS) | 150x1 watts/ch at 4 Ohms, 300x1 watts/ch at 2 Ohms, 400x1 watts/ch at 1 Ohm |
| Nzaghachi ugboro ugboro | 25-200Hz |
| Ntinye uche | 250mV-10V (Low Level), 1V-40V (High Level) |
| Signgbaàmà-na-Noise ruru | > 95dB |
| Ihe Mgbasa Ozi Na-arụ Ọrụ | Lo-pass na-agbanwe agbanwe 50Hz–200Hz, 12dB/octave |
| Subsonic Myọcha | 25Hz @24dB/octave |
| KickEQ Boost | Variable 0-6dB @40Hz |
| Akụkụ | 8-1/8" x 5.9" x 17" (20.6cm x 15cm x 43cm) |
| Ibu Ibu | 5.3 pound |
| Nọmba nlereanya | KickerBDL240611-01 (Bundle) |
Akwụkwọ ikike
The KICKER CXA400.1 Amplifier and CXARC Bass Knob are covered by a Akwụkwọ ikike nke onye nrụpụta afọ 1. This warranty covers defects in materials and workmanship under normal use. Please retain your proof of purchase for warranty claims. For specific warranty terms and conditions, refer to the documentation included with your product or visit the official KICKER websaịtị.
Nkwado
For technical assistance, troubleshooting, or warranty inquiries, please contact KICKER customer support. You can find contact information and additional resources on the official KICKER website. When contacting support, please have your product model number (CXA400.1, CXARC) and proof of purchase readily available.
Gaa leta KICKER Store on Amazon maka ngwaahịa na ozi ndị ọzọ.


