1. Okwu mmalite
The DFRobot Basic Electronics Starter Kit (DFR0100-LITE) is designed for beginners to learn Arduino programming and explore the fundamentals of electronics. This kit includes an UNO R3 compatible board and a variety of components, along with detailed tutorials for 12 progressive projects. It is fully compatible with Arduino UNO R3 and the Arduino IDE.
2. Ozi nchekwa
Please read and understand the following safety guidelines before using the kit:
- Always ensure power is disconnected before making or changing circuit connections.
- Avoid touching live electrical components.
- Do not short-circuit components or power sources.
- Jiri nke ziri ezi voltage and current as specified in project instructions.
- Debe obere ihe n'ebe ụmụaka nọ iji gbochie ihe egwu ịkpagbu.
- If you are unsure about any step, consult the provided tutorials or seek assistance.
3. Ihe ngwugwu
The DFRobot Basic Electronics Starter Kit includes the following components:
- 1x DFRduino Uno R3 compatible board
- 1x Prototyping Shield for Arduino
- 18x Jumper Cables M/M (Male-to-Male)
- 20x Resistor 220R
- 9x5mm LED
- 1 x RGB LED
- 4x Mini Pushbutton Switch
- 2x Ambient Light Sensor
- 2x Tilt Switch Sensor
- 1 x onye na-agba
- 3x 10K Potentiometer
- 1 x eriri USB
Each component is individually packaged and labeled for easy identification.

Image: The DFRobot DFRduino UNO R3 compatible board, a central component of the kit.

Image: A selection of components included in the DFRobot Basic Electronics Starter Kit, showing resistors, LEDs, potentiometers, and a buzzer.
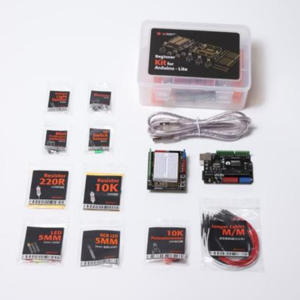
Image: Individually packaged components with clear labels for easy identification and organization.
4. Nhazi ntuziaka
Follow these steps to set up your DFRobot Basic Electronics Starter Kit:
- Download Arduino IDE: Gaa na Arduino gọọmentị websaịtị (https://www.arduino.cc/en/Main/Software) to download and install the Arduino Integrated Development Environment (IDE) on your computer.
- Connect the DFRduino Uno R3: Use the provided USB cable to connect your DFRduino Uno R3 board to your computer. The board is fully compatible with Arduino UNO R3.
- Wụnye ndị ọkwọ ụgbọala (ọ bụrụ na ọ dị mkpa): Your operating system may automatically install the necessary drivers. If not, refer to the Arduino IDE documentation for manual driver installation.
- Familiarize with Components: Take time to identify the various components in your kit. Each part is labeled to assist with this process.
- Access Tutorials: The kit includes 12 detailed, step-by-step tutorials. These tutorials provide clear wiring diagrams, sample code, and explanations for each project. You can find online tutorials at https://wiki.dfrobot.com/DFR0100_Lite_tutorial.

Foto: Ofeview of the DFRobot Arduino UNO R3 Starter Kit, highlighting the detailed tutorials provided.
5. Operating Instructions: Projects
The kit provides 12 progressive projects designed to teach fundamental electronics concepts. Each project builds upon previous knowledge, guiding you from simple circuits to more complex applications.
Project Examples:
- Ikanam na-egbuke egbuke: Learn basic output control.
- Interactive Traffic Lights: Understand sequential control and timing.
- Gesture-Controlled Light: Explore sensor input and conditional logic.
- Njikwa LED RGB: Master pulse-width modulation (PWM) for color mixing.
- DJ Station: Create interactive sound effects using inputs.
- And many more, covering various sensors and actuators.
Refer to the detailed tutorials for step-by-step instructions, wiring diagrams, and sample code for each project.
Vidiyo: Efereview of the DFRobot UNO R3 Starter Kit, demonstrating several of the 12 included projects, such as interactive traffic lights, gesture-controlled lights, and an RGB LED display. This video provides a visual introduction to the kit's capabilities and project examples.
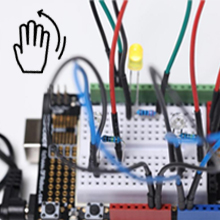
Image: A circuit demonstrating the gesture-controlled light project, where a hand movement triggers an LED.
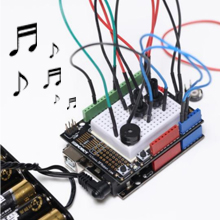
Image: A circuit setup for the DJ Station project, allowing users to create sounds by interacting with components.

Image: A circuit demonstrating the RGB LED project, showcasing color mixing capabilities.
6. Nlekọta
Proper maintenance ensures the longevity and functionality of your electronics kit:
- Nchekwa: Store all components in their original packaging or a dedicated storage box to prevent loss or damage. Keep them in a dry, cool place away from direct sunlight.
- Nhicha: Use a soft, dry cloth to clean the DFRduino board and other components. Avoid using liquids or abrasive cleaners.
- Ijikwa: Handle components, especially the DFRduino board, with care to avoid bending pins or damaging sensitive parts.
- Wires jumper: The 22-gauge thick jumper wires are designed for long-term use. Ensure they are not excessively bent or strained.
7. Nchọpụta nsogbu
If you encounter issues while using the kit, consider the following troubleshooting steps:
- Nyochaa waya: Double-check all wiring connections against the provided diagrams in the tutorials. Incorrect wiring is a common cause of problems.
- Code Verification: Ensure your code is correctly uploaded to the DFRduino board and matches the sample code provided in the tutorials. Verify that the correct board and port are selected in the Arduino IDE.
- Ịnye ọkụ: Confirm that the DFRduino board is receiving adequate power, either via USB or an external power source (if applicable for your project).
- Ọrụ akụrụngwa: If a specific component is not working, try testing it in a simpler circuit or replacing it with a known working component if available.
- Okwu ngwanrọ: Restart the Arduino IDE and your computer. Reinstalling the Arduino IDE or drivers might resolve software-related problems.
For further assistance, refer to the DFRobot technical support information in the "Support" section.
8. Nkọwapụta
| Njirimara | Nkọwa |
|---|---|
| Ụdị | DFROBOT |
| Aha Nlereanya | DFRobot Beginner Kit For Arduino-Lite |
| Nọmba nlereanya | DFR0100-LITE |
| Teknụzụ Njikọta | USB |
| Ngwa dakọtara | Arduino UNO R3 |
| Akara nhazi | Atmel |
| Sistemụ nrụọrụ | Linux (Compatible with various OS for Arduino IDE) |
| Mgbakọta ọdụ ụgbọ mmiri USB | 2 |
| Ngwa gụnyere | DFRobot Beginner Kit For Arduino-Lite (83 components) |
9. Akwụkwọ ikike Ozi
This item can be returned in its original condition for a refund or replacement within 30 days of receipt. For any questions regarding warranty or returns, please contact DFRobot customer support.
10. Nkwado
For technical assistance or product inquiries, please contact DFRobot support:
- Email (Store): store@dfrobot.com
- Email (Technical Support): techsupport@lattepanda.com (Note: LattePanda is a related brand under DFRobot for technical support)
- Nkuzi Ntanetị: https://wiki.dfrobot.com/DFR0100_Lite_tutorial


