
1. Okwu mmalite
The Mastech MS8250D is a high-performance digital multimeter designed for accurate measurement of AC/DC voltage, AC/DC current, resistance, capacitance, frequency, and temperature. It features a 6600-count display, auto/manual ranging, True RMS, Non-Contact Voltage (NCV) detection, diode and continuity testing, and a USB interface for PC connectivity. This manual provides detailed instructions for safe and effective use of the device.
Akụkụ ndị bụ isi:
- 6600-count digital display
- Automatic and Manual Ranging
- Ezi RMS mmesho
- Onye na-akpọtụrụ Voltage (NCV) nchọpụta
- Diode and Continuity Tester (buzzer < 50Ω)
- MAX/MIN value recording
- Ọrụ Jide Data
- Gosipụta ọkụ azụ
- Gbanyụọ ike akpaaka
- Ụdị nlegharị anya
- Ngosipụta batrị dị ala
- USB Interface for Windows OS
2. Ozi nchekwa
Ịdọ aka ná ntị: To avoid electric shock or personal injury, and to avoid damage to the meter or to the equipment under test, read all safety information carefully before using the meter. This device complies with CE, RoHS, and UL safety standards.
- Always ensure the test leads are in good condition and properly connected.
- Etinyekwala ihe karịrị ogo voltage, dị ka akara na mita, n'etiti ọnụ ọnụ ma ọ bụ n'etiti ihe ọ bụla ọnụ na ala ala.
- Jiri nlezianya na-arụ ọrụ na voltages karịrị 30V AC RMS, 42V elu, ma ọ bụ 60V DC. Vol ndị atages na-ebute ihe egwu ujo.
- Before measuring current, ensure the circuit is de-energized and the meter is connected in series.
- Always disconnect the test leads from the circuit before changing functions or ranges.
- Do not use the meter if it appears damaged or if the case is open.
- Replace the battery as soon as the low battery indicator appears to ensure accurate readings.
- Adhere to the specified measurement categories (CAT III 1000V / CAT IV 600V) for safe operation.
3. Ngwaahịa gafereview
Familiarize yourself with the components of your Mastech MS8250D Digital Multimeter.

Foto nke 3.1: N'ihu view of the Mastech MS8250D Digital Multimeter, showing the display, function dial, and input jacks. The display shows "1.987 V", indicating a voltage measurement. The function dial is set to T-RMS. Input jacks are labeled for µA mA, A, VΩHz%, and COM.
Isi Components:
- Ngosipụta LCD: Na-egosi ngụ nha, nkeji na ihe ngosi ọrụ.
- Ịkpọ oku ọrụ: Used to select the desired measurement function (e.g., Voltage, Current, Resistance, Diode, Continuity, Temperature).
- Bọtịnụ ọrụ:
- Jidesie: Na-akpọchi ọgụgụ ngosi dị ugbu a.
- Dịgasị: Switches between auto and manual ranging.
- REL: Activates relative measurement mode.
- Oke/MIN: Records maximum and minimum values.
- FUNC: Selects sub-functions within a dial position (e.g., AC/DC, Diode/Continuity).
- T-RMS: (Indicated on dial) True RMS measurement.
- NCV: Onye na-akpọtụrụ Voltage nchọpụta.
- Bọtịnụ ọkụ azụ: Activates display backlight.
- Ntinye Jacks:
- COM: Common terminal for all measurements (negative lead).
- VΩHz%: Ntinye maka voltage, resistance, frequency, capacitance, and diode/continuity measurements (positive lead).
- µA mA: Input for microampere na milliampere current measurements (positive lead). Fused for protection.
- A: Ntinye maka ampere current measurements (positive lead). Fused for protection.
Ngwa gụnyere:
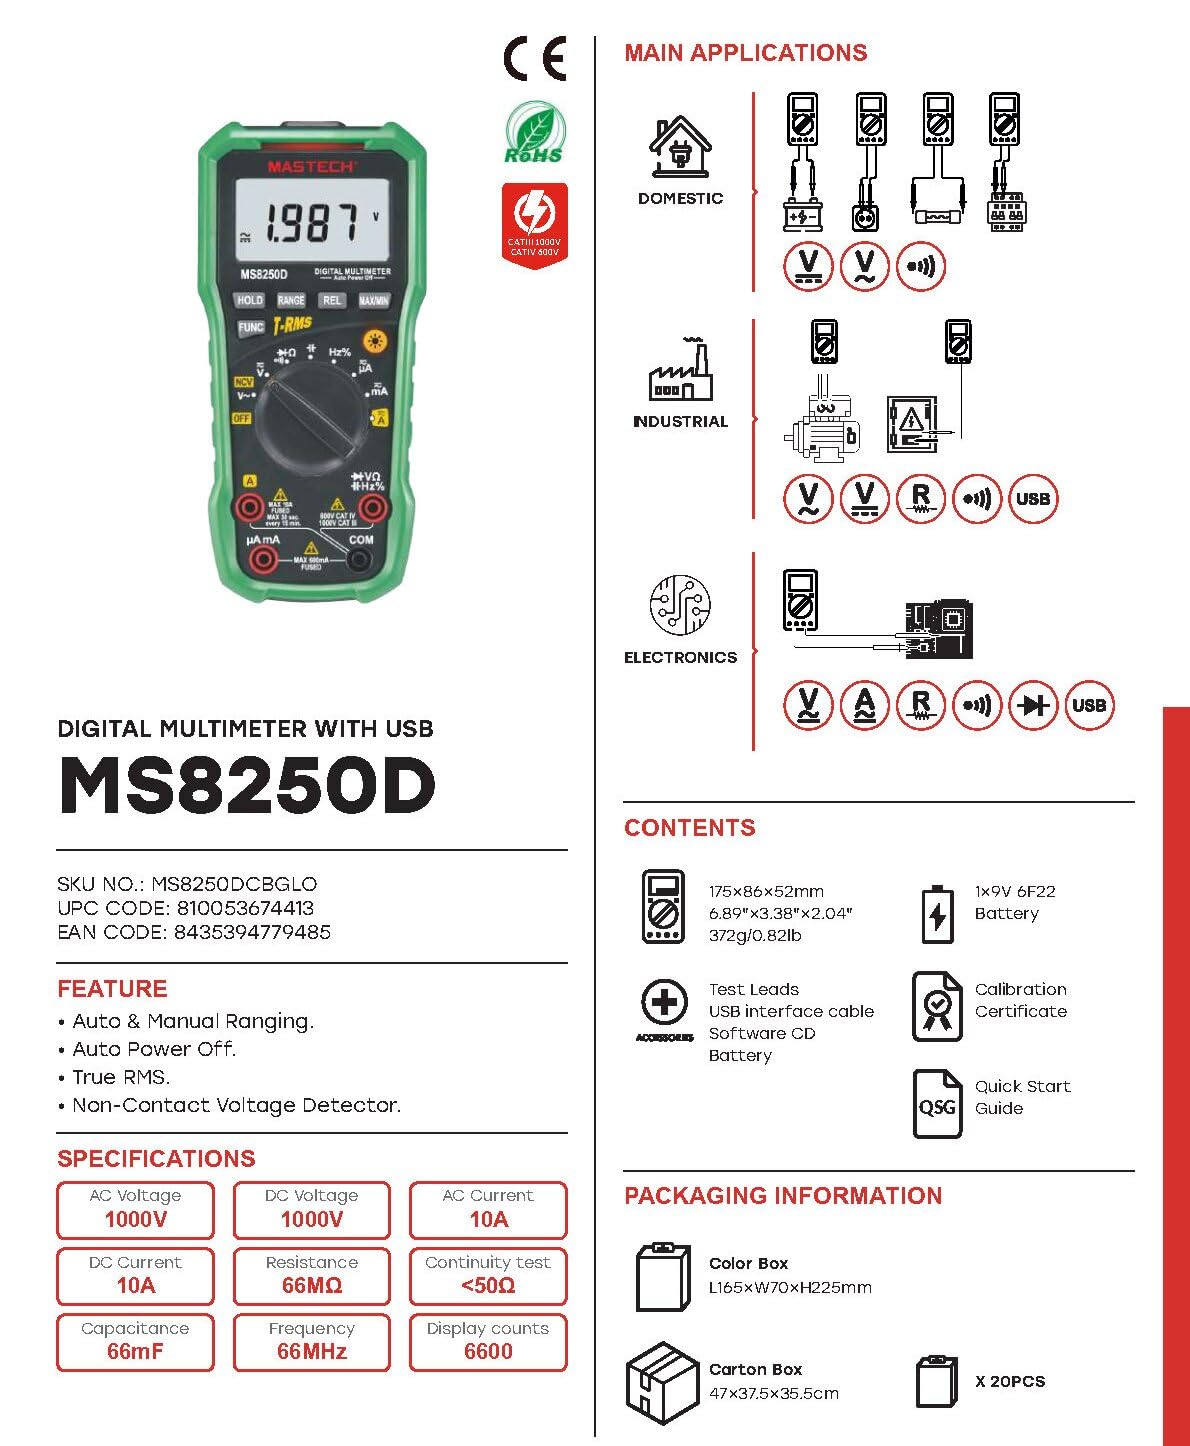
Foto nke 3.2: Diagram showing the Mastech MS8250D Multimeter and its included accessories. The image also illustrates typical applications in domestic, industrial, and electronics settings.
- Mastech MS8250D Digital Multimeter
- Nnwale Ndị Na-edu (Uhie na Oji)
- 1x 9V 6F22 Battery (pre-installed or included separately)
- USB Interface USB
- Software CD (for Windows OS)
- Asambodo mmezi
- Ngwa-Start Guide
4. Nhazi
4.1 Ntinye batrị
The MS8250D requires one 9V 6F22 battery for operation. Two LR44 batteries are also mentioned in specifications, likely for a different internal component or an error in data. For the main power, use the 9V battery.
- Hụ na agbanyụrụla multimeter ahụ.
- Chọta ebe mkpuchi batrị n'azụ mita.
- Jiri skrudị mee ka skru ahụ dị jụụ nke na-ejide mkpuchi ahụ.
- Wepu mkpuchi.
- Connect the 9V battery to the battery clips, observing correct polarity (+ and -).
- Tinye batrị n'ime oghere.
- Replace the battery compartment cover and secure it with the screw(s).
Mara: The meter also uses 2 LR44 batteries, which are typically included and pre-installed for specific functions like the backlight or non-contact voltage detection. Refer to the quick-start guide for specific details on these smaller batteries if replacement is needed.
4.2 Njikọ Ndị Nnwale Nlele
Always connect the black test lead to the COM jack. Connect the red test lead to the appropriate input jack based on the measurement type:
- Maka Voltage, Resistance, Capacitance, Frequency, Diode, and Continuity measurements: Connect the red lead to the VΩHz% jakị.
- For Current measurements (µA or mA): Connect the red lead to the µA mA jakị.
- For High Current measurements (A): Connect the red lead to the A jakị.
Ensure the test leads are fully inserted into the jacks.
5. Ntuziaka ọrụ
5.1 Gbanyụọ ma ọ bụ gbanyụọ
To turn the meter ON, rotate the function dial from the "OFF" position to any desired measurement function. To turn the meter OFF, rotate the function dial back to the "OFF" position.
The meter features an Gbanyụọ ike akpaaka function to conserve battery life. It will automatically power off after a period of inactivity. To disable or re-enable this feature, refer to the quick-start guide or the full user manual provided on the software CD.
5.2 Auto Ranging and Manual Ranging
The MS8250D defaults to Nchekwa onwe, which automatically selects the best measurement range. Press the RANGE bọtịnụ ka ịgbanwee gaa Usoro ntuziaka. In manual ranging, each press of the RANGE button cycles through available ranges. To return to auto ranging, press and hold the RANGE bọtịnụ.
5.3 Na-atụ AC/DC Voltage (V)
- Tọọ ọkpụkpọ ọrụ na V~ (Mpịakọta ACtage) ma ọ bụ V- (DC Voltage) ọnọdụ.
- Jikọọ ụzọ ule ojii na COM jack and the red test lead to the VΩHz% jakị.
- Connect the test probes across the circuit or component to be measured.
- Gụọ voltage value on the display. The meter will automatically detect AC or DC if the dial is set to the combined V position, or you can use the ỌUNụ button to toggle between AC and DC if available on your model.
5.4 Measuring AC/DC Current (A, mA, µA)
Ịdọ aka ná ntị: Never connect the meter in parallel to a voltage source when measuring current. This can blow the fuse or damage the meter.
- Gbanyụọ ike na sekit.
- Tọọ ọkpụkpọ ọrụ na A~ (AC Current), A- (DC Current), mA~, mA-, µA~, ma ọ bụ µA- ọnọdụ.
- Jikọọ ụzọ ule ojii na COM jakị.
- Jikọọ ụzọ nnwale uhie ahụ na A jack for high current, or µA mA jack for low current.
- Open the circuit where the current is to be measured and connect the meter in series with the load.
- Tinye ike na sekit.
- Read the current value on the display. Use the ỌUNụ button to toggle between AC and DC if needed.
5.5 Measuring Resistance (Ω)
- Tọọ ọkpụkpọ ọrụ na Ω ọnọdụ.
- Jikọọ ụzọ ule ojii na COM jack and the red test lead to the VΩHz% jakị.
- Ensure the circuit or component under test is de-energized.
- Jikọọ nyocha ule n'ofe akụkụ ahụ.
- Gụọ uru ndị na-eguzogide na ngosipụta.
5.6 Diode Test and Continuity Test
- Tọọ ọkpụkpọ ọrụ na Diode/Ọga n'ihu position (often shared with resistance or capacitance).
- Jikọọ ụzọ ule ojii na COM jack and the red test lead to the VΩHz% jakị.
- Jiri ihe ỌUNụ button to select between Diode Test and Continuity Test.
- For Diode Test: Jikọọ ihe nyocha uhie na anode na ihe nyocha ojii na katode nke diode. Ngosipụta ahụ ga-egosi vol nke na-aga n'ihu.tage drop (typically 0.5V to 0.8V for silicon diodes). Reversing the probes should show "OL" (Open Loop).
- Maka ule Ọga n'ihu: Connect the probes across the circuit or component. If resistance is less than approximately 50Ω, the buzzer will sound, indicating continuity.
5.7 Measuring Capacitance (F)
- Tọọ ọkpụkpọ ọrụ na Ike position (often shared with resistance or diode).
- Jikọọ ụzọ ule ojii na COM jack and the red test lead to the VΩHz% jakị.
- Ensure the capacitor is fully discharged before testing to avoid damage to the meter.
- Jikọọ nyocha ule n'ofe njedebe capacitor ahụ.
- Gụọ uru capacitance na ngosipụta.
5.8 Measuring Frequency (Hz) and Duty Cycle (%)
- Tọọ ọkpụkpọ ọrụ na Hz% position (often shared with voltagna).
- Jikọọ ụzọ ule ojii na COM jack and the red test lead to the VΩHz% jakị.
- Jikọọ nyocha ule ahụ n'ofe isi iyi mgbaàmà ahụ.
- The display will show the frequency. Press the ỌUNụ button to toggle to Duty Cycle measurement if available.
5.9 Ndị anaghị akpọtụrụ Voltage (NCV) Nchọpụta
- Tọọ ọkpụkpọ ọrụ na NCV ọnọdụ.
- Hold the meter with the NCV sensor (usually at the top of the meter) near a live AC voltage isi iyi.
- Mita ahụ ga-egosi ọnụnọ AC voltage through an audible beep and/or visual indicator (e.g., LED).
5.10 USB Interface (Windows OS)
The MS8250D includes a USB interface for connecting to a computer running Windows OS. This allows for data logging and real-time monitoring of measurements. Install the provided software from the CD and follow the on-screen instructions for driver installation and software usage.
6. Nlekọta
6.1 Nhicha
Wipe the meter's case with a damp ákwà na ihe nhicha dị nro. Ejila ihe na-eme ka ihe dị nro ma ọ bụ ihe mgbaze dị nro. Hụ na mita ahụ kpọrọ nkụ kpamkpam tupu e jiri ya.
6.2 nnọchi batrị
When the low battery indicator appears on the display, replace the 9V battery immediately to ensure accurate readings. Follow the steps in Section 4.1 Battery Installation.
6.3 Mgbanwe Fuse
If the meter fails to measure current, the fuse may be blown. Fuses are located inside the meter. To replace a fuse:
- Ensure the meter is turned OFF and all test leads are disconnected.
- Open the battery compartment cover (and potentially the main case, depending on design).
- Carefully remove the old fuse.
- Replace with a fuse of the exact same type and rating (e.g., F600mA/250V for mA/µA range, F10A/250V for A range). Refer to the meter's internal markings or the full manual for specific fuse ratings.
- Reassemble the meter, ensuring all screws are tightened.
Ịdọ aka ná ntị: Never use a fuse with a different rating or bypass the fuse. This can damage the meter and pose a serious safety hazard.
7. Nchọpụta nsogbu
| Nsogbu | Ihe nwere ike ime | Ngwọta |
|---|---|---|
| Mita ahụ anaghị agba ọkụ. | Batrị nwụrụ anwụ. | Dochie batrị 9V. |
| "OL" (Overload) gosiri. | Ntụle gafere oke achọrọ ma ọ bụ oke ikike mita kachasị. | Switch to a higher range (if in manual ranging) or ensure the measurement is within the meter's limits. |
| No current reading. | Blown fuse; incorrect lead connection; open circuit. | Check and replace fuse if necessary. Ensure leads are connected correctly (in series). Verify circuit continuity. |
| Ọgụgụ na-ezighi ezi. | Low battery; poor lead contact; external interference. | Replace battery. Ensure leads are firmly connected. Move away from strong electromagnetic fields. |
| Display shows "USB" but no PC connection. | Drivers not installed; incorrect software settings. | Install drivers from the provided CD. Refer to software manual for connection instructions. |
8. Nkọwapụta
The following table details the technical specifications of the Mastech MS8250D Digital Multimeter.

Foto nke 8.1: Detailed specifications table for the Mastech MS8250D, outlining ranges, resolutions, and accuracies for various measurement functions.
| Ọrụ | Oke | Mkpebi | Izi ezi |
|---|---|---|---|
| DC Voltage | |||
| 660mV | 0.1mV | ± (0.8%+3) | |
| 6.6V/66V/660V/1000V | 1mV/10mV/0.1V/1V | ± (0.5%+5) | |
| AC Voltage (ezigbo RMS) | |||
| 660mV | 0.1mV | ± (1.5%+5) | |
| 6.6V/66V | 1mV/10mV | ± (1.2%+5) | |
| 660V/1000V | 0.1V/1V | ± (1.0%+3) | |
| DC ugbu a | |||
| 660µA/6600µA/66mA/660mA | 0.1µA/1µA/10µA/0.1mA | ± (1.0%+5) | |
| 10A | 10mA | ± (2.0%+5) | |
| AC ugbu a (ezigbo RMS) | |||
| 660µA/6600µA/66mA/660mA | 0.1µA/1µA/0.01mA/0.1mA | ± (1.5%+5) | |
| 10A | 10mA | ± (3.0%+5) | |
| Nguzogide | |||
| 660Ω / 6.6kΩ / 66kΩ / 660kΩ / 6.6MΩ | 0.1Ω / 1Ω / 10Ω / 100Ω / 1kΩ | ± (0.8%+5) | |
| 66MΩ | 10kị | ± (1.5%+5) | |
| Ike | |||
| 6.6nF/66nF/660nF/6.6µF/66µF | 1pF/10pF/0.1nF/1nF/10nF | ± (4.0%+5) | |
| 600µF | 1µF | ± (3.0%+5) | |
| 6.6mF/66mF | 1µF/10µF | ± (4.0%+5) | |
| Ugboro ugboro | |||
| 66Hz/660Hz/6.6kHz/66kHz | 0.01Hz/0.1Hz/1Hz/10Hz | ± (1.5%+5) | |
| 660kHz/6.6MHz/66MHz | 0.1kHz / 1kHz / 10kHz | ± (1.5%+5) | |
| Usoro ọrụ | |||
| 0.1% ~ 99.9% | 0.1% | ± (2.0%+5) | |
Nkọwa n'ozuzu:
- Ngosipụta: 6600 Ọnụ
- Isi mmalite ike: 1x 9V 6F22 Battery (main power), 2x LR44 batteries (auxiliary, e.g., backlight)
- Gbanyụọ ike akpaaka: Ee
- Ezi RMS: Ee
- Onye na-akpọtụrụ Voltage (NCV) Detector: Ee
- Diode Open Voltage: 3.2V
- Continuity Buzzer: <50Ω
- Oke/MIN: Ee
- Jide data: Ee
- Low Battery Display: Ee
- Gosipụta ọkụ azụ: Ee
- Njikọ USB: Yes (Windows OS)
- Ogo nchekwa: CAT III 1000V / CAT IV 600V
- Nzizi nha: 0.4% (general, specific accuracies per function in table)
- Nrụ ọrụ Voltage (Nkeji): 3.2 volts
- Nleba okpomọkụ: 50 Ogo Celsius
- Akụkụ (L x W x H): 20 x 15 x 25 cm
- Ibu ihe: 1 n'arọ
- Ihe: Acrylonitrile Butadiene Styrene (ABS)
- Agba: Acha anụnụ anụnụ
- Onye nrụpụta: MASTEK
- Mba onye si: Taiwan
- Asambodo: CE, RoHS, UL
9. Akwụkwọ ikike na nkwado
Mastech products are designed for reliability and durability. For specific warranty information, please refer to the warranty card included with your product or contact Mastech customer support directly. Typically, Mastech offers a limited warranty against defects in materials and workmanship.
For technical support, troubleshooting assistance, or warranty claims, please contact your authorized Mastech dealer or visit the official Mastech websaịtị maka ozi kọntaktị.
Ogologo oge nnweta nke EU mapụtara: Afọ 1