1. Okwu mmalite
Thank you for choosing the OTIC 10.1-inch Portable Dual Screen Car DVD Player. This device is designed to provide versatile entertainment on the go, featuring two synchronized screens, a long-lasting rechargeable battery, and broad media compatibility. This manual will guide you through the proper setup, operation, and maintenance of your new DVD player to ensure optimal performance and longevity.
2. Ihe ngwugwu
Biko lelee ngwugwu ahụ nke ọma iji hụ na ihe niile dị ma dịkwa mma. Ọ bụrụ na ihe ọ bụla efuo ma ọ bụ mebie, biko kpọtụrụ onye na-ere ahịa gị.
- 1 x Main DVD Player Unit
- 1 x Slave Monitor Unit
- 1 x AC / DC nkwụnye ọkụ
- 1 x DC to DC Connection Cable
- 1 x AV Connection Cable
- 1 x Ihe nkwụnye chaja ụgbọala
- 1 x Njikwa anya (batrị gụnyere)
- 2 x ekwe ntị
- 2 x Eriri mgbago
- Akwụkwọ ntuziaka onye ọrụ 1 x (akwụkwọ a)
- 1 x Ntuziaka mmalite ngwa ngwa

Mara: The remote control requires 2 AAA batteries, which are included.
3. Atụmatụ igodo
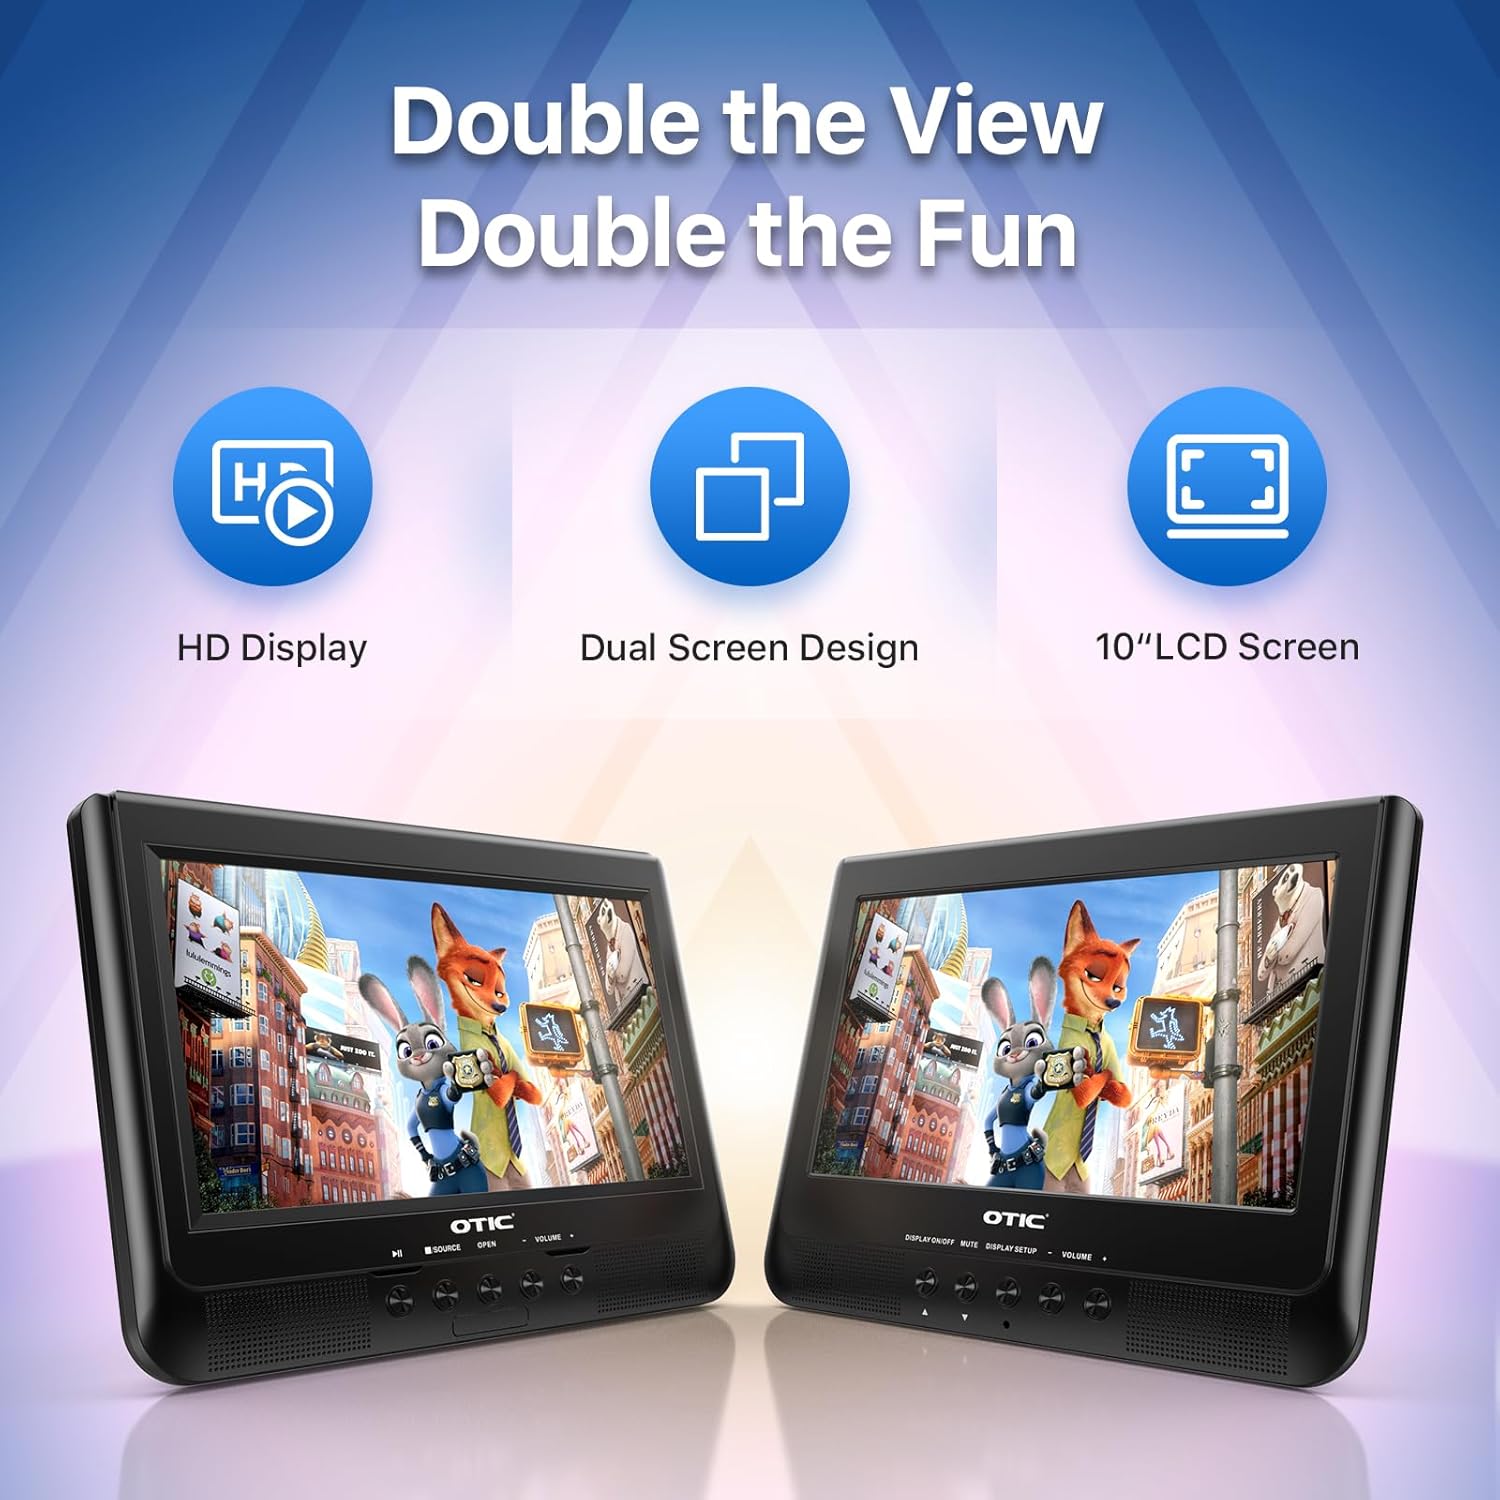
- Dual Display Capability: Connect the host DVD player to the slave monitor using the included AV cable for synchronized viewing of the same content.
- High-Resolution Screens: Both 10.1-inch displays feature a resolution of 1024 x 600 pixels. The main unit's screen can rotate 270° and flip 180° for optimal viewakụkụ .
- Ndụ batrị agbatịkwuru: Equipped with a built-in 2500 mAh rechargeable battery, providing 3-5 hours of continuous video playback.
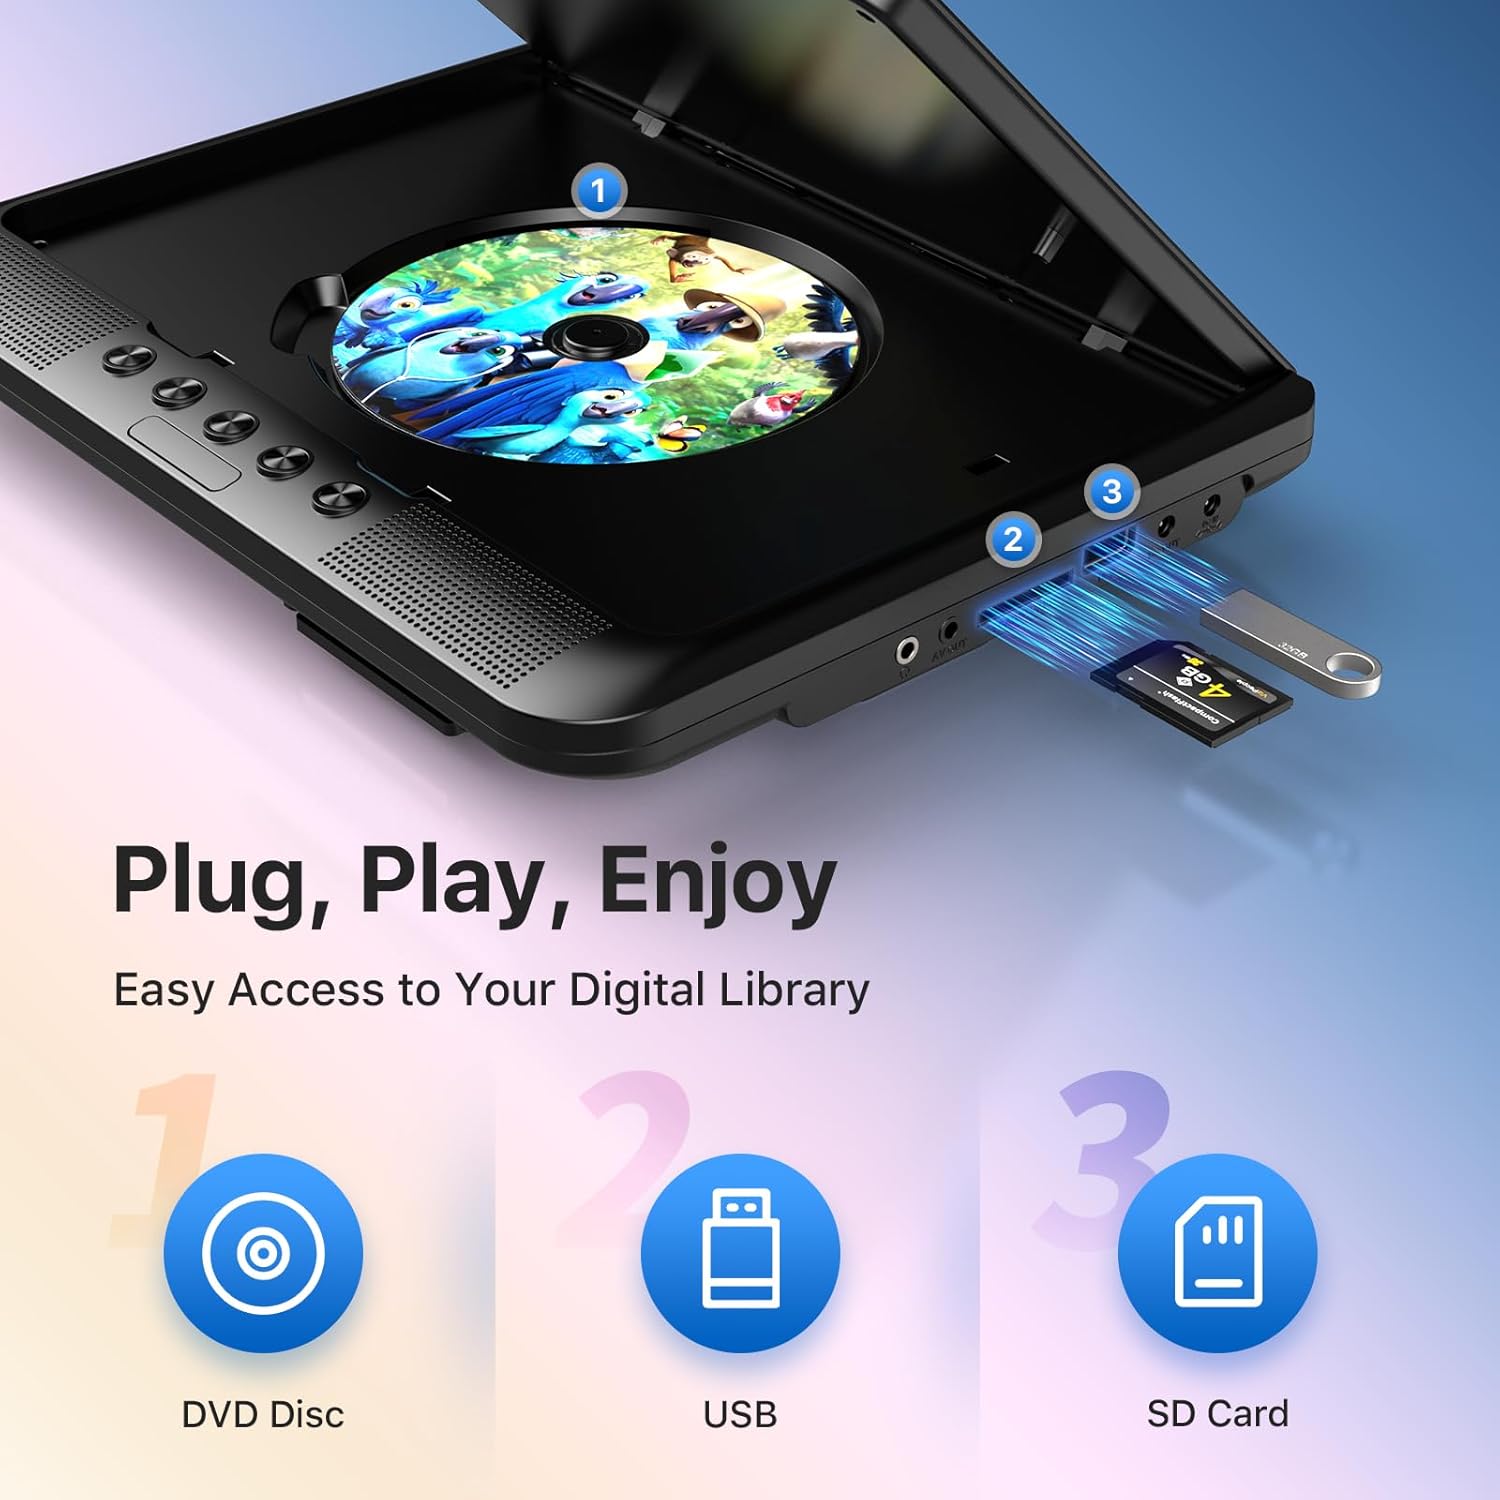
- Versatile Media Support: Plays various formats including CD, DVD, CD-R/RW, DVD±R/±RW, VCD/SVCD. Supports USB drives and SD cards up to 32GB for video (VOB, AVI, MPEG1, MPEG2, XVID), audio (MP3, WMA), and image (JPG, JPEG) files. (Note: Blu-ray DVDs are not supported.)
- Ọrụ ebe nchekwa ikpeazụ: Automatically resumes playback from where you left off, ensuring a seamless viewahụmahụ.
- Audio emelitere: Integrated dual stereo speakers deliver clear sound. A 3.5mm headphone jack is available for private listening.
- Ntinye/Mmepụta AV: Allows connection to larger TV screens for shared viewing or to external video sources.
4. Ntuziaka Nhazi
4.1 Nchaji izizi
Before first use, fully charge the main DVD player unit. Connect the AC/DC power adapter to the player's DC IN port and plug it into a wall outlet. The charging indicator light will typically turn off or change color when fully charged.
4.2 Connecting the Dual Screens
- Locate the AV OUT port on the main DVD player unit.
- Locate the AV IN port on the slave monitor unit.
- Connect the included AV connection cable between the AV OUT of the main unit and the AV IN of the slave unit.
- Connect the DC to DC connection cable from the main unit's DC OUT port to the slave unit's DC IN port to power the slave monitor.
4.3 Ịkwanye ngwaọrụ
- Ike AC: Use the AC/DC power adapter for home use.
- Ike Ụgbọala: Use the car charger adapter to power the unit from your vehicle's 12V power outlet.
- Ike batrị: The built-in rechargeable battery provides portable power for outdoor use.
4.4 Mounting in a Vehicle
Use the provided mounting straps to securely attach the DVD player and slave monitor to the headrests in your car. Ensure they are positioned safely and do not obstruct the driver's view ma ọ bụ itinye airbag.

5. Ntuziaka ọrụ
5.1 Nkpọghachi azụ
- Ike Na: Press the 'POWER' button on the unit or remote control.
- Fanye diski: Gently open the disc cover and place a DVD or CD onto the spindle, label side up. Close the cover firmly.
- Ọkụ USB/SD: Insert a USB drive into the USB port or an SD card into the SD card slot. The player should automatically detect the media or allow you to select the source using the 'SOURCE' button.
- Njikwa ọkpụkpọ: Use the 'PLAY/PAUSE', 'STOP', 'NEXT', 'PREVIOUS', 'FF' (Fast Forward), and 'REW' (Rewind) buttons on the unit or remote control to manage playback.
- Ndozi olu: Use the 'VOL+' and 'VOL-' buttons to adjust the volume.

5.2 Iji njikwa anya
The included remote control provides full functionality for convenient operation from a distance. Point the remote control directly at the main DVD player unit's IR sensor.
5.3 Last Memory Function
The player automatically remembers the last playback point. To resume from where you left off, simply power on the device and press 'PLAY'. This function is active for most disc and digital media formats.
5.4 Connecting to an External Display (TV)
To share your viewing experience on a larger screen, use the AV OUT port on the main DVD player unit and connect it to the AV IN ports of your television using the included AV cable. Select the correct AV input on your TV.

6. Ndakọrịta nke mgbasa ozi
The OTIC DVD player supports a wide range of media formats:
- Disc Formats: DVD, DVD+R, DVD-R, DVD+RW, DVD-RW, CD, CD+R, CD-R, CD+RW, CD-RW, VCD, SVCD. (Blu-ray discs are not supported.)
- Video Formats (USB/SD): VOB, AVI, MPEG1, MPEG2, XVID.
- Audio Formats (USB/SD): MP3, WMA.
- Image Formats (USB/SD): JPG, JPEG.
USB drives and SD cards up to 32GB capacity are supported.

7. Nlekọta
7.1 Na-ehicha ngalaba ahụ
Wipe the exterior of the player with a soft, dry cloth. For stubborn marks, slightly dampen the cloth with water. Do not use abrasive cleaners or solvents, as they may damage the surface.
7.2 Nlekọta diski
Handle discs by their edges. Keep discs clean and free of scratches. Store them in their cases when not in use. A dirty or scratched disc can cause playback issues.
7.3 Nlekọta batrị
To prolong battery life, avoid fully discharging the battery frequently. If storing the unit for an extended period, charge it to about 50% every few months.
8. Nchọpụta nsogbu
If you encounter issues with your OTIC DVD player, please refer to the following common problems and solutions:
| Nsogbu | Ihe nwere ike ime | Ngwọta |
|---|---|---|
| Onye ọkpụkpọ anaghị agba ọkụ. | Batrị agwụla; Ejikọtaghị ihe nkwụnye ọkụ ma ọ bụ mejọrọ. | Charge the battery; Ensure power adapter is securely connected and functional. |
| Enweghị foto na ihuenyo. | Disc is dirty/scratched; Incorrect source selected; AV cable loose (for slave monitor/TV). | Clean or replace disc; Press 'SOURCE' button to select correct input; Check AV cable connections. |
| Enweghị ụda. | Volume too low; Mute function active; Headphone connected. | Increase volume; Press 'MUTE' button on remote; Disconnect headphones if using speakers. |
| Disc skipping or freezing. | Dirty/damaged disc; Player is on an unstable surface; Excessive vibration. | Clean or replace disc; Place player on a stable surface; Reduce vibrations if in a moving vehicle. |
| Njikwa anya anaghị arụ ọrụ. | Batteries depleted; Obstruction between remote and player; Incorrect angle. | Replace batteries; Ensure clear line of sight to IR sensor; Point remote directly at player. |
If the problem persists after trying these solutions, please contact OTIC customer support for further assistance.
9. Nkọwapụta
| Njirimara | Nkọwapụta |
|---|---|
| Ụdị | OTIC |
| Nọmba nlereanya | DP-2123A |
| Nha ihuenyo | 10.1 Inches (visible display area) |
| Ụdị ihuenyo | LCD |
| Ngosipụta mkpebi | 1024 x 600 pikselụ |
| Ike batrị | 2500 mAh (built-in rechargeable) |
| Oge ịkpọghachi batrị | 3-5 awa |
| Ụdị diski dakọtara | CD, CD-R/RW, DVD, DVD+R/RW, DVD-R/RW, VCD, SVCD |
| Compatible Digital Media | USB drives (up to 32GB), SD cards (up to 32GB) |
| Ụdị vidiyo akwadoro | VOB, AVI, MPEG1, MPEG2, XVID |
| Ụdị ọdịyo akwadoro | MP3, WMA |
| Ụdị onyonyo akwadoro | JPG, JPEG |
| Njikọta | AV In, AV Out, USB, SD Card Slot, 3.5mm Headphone Jack, DC In, DC Out |
| Akụkụ (Isi ngalaba) | Ihe dịka 35.56 x 13.46 x 25.4 cm (14 x 5.3 x 10 sentimita asatọ) |
| Ibu | Ihe dị ka 2.23 n'arọ (4.92 lbs) |
| Agba | Nwa |
10. Akwụkwọ ikike na nkwado
For information regarding warranty coverage, technical support, or service, please refer to the warranty card included in your package or contact the retailer from whom you purchased the product. You may also visit the official OTIC websaịtị maka ozi nkwado kachasị ọhụrụ.
Biko dowe ihe akaebe nke ịzụrụ ihe maka akwụkwọ ikike.