1. Ozi nchekwa
Biko gụọ ntuziaka nchekwa niile nke ọma tupu i jiri ngwaahịa a. Ọ bụrụ na ị gbasoghị ntuziaka ndị a, ọ nwere ike ibute mgbawa eletriki, ọkụ, ma ọ bụ ihe egwu ndị ọzọ.
- Ewepụla ihe nrụpụta mmiri ozuzo ma ọ bụ mmiri iji gbochie ọkụ ma ọ bụ ujo eletrik.
- Emeghela ihe ngosi ahụ casing. Enweghị akụkụ ọrụ ọ bụla dị n'ime ya. Nye ndị ọrụ ruru eru ọrụ niile.
- Gbaa mbọ hụ na ikuku ikuku dị mma. Akwụsịla oghere ikuku.
- Jiri naanị ihe nkwụnye ike enyere na ihe ngosi ahụ.
- Zere ka anya gị na-abanye na lenzi ihe ngosi mgbe i jiri anya gị hụ ihe na-egosi ihe mgbe iamp dị na.
- Debe ihe ngosi ahụ ka ọ ghara iru ebe okpomọkụ na anwụ na-acha kpọmkwem.
2. Ihe ngwugwu
Nyochaa na etinyere ihe niile edepụtara n'okpuru na ngwugwu gị:
- 1 x Jectse Mini LED Projector
- 1 x Remote Control (2 AAA batteries not included)
- 1 x AV Line (3-in-1 RCA cable)
- 1 x Akwụkwọ ntuziaka
- 1 x nkwụnye ọkụ

Figure 2.1: Contents of the Jectse Mini LED Projector package.
3. Ngwaahịa gafereview
The Jectse Mini LED Projector is a compact and portable device designed for various multimedia applications. It features a 1080P resolution, LED light source, and multiple connectivity options.

Foto nke 3.1: N'ihu na n'elu view of the Jectse Mini LED Projector.
3.1 Ihe Ndị Na-egosi Ihe Nlereanya

Figure 3.2: Top panel controls of the Jectse Mini LED Projector.
- oghere: Na-arụ ọrụ onyonyo na ihuenyo.
- Grille ikuku ikuku: Na-eme ka ikuku dị mma maka oyi.
- bọtịnụ njikwa: (Refer to Figure 3.2) For basic navigation and power control.
- Wheel lekwasịrị anya: Na-edozi nchapụta onyonyo.
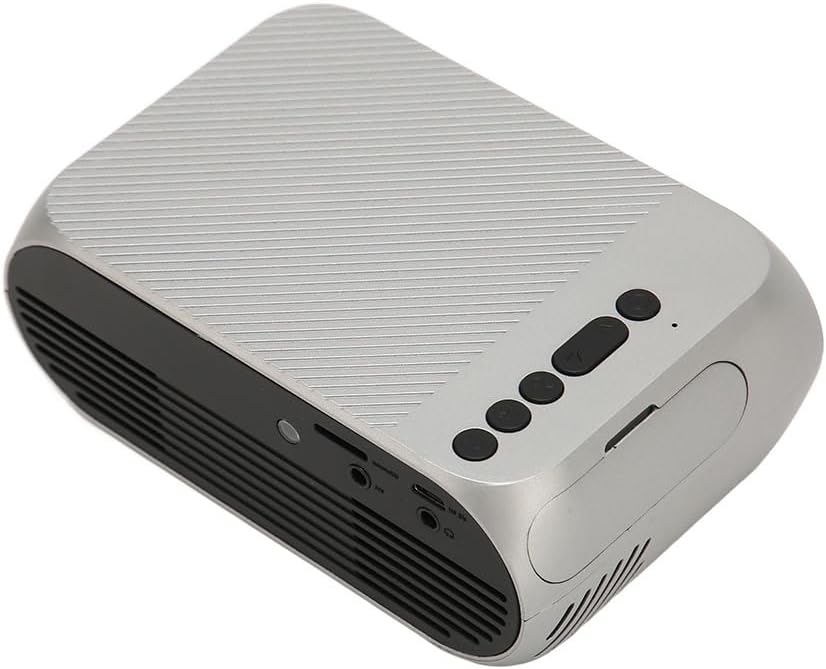
Foto nke 3.3: Azụ na akụkụ view nwere ọdụ ụgbọ mmiri ntinye/mpụta.
3.2 ọdụ ụgbọ mmiri ntinye / mmepụta
- HD Multimedia Interface (HDMI): For connecting devices like laptops, gaming consoles, and media players.
- Ọdụ ụgbọ mmiri AV: For connecting older devices using the included AV cable.
- Ọdụ ụgbọ mmiri USB: Maka ijikọ draịva USB iji kpọọ mgbasa ozi files ozugbo.
- Ntinye ike: Maka ijikọ nkwụnye ọkụ.
- Audio Output (3.5mm Jack): Maka ijikọ ndị na-ekwu okwu mpụga ma ọ bụ ekweisi.
4. Nhazi
4.1 Ntinye
Place the projector on a stable, flat surface. Ensure there is adequate space around the projector for ventilation. The ideal projection distance is between 1.5 to 2 meters for optimal image size and clarity.

Figure 4.1: Recommended projection distance and screen sizes.
4.2 Njikọ ike
- Jikọọ ihe nkwụnye ọkụ na ọdụ ụgbọ mmiri ntinye ike nke projector.
- Plug the power adapter into a suitable electrical outlet (100-240V).
4.3 Isi mmalite ntinye eji ejikọta
The projector supports HD Multimedia Interface, AV, and USB inputs.

Figure 4.2: Projector compatibility with various devices.
- HD Multimedia Interface: Connect an HD Multimedia Interface cable from your source device (e.g., laptop, game console) to the projector's HD Multimedia Interface port.
- Nke: Connect the included AV cable to the projector's AV port and the corresponding audio/video output ports on your source device.
- USB: Insert a USB flash drive into the projector's USB port.
4.4 Ndozi anya
After powering on the projector, rotate the focus wheel (usually located near the lens) until the projected image appears clear and sharp.
5. Ntuziaka ọrụ
5.1 Gbanyụọ/ gbanyụọ
- Iji gbanye: Press the Power Switch button on the projector or the power button on the remote control.
- Iji gbanyụọ: Press the Power Switch button again. The projector will shut down.
5.2 Nhọrọ Isi mmalite
After powering on, use the "Signal Source Button" on the projector or the "Source" button on the remote control to cycle through available input sources (HD Multimedia Interface, AV, USB).
5.3 Nsorouzọ NchNhr
Use the Direction Buttons and Confirm Button on the projector or the arrow keys and OK button on the remote control to navigate through the projector's on-screen menu for settings adjustments (e.g., picture mode, aspect ratio, sound settings).
5.4 Ojiji njikwa anya
Insert two AAA batteries (not included) into the remote control. Point the remote control towards the projector's IR receiver to operate functions such as power, source selection, volume, and menu navigation.
6. Nlekọta
6.1 Ihicha oghere
Use a soft, lint-free cloth specifically designed for optical lenses to gently wipe the projector lens. Do not use abrasive cleaners or excessive force, as this can scratch the lens.
6.2 Nhicha izugbe
Wipe the exterior of the projector with a soft, dry cloth. Do not use liquid cleaners or solvents. Ensure the ventilation grilles are free from dust and debris to maintain optimal cooling.
7. Nchọpụta nsogbu
| Nsogbu | Ihe nwere ike ime | Ngwọta |
|---|---|---|
| Ọnweghị onyonyo atụpụtara |
|
|
| Onyonyo na-agba agba |
|
|
| Enweghị ụda |
|
|
| Njikwa anya anaghị arụ ọrụ |
|
|
8. Nkọwapụta
| Njirimara | Nkọwa |
|---|---|
| Ụdị | Jectse |
| Nọmba nlereanya | Jectse3giz17bkpy |
| Mkpebi | 1920*1080p |
| Isi Iyi Ìhè | Ikanam |
| Ndụ LED | awa 3000 |
| Ogologo amụma | 1.5-2m |
| Oke amụma | 1.6:1 |
| Akụkụ akụkụ | 16:9 |
| Ntinye ike | 100-240V |
| Nha ngwaahịa | 13 x 8.5 x 5 cm (ihe dị ka 5.1 x 3.3 x 2 sentimita) |
| Ibu Ibu | 1.1 pound |
| Teknụzụ Njikọta | HD Multimedia Interface, AV, USB |
| Atụmatụ pụrụ iche | Adjustable, Portable Design |
9. Akwụkwọ ikike na nkwado
For warranty information or technical support, please refer to the contact details provided with your purchase or visit the official Jectse websaịtị. Debe ihe akaebe nke ịzụrụ maka akwụkwọ ikike.