
AquilaPro KL02060
AquilaPro Laser Measuring Tool
Akwụkwọ ntuziaka onye ọrụ
Ụdị: KL02060
1. Okwu mmalite
This manual provides comprehensive instructions for the safe and effective use of your AquilaPro Laser Measuring Tool. Designed for precision and ease of use, this compact device offers various measurement modes for both professional and home applications. Please read this manual thoroughly before operation and retain it for future reference.

Figure 1: AquilaPro Laser Measuring Tool
2. Ozi nchekwa
WARNING: Laser Radiation
- Elepụla anya ozugbo n'ime oghere laser.
- Zere ikpughe anya ozugbo na doo laser.
- Atụkwasịla laser ahụ mmadụ ma ọ bụ anụmanụ.
- Jiri naanị dị ka akọwara n'akwụkwọ ntuziaka a.
- Debe ebe ụmụaka na-apụghị iru.
- Anwala ịkwasa ma ọ bụ gbanwee ngwaọrụ ahụ.
This device emits Class 2 laser radiation. Maximum output power is less than 1mW at 635nm.
3. Ngwaahịa gafereview
The AquilaPro Laser Measuring Tool features a compact metal fuselage with an HD display for clear readings. Familiarize yourself with the device's components and controls:

Figure 2: Device Components and Controls
- Ihuenyo: Displays measurements, modes, and battery status.
- UNIT/Laser Button: Activates laser for measurement, short press for single measurement, long press to switch units.
- +/- bọtịnụ: For addition and subtraction measurements.
- PRESET/History Button: Accesses measurement history and preset values.
- FUNC/Reference Button: Cycles through measurement functions (Area, Volume, Pythagorean, etc.) and switches front/rear reference point.
- Power/Backlight Button: Long press to power on/off, short press to toggle backlight.
4. Nhazi
4.1 Ịchaji ngwaọrụ
The device is equipped with a rechargeable lithium-ion battery. Before first use, fully charge the device using the provided USB-C cable.
- Connect the USB-C cable to the charging port at the bottom of the device.
- Jikọọ nsọtụ nke ọzọ nke eriri ahụ na ihe nkwụnye ike USB (anaghị etinye ya) ma ọ bụ ọdụ USB kọmputa.
- Ihe ngosi batrị dị na ihuenyo ga-egosi ọnọdụ chajị.
- A full charge provides approximately 10,000 single measurements.

Ọgụgụ 3: ọdụ ụgbọ mmiri USB-C
4.2 Gbanyụọ ma ọ bụ gbanyụọ
- Ike Na: Pịa ogologo Ike bọtịnụ () maka 2 sekọnd.
- Gbanyụọ: Pịa ogologo Ike button for 2 seconds. The device will also automatically power off after 45 seconds of inactivity to conserve battery.
5. Basic Ọrụ
5.1 Otu nha
- Ike na ngwaọrụ.
- Point the laser beam at the target surface.
- Mkpirisi pịa UNIT/Laser button. The measurement will be displayed on the screen.

Figure 4: Taking a Field Measurement
5.2 Mgbanwe nkeji
The device supports switching between meters (m), inches (in), and feet (ft).
- Pịa ogologo UNIT/Laser button to cycle through the units.
- Release the button when your desired unit is displayed.

Figure 5: Unit Conversion Display
5.3 Reference Point Switching (Datum)
You can set the measurement reference point to either the front or rear of the device.
- Mkpirisi pịa FUNC/Reference button to toggle between front and rear datum.
- The display will indicate the active reference point.

Figure 6: Front or Rear Measuring Reference
6. Advanced Measurement Modes
The AquilaPro Laser Measuring Tool offers several advanced modes for complex measurements:

Figure 7: Multiple Measurement Modes
- Ntụle na-aga n'ihu: Provides real-time distance updates as you move the device. Useful for scanning and finding minimum/maximum distances.
- Nlele mpaghara: Na-atụ ogologo na obosara iji gbakọọ mpaghara elu.
- Ntụle olu: Na-atụ ogologo, obosara, na elu iji gbakọọ olu nke oghere.
- Ntụ Pythagorean: Calculates indirect distances using the Pythagorean theorem (e.g., height of a building).
- Addition/Subtraction: Allows you to add or subtract measurements.
To select an advanced mode, short press the FUNC/Reference button repeatedly until the desired mode icon appears on the display. Follow the on-screen prompts to perform the measurements for each mode.
6.1 Addition/Subtraction Function
This function allows you to add or subtract consecutive measurements.
- After taking a measurement, press the +/- button to enter addition or subtraction mode.
- Take the next measurement. The device will automatically add or subtract it from the previous value.
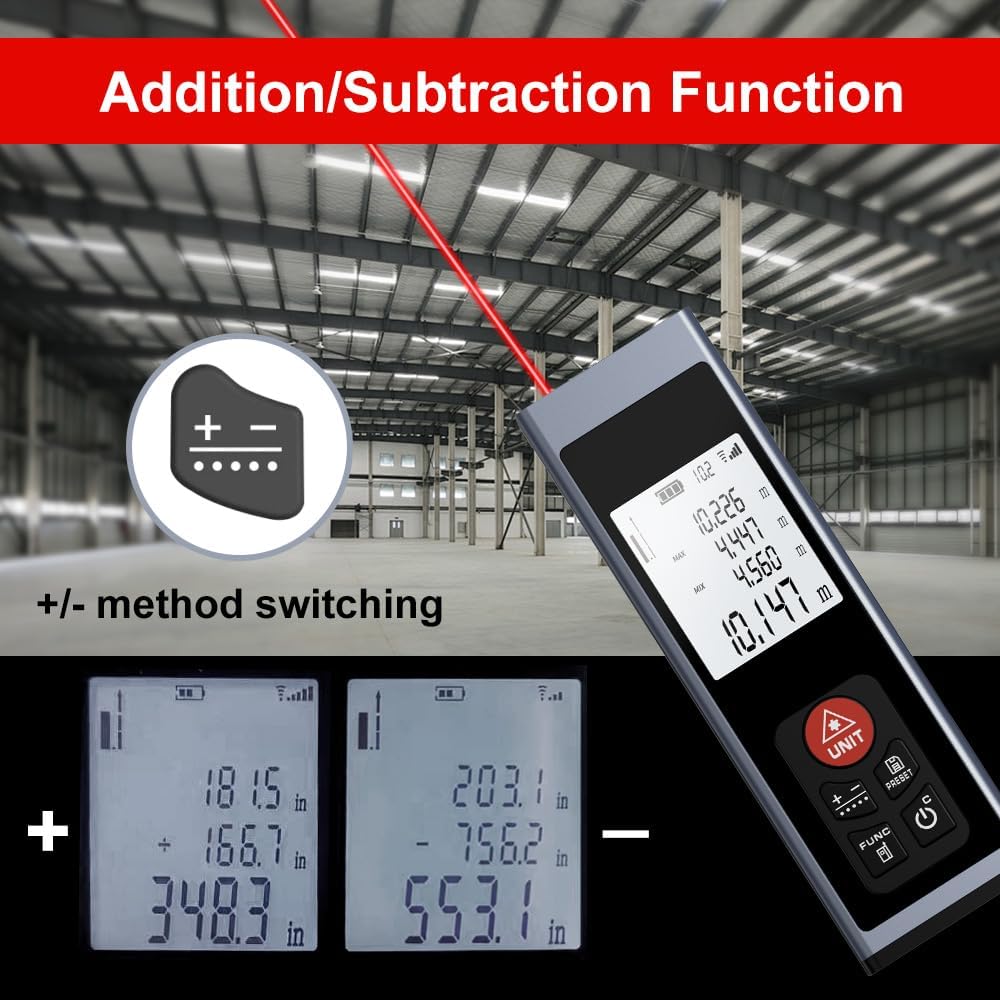
Figure 8: Addition/Subtraction Function
6.2 Memory Storage Function
The device can store up to 28 sets of measurement data.
- Iji view stored data, short press the PRESET/History bọtịnụ.
- Use the arrow buttons (if available, or cycle through with PRESET) to navigate through the stored measurements.

Figure 9: Memory Storage Display
7. Official Product Video
Watch this official video from the seller for a quick introduction to the AquilaPro Laser Measuring Tool.
Video 1: AquilaPro Laser Measuring Tool Introduction (Source: AQUILA OPTICS)
8. Nlekọta
- Nhicha: Jiri nwayọọ, damp ákwà iji hichaa ngwaọrụ ahụ. Ejila ihe nhicha ma ọ bụ ihe mgbaze.
- Nchekwa: Chekwaa ngwaọrụ ahụ n'ebe dị jụụ, kpọrọ nkụ, pụọ na ìhè anyanwụ kpọmkwem na oke okpomọkụ.
- Nlekọta batrị: If storing for extended periods, charge the battery every 3 months to prolong its lifespan.
- Nguzogide mmiri: The device is rated IP54, meaning it is protected against dust and splashing water. Do not immerse in water.
9. Nchọpụta nsogbu
| Nsogbu | Ihe nwere ike ime | Ngwọta |
|---|---|---|
| Ngwaọrụ anaghị agbanwu. | Low battery; Device is off. | Charge the battery; Long press the Power button. |
| Ọgụgụ na-ezighi ezi. | Unstable surface; Obstruction in laser path; Incorrect reference point. | Ensure stable surface; Clear laser path; Check and adjust reference point (front/rear datum). |
| Ngosipụta adịchaghị njọ ma ọ bụ enweghị ọgụgụ. | Backlight off; Low battery. | Short press Power button to toggle backlight; Charge the battery. |
| A naghị ahụ laser anya. | Bright ambient light; Laser not activated. | Use in lower light conditions; Short press UNIT/Laser button. |
10. Nkọwapụta
| Njirimara | Nkọwa |
|---|---|
| Ụdị | AquilaPro |
| Aha Nlereanya | KL02060 |
| Oke nso | 197ft (60m) |
| Izi ezi | ±0.078 inch (2mm) |
| Ihe onwunwe | Aluminom |
| Agba | Nwa |
| Akụkụ ngwaahịa (LxWxH) | 1.1"L x 0.6"W x 3.4"H |
| Ụdị batrị | Lithium-ion nwere ike ịgbanye |
| Ogo nchekwa mba ụwa | IP54 (Uzuzu na-eguzogide) |
| Ngwa gụnyere | Lanyard |
11. Akwụkwọ ikike na nkwado
This AquilaPro Laser Measuring Tool comes with a 1-afọ emeputa akwụkwọ ikike site na ụbọchị ịzụrụ. Biko dowe ihe akaebe nke ịzụrụ ihe maka akwụkwọ ikike.
For technical support or warranty inquiries, please contact AquilaPro customer service through the retailer's platform or visit the official AquilaPro store on Amazon: AquilaPro Amazon Store.
Ask a question about this manual
Ask about setup, troubleshooting, compatibility, parts, safety, or missing instructions. Manuals+ will review the question and use this page’s manual context to help answer it.