
1. Okwu mmalite
This manual provides instructions for the safe and effective use of your AquilaPro KL02060 Laser Measuring Tool. This compact device is designed for accurate distance measurements up to 197 feet (60 meters) with an accuracy of ±0.078 inches (2mm). It features multiple measurement modes, unit switching, and a USB rechargeable battery.
2. Ozi nchekwa
WARNING: Read all safety warnings and instructions before using this product.
- This device is a Class II laser product with a power output of less than 1mW.
- Elepụla anya ozugbo n'ime oghere laser.
- Atụkwasịla ọkụ laser ahụ mmadụ ma ọ bụ anụmanụ.
- Do not disassemble or modify the device. Repairs should only be performed by authorized service personnel.
- Debe ngwaọrụ ahụ ka ụmụaka ghara iru ya.
- Use only the specified charging method (USB).
- Avoid using the device in explosive atmospheres or near flammable materials.
3. Ngwaahịa gafereview
Familiarize yourself with the components and controls of your AquilaPro KL02060 Laser Measuring Tool.

Foto 3.1: N'ihu view of the AquilaPro KL02060 Laser Measuring Tool with key components labeled. Labels include: screen, single measurement/unit switch button, addition/subtraction measurement button, function/front/rear reference button, history/preset value setting button, and power/backlight button.
- Ihuenyo: Displays measurements, modes, battery status, and other information.
- Single Measurement / Unit Switch Button: Initiates a single measurement or cycles through measurement units (m/in/ft).
- Addition / Subtraction Measurement Button: Activates addition or subtraction functions for measurements.
- Function / Front/Rear Reference Button (FUNC): Cycles through measurement modes (e.g., length, area, volume, Pythagorean) and switches the measurement reference point (front or rear of the device).
- History / Preset Value Setting Button (PRESET): Accesses measurement history or sets preset values.
- Power / Backlight Button: Turns the device on/off and controls the screen backlight.
4. Nhazi
4.1 Ịchaji batrị
The AquilaPro KL02060 is equipped with a rechargeable Lithium-ion battery. Before first use, fully charge the device.
- Chọta ọdụ ụgbọ mmiri chaja USB dị na ngwaọrụ ahụ.
- Connect the device to a standard USB power source (e.g., computer, wall adapter) using the provided USB cable.
- Ihe ngosi batrị dị na ihuenyo ga-egosi ọnọdụ chajị.
- Ozugbo chajịchara ya nke ọma, kwụpụ eriri USB ahụ.
5. Ntuziaka ọrụ
5.1 Gbanyụọ ma ọ bụ gbanyụọ
- Iji gbanye: Pịa ma jide Power / Backlight Button () for approximately 2 seconds.
- Ka ịgbanyụ: Pịa ma jide Power / Backlight Button for approximately 3 seconds. The device will also automatically power off after a period of inactivity to conserve battery.
5.2 Mgbanwe nkeji
The device supports measurements in meters (m), inches (in), and feet (ft).
- While the device is on, short press the Single Measurement / Unit Switch Button to cycle through the available units. The current unit will be displayed on the screen.
5.3 Benchmark Switching (Front/Rear Reference)
The measurement can be taken from the front edge or the rear edge of the device. The default setting is typically the rear edge.

Foto 5.1: Illustration of switching between front and rear measurement reference points. The icon on the screen indicates the active reference point.
- Mkpirisi pịa Function / Front/Rear Reference Button (FUNC) to toggle between front and rear reference points.
- An icon on the display will indicate whether the measurement is taken from the front or rear of the device.
- Front Reference: Measurement starts from the front edge of the device.
- Rear Reference: Measurement starts from the rear edge of the device (includes the length of the device itself).
Ụdị nha 5.4
The AquilaPro KL02060 offers various measurement functions. Press the Function / Front/Rear Reference Button (FUNC) repeatedly to cycle through the modes.

Foto 5.2: Visual representation of the different measurement modes available on the device.
- Otu nha: Pịa Single Measurement / Unit Switch Button once to emit the laser, then press again to take a single distance measurement.
- Ntụle Na-aga n'ihu (Nsochi): In this mode, the device continuously measures and displays the distance as you move it. This is useful for finding minimum/maximum distances or for real-time positioning.
- Nlele mpaghara:
- Select Area mode.
- tụọ ogologo.
- tụọ obosara.
- Ngwaọrụ ahụ ga-agbakọ ma gosipụta mpaghara ahụ na akpaghị aka.
- Ntụle olu:
- Select Volume mode.
- tụọ ogologo.
- tụọ obosara.
- Tụlee ịdị elu.
- Ngwaọrụ ahụ ga-agbakọ ma gosipụta olu ya na akpaghị aka.
- Pythagorean Measurement (Indirect Measurement): Used to calculate inaccessible distances using the Pythagorean theorem.
- Select Pythagorean mode (e.g., two-point or three-point).
- Follow the on-screen prompts to measure the required sides (hypotenuse and one leg).
- The device will calculate the unknown leg or height.
5.5 Mgbakwunye na Mwepụ
You can add or subtract measurements directly on the device.
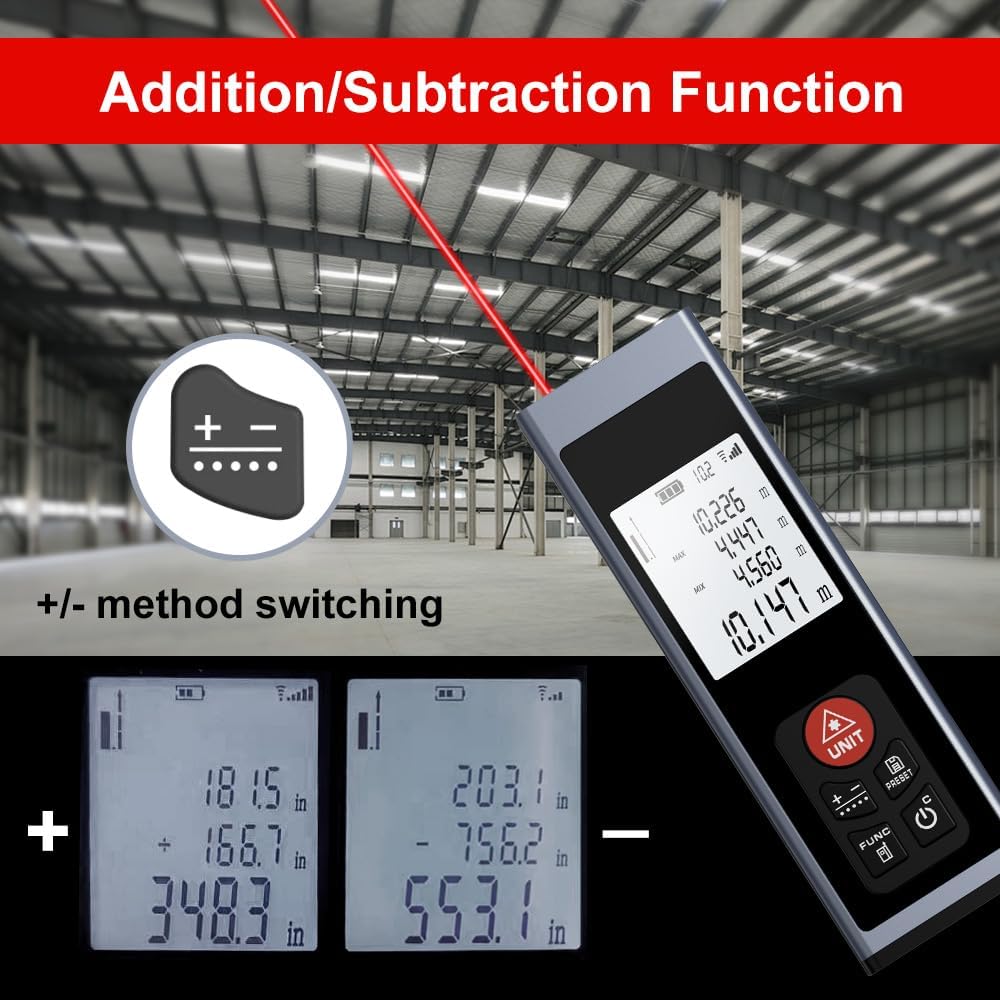
Foto 5.3: Examples of addition and subtraction operations displayed on the device screen.
- Take your first measurement.
- Pịa Addition / Subtraction Measurement Button () to select either addition (+) or subtraction (-).
- Take your second measurement.
- The device will display the calculated sum or difference.
5.6 Measurement History and Preset Values
- Pịa History / Preset Value Setting Button (PRESET) ka review previous measurements or to set specific preset values for quick recall. Refer to the on-screen prompts for detailed usage.
6. Nlekọta
- Nhicha: Jiri nwayọọ, damp cloth to clean the device. Do not use abrasive cleaners or solvents. Ensure the laser lens and display are kept clean for optimal performance.
- Nchekwa: Store the device in a cool, dry place, away from direct sunlight and extreme temperatures. If storing for an extended period, ensure the battery is partially charged (around 50%) to prolong its lifespan.
- Nlekọta batrị: Na-agbanye batrị mgbe niile, ọbụlagodi ma ọ bụrụ na anaghị ejikarị ngwaọrụ ahụ, iji kwado ahụike batrị.
7. Nchọpụta nsogbu
If you encounter issues with your AquilaPro KL02060, refer to the following common solutions:
| Nsogbu | Ihe nwere ike ime | Ngwọta |
|---|---|---|
| Ngwaọrụ anaghị agbanwu ọkụ. | Batrị dị ala ma ọ bụ mebie. | Charge the device using the USB cable. |
| Ntụle ezighi ezi. | Dirty laser lens; incorrect reference point; unstable surface. | Clean the laser lens; verify the front/rear reference setting; ensure a stable measurement surface. |
| A naghị ahụ ìhè laser anya. | Bright ambient light; device malfunction. | Use in lower light conditions; contact customer support if problem persists. |
| Ngosipụta ghe oghe ma ọ bụ oyi kpọnwụrụ. | Software error; low battery. | Try restarting the device. Ensure battery is charged. |
If the problem persists after attempting these solutions, please contact AquilaPro customer support.
8. Nkọwapụta
| Njirimara | Nkọwa |
|---|---|
| Nọmba nlereanya | KL02060 |
| Oke nso | 197 ft (60 m) |
| Izi ezi | ±0.078 inch (±2 mm) |
| Nkeji nha | Meters (m), Inches (in), Feet (ft) |
| Klas laser | Klas II, <1mW |
| Ụdị batrị | Rechargeable Lithium-ion (included) |
| Nchaji ọdụ ụgbọ mmiri | USB |
| Akụkụ ngwaahịa | 2.79 x 1.52 x 8.64 cm (approx. 28L x 15W x 86H mm) |
| Ibu Ibu | 50 g |
| Ihe onwunwe | Aluminom |
| Ọkwa Nguzogide mmiri | Waterproof (IP54 International Protection Rating) |
| Ngwa gụnyere | Lanyard |
9. Akwụkwọ ikike na nkwado
AquilaPro products are designed for reliability and performance. For warranty information or technical support, please refer to the contact details provided with your purchase or visit the official AquilaPro websaịtị.