
PROSCAN PDVD7751
Ntuziaka Ntuziaka Ngwaọrụ DVD nke Proscan PDVD7751 nke ihuenyo abụọ nke nwere ihuenyo 7"
Model: PDVD7751
Okwu mmalite
This manual provides essential information for the safe and efficient operation of your Proscan PDVD7751 7" Dual Screen Portable DVD Player. Please read this manual thoroughly before using the device and retain it for future reference.
The Proscan PDVD7751 is designed to provide portable entertainment with its dual 7-inch widescreen color LCD displays. It is suitable for various environments, including family road trips and general on-the-go use. The player supports multiple media formats and offers flexible power options for convenience.
Ihe ngwugwu
Nyochaa na etinyere ihe niile edepụtara n'okpuru na ngwugwu gị:
- Main Unit Proscan 7" Dual Screen Portable DVD Player
- Second Display Screen Unit
- AC Wall nkwụnye
- Ihe nkwụnye ụgbọ ala DC
- 2x Headrest Mounting Straps
- 1x Video Connection Cable (for connecting both displays)
- Ntuziaka onye ọrụ (akwụkwọ a)

Image: All components included in the Proscan PDVD7751 package, laid out on a surface.
Melite
1. Ịkwanye ngwaọrụ
The unit can be powered using either the included AC wall adapter for home use or the DC car adapter for in-vehicle use.
- Ike AC: Connect the AC wall adapter to the DC IN port on the main unit and plug it into a standard wall outlet.
- Ike Ụgbọala: Connect the DC car adapter to the DC IN port on the main unit and plug it into your vehicle's cigarette lighter socket.
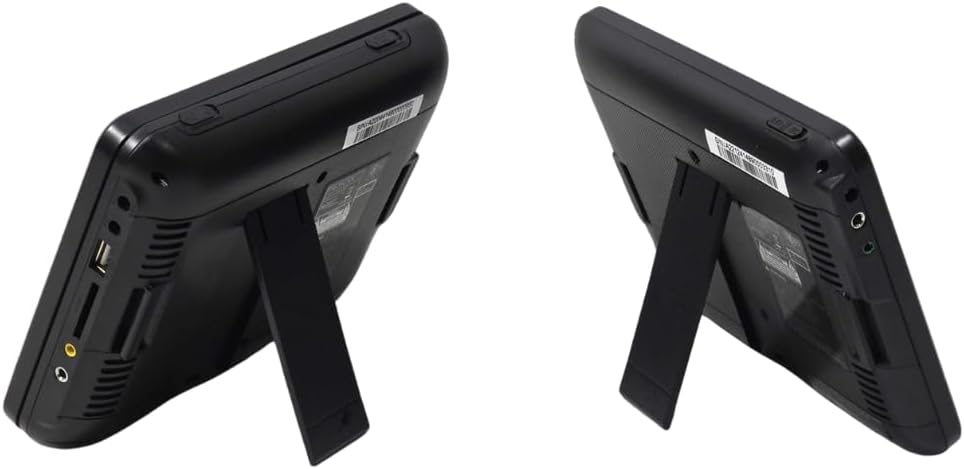
Image: Close-up of the side panel of the main DVD player unit, highlighting the power input and other ports.
2. Connecting the Dual Screens
To utilize both screens, connect the video connection cable from the main unit to the second display screen unit.
- Locate the AV OUT port on the main DVD player unit.
- Connect one end of the video connection cable to the AV OUT port.
- Locate the AV IN port on the second display screen unit.
- Connect the other end of the video connection cable to the AV IN port on the second display.
3. Headrest Installation (Optional)
The included headrest mounting straps allow for easy installation in a vehicle.
- Securely attach one mounting strap to the back of each screen unit.
- Wrap the straps around the vehicle's headrests and fasten them to hold the screens in place.
- Adjust the straps to ensure the screens are stable and at an optimal viewakụkụ n'akuku.

Image: Two Proscan screens securely attached to the back of car headrests using the provided straps.
Ntuziaka ọrụ
1. Ịtinye diski
- Open the disc cover on the main DVD player unit.
- Carefully place a DVD or CD onto the spindle with the label side facing up.
- Close the disc cover firmly until it clicks into place.
2. Na-egwu mgbasa ozi
- Turn on the main unit using the power switch. The screen will display the Proscan logo.
- The player will automatically detect the disc and begin playback.
- Use the control buttons on the unit or the remote control to manage playback (Play/Pause, Stop, Skip, Volume).

Image: The main DVD player unit with a movie playing on its 7-inch screen.
3. Using USB and SD Card
The player supports media playback from USB drives and SD cards.
- Insert a USB drive into the USB port or an SD card into the SD card slot on the side of the main unit.
- Use the 'Mode' button on the unit or remote to select the appropriate input source (USB or SD).
- Navigate through your media files using the control buttons and select the desired file maka ịkpọghachi.

Image: Close-up of the side panel of the main DVD player unit, showing the USB port and SD card slot.
4. Ndakọrịta nke mgbasa ozi
The Proscan PDVD7751 supports a wide range of media formats:
- Ụdị DVD: DVD, DVD±R/RW, VCD
- CD Formats: CD, CD-R/RW
- Ụdị ọdịyo: MP3
Nlekọta
- Nhicha: Use a soft, dry cloth to clean the screen and exterior of the unit. Do not use liquid cleaners or abrasive materials.
- Nlekọta diski: Jide diski ndị ahụ n'akụkụ ha iji zere mkpịsị aka na ọkọ. Debe diski ndị ahụ n'ime akpa ha mgbe a naghị eji ha.
- Nchekwa: When not in use for extended periods, store the player in a cool, dry place away from direct sunlight and extreme temperatures.
Nchọpụta nsogbu
| Nsogbu | Ihe nwere ike ime | Ngwọta |
|---|---|---|
| Enweghị ike | Ejikọtaghị ihe nkwụnye ọkụ ma ọ bụ mejọrọ. | Ensure the AC/DC adapter is securely connected to the unit and a working power source. Check the power outlet. |
| Diski anaghị egwu egwu / njehie "Enweghị Diski" | Disc is dirty, scratched, or inserted incorrectly. Protective tag ewepụrụghị ya. | Clean the disc with a soft cloth. Reinsert the disc with the label side up. Ensure the yellow protective tag from the disc tray is removed before first use. |
| No picture on second screen | Video connection cable is loose or faulty. | Check that the video connection cable is securely plugged into both the main unit's AV OUT and the second screen's AV IN ports. |
| Enweghị ụda | Olu dị obere ma ọ bụ mechie. | Increase the volume using the VOL+ button or check if the unit is muted. |
Nkọwapụta
- Akara: PROSCAN
- Nọmba nlereanya: PDVD7751
- Nha ihuenyo: Abụọ 7 sentimita asatọ
- Ụdị ngosi: LCD
- Agba: Nwa
- Ibu ihe: Ihe dị ka 2 pound
- Nkwado Ụdị Mgbasa Ozi: SD Card, USB, DVD, DVD±R/RW, CD, CD-R/RW, VCD, MP3
Akwụkwọ ikike na nkwado
For warranty information or technical support, please refer to the contact details provided with your purchase documentation or visit the official Proscan websaịtị.
Vidiyo ngwaahịa
FANGOR Car DVD Player - Make Kids Love Road Trips
Video: An official seller video demonstrating the FANGOR car DVD player, highlighting its use for entertaining children during road trips. This video showcases the dual screen setup and ease of use in a vehicle environment.
OTIC 10.1" Dual Screen DVD Player
Video: An official seller video showcasing the OTIC 10.1" Dual Screen DVD Player. This short video demonstrates the product's features and how it can be used to provide entertainment on the go.
Ask a question about this manual
Ask about setup, troubleshooting, compatibility, parts, safety, or missing instructions. Manuals+ will review the question and use this page’s manual context to help answer it.