1. Okwu mmalite
This instruction manual provides comprehensive guidance for the assembly, operation, maintenance, and troubleshooting of your Marada 8040 Aluminum Profile Racing Simulator Cockpit with Seat. Please read this manual thoroughly before assembly and use to ensure proper setup and safe operation.

Figure 1: Marada Aluminum Profile Racing Simulator Cockpit with Seat.
2. Ozi nchekwa
- Ensure all components are securely fastened before use. Loose parts can cause instability and potential injury.
- Debe aka na mkpịsị aka gị ka ha ghara ịgagharị n'ebe dị iche iche mgbe ị na-ahazi ya.
- Do not exceed the maximum weight limit of 400 pounds for the cockpit.
- Use appropriate tools for assembly and adjustments. Avoid over-tightening screws to prevent damage to the aluminum profiles.
- Keep children and pets away from the cockpit during assembly and operation.
3. Ihe ngwugwu
Your Marada 8040 Racing Simulator Cockpit is shipped in three separate boxes. Please verify all components are present before beginning assembly.

Figure 2: Package details for Marada Racing Simulator Cockpit, indicating components are shipped in three boxes: Racing Seat, Profile Racing Frame, and Racing Controller Stand.
Ngwa gụnyere:
- Aluminom Profile Frame sections (various lengths)
- Racing Seat with sliding rails
- Steering Wheel Bracket
- Nkwụsị Pedal
- Ugwu Shifter
- Assembly Hardware (bolts, nuts, corner brackets, T-nuts, wrenches)
4. Ntọala na Mgbakọ
Assembly of the Marada 8040 cockpit involves connecting the aluminum profiles and mounting the various components. It is recommended to use hand tools for assembly to prevent over-tightening and damage to the aluminum rails.
4.1 Frame Mgbakọ
Begin by assembling the base frame using the provided aluminum profiles and corner brackets. Ensure all connections are secure but do not fully tighten until all major frame components are in place to allow for minor adjustments.

Figure 3: Initial assembly of the aluminum profile etiti.
Ntinye oche 4.2
Attach the seat brackets to the main frame, then secure the racing seat onto these brackets. The seat features dual brake slides for stability and ease of adjustment.
Figure 4: Racing seat mounted on the cockpit frame.
4.3 Steering Wheel and Pedal Stand Assembly
Mount the steering wheel bracket and pedal stand to the main frame. These components are designed for extensive adjustability to suit various driving positions.
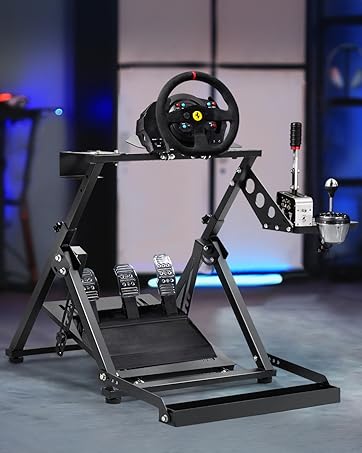
Figure 5: Steering wheel stand assembly.

Figure 6: Pedal stand with flexible placement options.
4.4 Shifter Mount Installation
Attach the shifter mount to the side of the cockpit frame. This mount supports both left and right-hand driving configurations.

Figure 7: Shifter mount attached to the cockpit.
5. Ndozi
The Marada 8040 cockpit offers extensive adjustability to optimize your racing experience. Take your time to find the most comfortable and effective setup for your body and driving style.
5.1 Ndozi oche
- Akụkụ azụ azụ: The ergonomic seat supports a backrest adjustment range of 90-180 degrees, allowing for various driving modes (F1, truck, off-road) or even reclining for breaks.
- Forward/Backward Position: Utilize the double track design and sliding rails to move the seat forward or backward to achieve optimal pedal and steering wheel reach.

Figure 8: Seat recline and position adjustments.
5.2 Steering Wheel and Pedal Adjustment
- Steering Wheel Angle: The steering wheel bracket can be adjusted for angle and height to match your preferred driving posture.
- Pedal Position: The pedal stand allows for up and down movement, multiple angle adjustments, and even inverted installation for different driving preferences.

Figure 9: Adjusting steering wheel and shifter positions.
5.3 Shifter Position Adjustment
The shifter bracket features a locking design that supports forward and backward movement, allowing you to position your shifter optimally.
Video 1: Demonstrates the adjustability of the Marada Sim Racing Cockpit, including seat, wheel, and pedal positions.
6. Ndakọrịta
The Marada 8040 Racing Simulator Cockpit is designed for broad compatibility with popular racing peripherals.
- Ngwa dakọtara: Logitech (G29, G920, G923), Thrustmaster (T300RS GT, T248), Fanatec, Moza R5, and other similar brands.
- Hardware Platforms: PlayStation 4, PlayStation 5, Xbox, Xbox 360, Xbox One.

Figure 10: Compatibility with various steering wheels and pedals.
7. Ntuziaka ọrụ
Once assembled and adjusted, connect your preferred racing peripherals (steering wheel, pedals, shifter) to your gaming platform. Ensure all cables are managed to prevent interference or damage. Enjoy an immersive racing experience with the stable and adjustable Marada 8040 cockpit.

Figure 11: User enjoying the racing simulator cockpit.
Video 2: Shows the Marada cockpit in use with a racing setup, demonstrating the immersive experience.
8. Nlekọta
- Regularly inspect all bolts and connections to ensure they remain tight. Re-tighten as necessary.
- Clean the aluminum profiles and seat fabric with a damp akwa . Zere kemịkalụ siri ike nke nwere ike imebi njedebe.
- Keep the cockpit in a dry environment to prevent rust or corrosion.
9. Nchọpụta nsogbu
- Akwụsịghị ike/na-ama jijiji: Check all frame connections and ensure bolts are tightened. Verify the cockpit is on a flat, stable surface.
- Ịgbanwe Ihe Isi Ike: Loosen the relevant bolts slightly, make the adjustment, then re-tighten. Ensure no debris is obstructing the sliding mechanisms.
- Peripherals Not Mounting: Refer to the mounting instructions for your specific peripheral (steering wheel, pedals, shifter) and ensure you are using the correct mounting points and hardware provided with the cockpit.
10. Nkọwapụta
| Njirimara | Nkọwapụta |
|---|---|
| Aha ika | Marada |
| Aha Nlereanya | 8040 racing simulator cockpit with seat |
| Ibu Ibu | 104.72 pound |
| Akụkụ ihe (L x W x H) | 31.5 x 25.9 x 7.1 sentimita asatọ |
| Ngwa dakọtara | Logitech, Fanatec, Thrustmaster |
| Ngwaike Platform | Playstation 4, Playstation 5, Xbox, Xbox 360, Xbox one |
| Atụmatụ oche | Black ergonomic racing simulator seats are breathable and non collapsing, adjustable back, double track design |
| Frame Ihe | 40x80mm solid aluminum profile |
| Ngbanwe | Unlimited adjustment of seat, steering wheel bracket, and footrest; three driving modes (F1, truck, off-road) |

Figure 12: Cockpit dimensions and user limits.
11. Akwụkwọ ikike na nkwado
The Marada 8040 Racing Simulator Cockpit comes with a Akwụkwọ ikike nke ọnwa 3 and permanent online technical support. For any inquiries or assistance, please contact Marada customer support.
Ị nwere ike ịchọta ozi ndị ọzọ na nkọwa kọntaktị na Marada Store Page.