
Okwu mmalite
This manual provides comprehensive instructions for the installation and use of the VCELINK Cat 7 Tool-Free RJ45 Connector. Designed for ease of use and high performance, this connector allows for quick and reliable termination of Cat 7 network cables without specialized crimping tools. Its robust construction ensures stable signal transmission and durability.
The full metal structure, made from zinc alloy, effectively shields against external network signal interference. Phosphor bronze gold-plated contacts ensure fast and stable signal transmission, resisting corrosion and repeated connections, contributing to the RJ45 connector's high transmission quality and long lifespan.
The innovative tool-free design with an LSA threading guide simplifies and speeds up wiring. This connector is also reusable, helping to reduce waste. The entire installation process can be completed in approximately 2 minutes, making it accessible for both professional installers and DIY enthusiasts.
Ozi nchekwa
- Always handle network cables and connectors with care to avoid damage to the conductors or insulation.
- Gbaa mbọ hụ na mpaghara ọrụ ahụ dị ọcha yana ọkụ nke ọma.
- Do not expose the connector to excessive moisture or extreme temperatures.
- Debe ebe ụmụaka na-apụghị iru.
- If any part of the connector appears damaged, do not use it.
Ihe ngwugwu
Ngwungwu ahụ gụnyere:
- 2 x VCELINK Cat 7 Tool-Free RJ45 Connectors
- Akwụkwọ ntuziaka onye ọrụ 1 x (akwụkwọ a)
Nkọwapụta
| Nọmba nlereanya | KJ20BK-C7-2P-DE |
| Akụkụ ngwaahịa (L x W x H) | 4.97 x 2 x 0.92 cm |
| Ibu Ibu | 36 grams |
| Ihe dị n'elu | Zinc Alloy |
| Ụdị njikọ | RJ45 |
| Ụdị USB | Ethernet |
| Eriri Ethernet nke ụdị eriri | Category 7 (Cat 7) |
| Ọnụego mbufe data | 10 Gigabits per second (10Gbps) |
| Ugboro ugboro | 600 MHz |
| Ọnụọgụ nke ntụtụ | 8 |
| Ngwa dakọtara | Laptop, Router, Smart TV, Switch, Camera, TV Box |
| Akwadoro ojiji | Igwe nwụnye |
| Supported Cable Diameter (including insulation) | 1.35 ruo 1.5 mm |
| Ogologo eriri USB akwadoro | 6 ruo 9.5 mm |
| Supported Wire Gauge | AWG22-AWG26 (for CAT5 to CAT8 network cables) |
| Okpomọkụ na-arụ ọrụ | -10 Celsius C ruo 60 Celsius |
| Power over Ethernet (PoE) Support | PoE, PoE+, UPoE |
| Nkwekọrịta ụkpụrụ | Cat.6A ISO/IEC11801, TIA568-C.2 |
| Wiring Schemes Supported | T568A ma ọ bụ T568B |
Ntọala na nwụnye
Follow these steps to properly install the VCELINK Cat 7 Tool-Free RJ45 Connector:
Nzọụkwụ 1: Kwadebe eriri

Insert the cable boot onto the network cable. Carefully strip approximately 2-3 cm (0.8-1.2 inches) of the outer jacket from the cable end, exposing the shielded wires.
Step 2: Remove Foil Shield and Braid
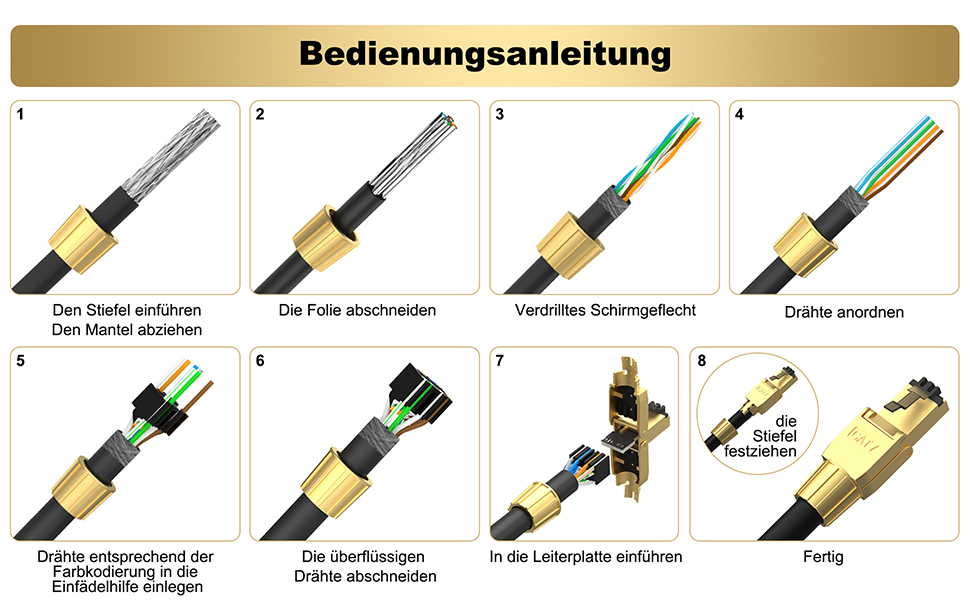
Carefully cut and remove any foil shield present. Twist the shield braid together to form a single strand.
Step 3: Organize and Place Wires

Untwist the wire pairs and straighten them. Refer to the color code diagram (T568A or T568B, typically printed on the load bar) and carefully insert each wire into its corresponding slot in the load bar. Ensure the wires are fully seated.
T568A Wiring Diagram:
1: White/Green, 2: Green, 3: White/Orange, 4: Blue, 5: White/Blue, 6: Orange, 7: White/Brown, 8: Brown
T568B Wiring Diagram:
1: White/Orange, 2: Orange, 3: White/Green, 4: Blue, 5: White/Blue, 6: Green, 7: White/Brown, 8: Brown
Step 4: Trim Excess Wires

Once all wires are correctly placed in the load bar, use a sharp cutter to trim any excess wire ends flush with the top of the load bar.
Step 5: Insert Load Bar into Connector

Carefully insert the load bar, with the trimmed wires, into the main body of the RJ45 connector. Ensure it clicks securely into place, making proper contact with the PCB.
Step 6: Close and Secure the Connector

Close the two halves of the connector housing until they snap together firmly. Slide the cable boot forward and tighten it onto the connector body to secure the cable and provide strain relief. The installation is now complete.
Ntuziaka ọrụ
Once properly installed, the VCELINK Cat 7 Tool-Free RJ45 Connector functions as a standard network connector. Simply plug the terminated cable into any compatible RJ45 port on your network devices.

The connector is compatible with a wide range of devices including laptops, routers, Smart TVs, network switches, IP cameras, and TV boxes.
The connector supports data transfer rates up to 10Gbps and frequencies up to 600MHz, making it suitable for high-speed network applications, including those requiring Power over Ethernet (PoE, PoE+, UPoE).
Nlekọta
The VCELINK Cat 7 Tool-Free RJ45 Connector requires minimal maintenance. To ensure optimal performance and longevity:
- Keep the connector and connected cables clean and free from dust and debris.
- Avoid bending or twisting the cable excessively near the connector.
- Ensure the connector is securely plugged into devices to prevent intermittent connections.
- Do not expose the connector to corrosive liquids or extreme environmental conditions.
Nchọpụta nsogbu
If you experience issues with your network connection after installing the connector, consider the following:
- Enweghị njikọ netwọkụ:
- Verify that all wires are correctly seated in the load bar according to the T568A or T568B standard.
- Ensure the load bar is fully inserted into the connector body and the housing is securely closed.
- Check that the cable is properly connected to both the network device and the wall jack/patch panel.
- Test the cable with a network cable tester if available.
- Ọsọ netwọk dị nwayọ:
- Confirm that the cable used is indeed Cat 7 and meets the specifications for your network speed requirements.
- Ensure there are no kinks or severe bends in the cable.
- Check for any external interference sources near the cable run. The full metal shielding of the connector helps, but the cable itself should also be shielded for optimal performance.
- Njikọ na-adịte aka:
- Re-check all connections for looseness.
- Inspect the wire terminations within the load bar for any loose or improperly cut wires.
Akwụkwọ ikike na nkwado
VCELINK provides an Akwụkwọ ikike ịdị mma nke ọnwa 18 for this product. We are committed to ensuring customer satisfaction.
In case of any quality-related issues, you are eligible for a full refund or a free replacement. Our customer service team is available awa 24 to assist you with any questions or concerns regarding your VCELINK Cat 7 Tool-Free RJ45 Connector.
For support, please contact VCELINK directly through the retailer's platform or visit our official websaịtị.