
1. Okwu mmalite
This manual provides detailed instructions for the installation, operation, and maintenance of your Geek Smart Fingerprint Door Lock, Model L-B201. Please read this manual thoroughly before installation and use to ensure proper function and longevity of the product. Keep this manual for future reference.
2. Akụrụngwa Ngwaahịa
- Nchọpụta akara mkpịsị aka: Stores up to 20 unique fingerprints for quick and secure access. Unlocks in approximately 0.1 seconds.
- Ụdị arụ ọrụ abụọ: Easily switch between Normal mode (auto-lock after 5 seconds) and Passage mode (remains unlocked for free passage).
- Ogologo ndụ batrị: Powered by 4 AAA batteries (not included), providing approximately 8-12 months of operation.
- Ike Mberede: Equipped with a USB port for emergency charging if batteries deplete.
- Nwụnye dị mfe: Designed for easy DIY installation with minimal tools required. Voice assistant guides programming.
- Ndakọrịta Universal: Suitable for both left and right-handed doors. Fits standard door thicknesses from 1-3/8'' to 2-1/8'' (35 to 55mm). Adjustable latch for 2-3/8'' (60mm) or 2-3/4'' (70mm) backsets.
- Nnweta Ndabere: Includes physical keys for manual override.
3. Ihe ngwugwu
Chọpụta na akụrụngwa niile dị tupu ịmalite nrụnye:
- Mgbakọ njikwa ihu
- Mgbakọ njikwa azụ
- Latch
- Efere efere
- Igodo (2)
- Keyhole Cover Pin
- Ihe mgbakwasị ụkwụ (4)
- Akpa rọba
- Akwụkwọ ntuziaka (akwụkwọ a)
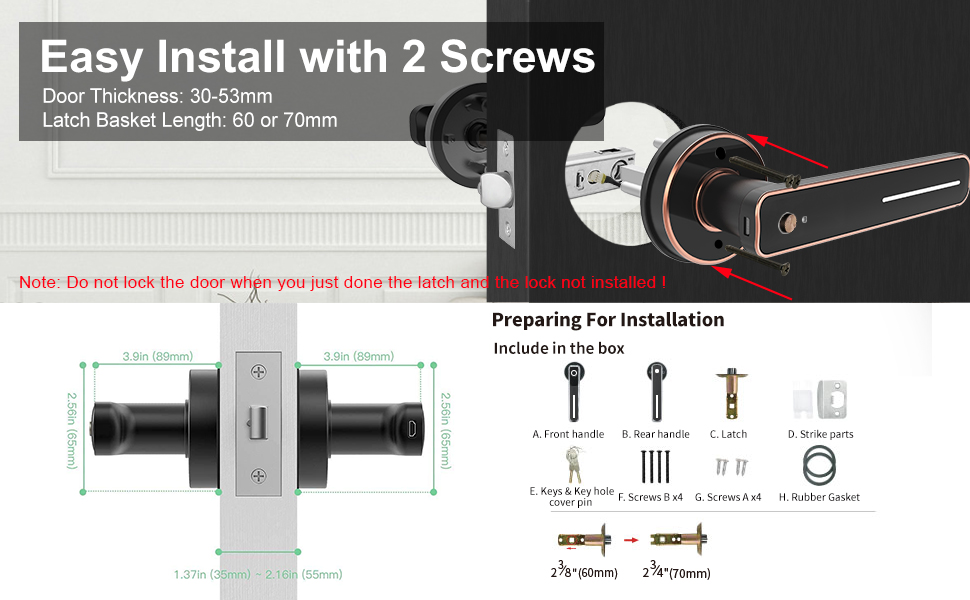
Image: Included components for installation, featuring front and rear handles, latch, strike plate, keys, screws, and gasket.
4. Ntuziaka nwụnye
Installation typically requires only a screwdriver. Follow these steps carefully:
- Kwadebe Ọnụ ụzọ: Ensure your door meets the thickness requirements (1-3/8'' to 2-1/8'' or 35-55mm) and that the latch backset is set correctly (60mm or 70mm).
- Wụnye Latch: Insert the latch into the door edge. Ensure the bevel of the latch bolt faces the door frame. Secure with screws.
- Install the Front Handle: Position the front handle assembly on the exterior side of the door, aligning the spindle with the latch mechanism.
- Install the Rear Handle: Place the rubber gasket on the interior side of the door. Connect the rear handle assembly to the front handle, ensuring wires are not pinched.
- Secure the Lock: Use the provided screws to firmly attach both handle assemblies to the door.
- Wụnye Efere Strike: Mount the strike plate on the door frame, aligning it with the latch bolt.
- Fanye batrị: Open the battery compartment on the rear handle and insert 4 AAA batteries (not included), observing polarity.

Image: Visual guide for installing the smart lock using two screws, highlighting door thickness and latch basket length.
Note: Do not lock the door when you have just installed the latch and the lock is not fully assembled.
5. Ọrụ
5.1 Initial Setup and Fingerprint Enrollment
- After battery installation, the lock will prompt you with voice instructions.
- To add the first administrator fingerprint, follow the voice prompts. You will typically need to place your finger on the sensor multiple times from different angles.
- Once the administrator fingerprint is registered, you can add additional user fingerprints (up to 20 total) by following similar voice prompts.

Image: The fingerprint sensor in action, showing a quick 0.1-second read speed and capacity for 20 fingerprints.
5.2 Imeghe ụzọ
- Mkpisiaka: Place a registered finger on the sensor. The lock will unlock if the fingerprint is recognized.
- Igodo: In case of emergency or battery depletion, use the provided physical key to unlock the door.
5.3 Mode Switching (Passage Mode / Normal Mode)
The lock features a mode switching button, typically located on the interior handle. Press this button to toggle between modes.
- Ụdị nkịtị: The lock will automatically engage (auto-lock) approximately 5 seconds after being unlocked. This is the standard secure mode.
- Ụdị ngafe: The lock will remain unlocked, allowing free entry and exit without requiring a fingerprint or key. This mode is suitable for periods of high traffic.
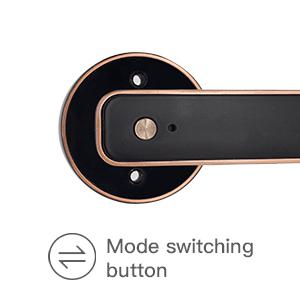
Image: Detail of the mode switching button on the lock's interior handle.

Image: The lock set to Passage Mode, allowing unrestricted entry and exit.
5.4 Nchaji Mberede
If the batteries run out, the lock can be temporarily powered using a standard USB power bank connected to the emergency USB port on the exterior handle. This allows you to unlock the door with a registered fingerprint or key.

Image: The USB port for emergency power, located on the exterior handle.

Image: A physical backup key provided for manual access.
6. Nlekọta
- Nhicha: Wipe the lock surface with a soft, dry cloth. Avoid abrasive cleaners or solvents that could damage the finish or electronic components.
- Ngbanwe batrị: Replace all 4 AAA batteries when the low battery indicator or voice prompt is activated. Do not mix old and new batteries.
- Nlekọta Ihe Mmetụta Mkpisi Aka: Debe ihe mmetụta mkpịsị aka dị ọcha ma kpọọ nkụ maka arụmọrụ kacha mma.
7. Nchọpụta nsogbu
| Nsogbu | Ihe nwere ike ime | Ngwọta |
|---|---|---|
| Mkpọchi anaghị aza. | Batrị nwụrụ anwụ. | Replace batteries or use emergency USB power. |
| Achọpụtaghị akara mkpịsị aka. | Finger is wet/dirty, sensor is dirty, or fingerprint not properly registered. | Clean finger and sensor. Re-enroll fingerprint if necessary. Try a different registered finger. |
| Mkpọchi anaghị akpọchi akpaaka. | Lock is in Passage Mode. | Press the mode switching button to return to Normal Mode. |
| Voice prompts are unclear or absent. | Low battery or internal error. | Dochie batrị. Ọ bụrụ na nsogbu dị, kpọtụrụ nkwado ndị ahịa. |
8. Nkọwapụta
| Njirimara | Nkọwa |
|---|---|
| Nlereanya | L-B201 |
| Ụdị | Geek Smart |
| Ụdị mkpọchi | Biometric Fingerprint Handle Lock |
| Ihe onwunwe | Aluminom |
| Agba | Nwa |
| Ike akara mkpịsị aka | Ruo 20 |
| Mepee ọsọ | Ihe dị ka sekọnd iri atọ |
| Isi Iyi Ike | Batrị 4 x AAA (anaghị etinye ya) |
| Ike mberede | Ọdụ ụgbọ mmiri USB |
| Ndụ batrị | Ọnwa 8-12 (ihe dị ka) |
| Ọkpụrụkpụ ọnụ ụzọ | 1-3/8'' to 2-1/8'' (35-55mm) |
| Latch nwere ike idozi | 2-3/8'' (60mm) or 2-3/4'' (70mm) |
| Akụkụ (L x W x H) | 6.03 x 2.55 x 2.82 sentimita asatọ |
| Ibu Ibu | 2.72 pound |
| Njikọta | No Bluetooth or Wi-Fi Connectivity |
9. Akwụkwọ ikike na nkwado
For warranty information and customer support, please refer to the official Geek Smart website or contact the retailer from whom you purchased the product. Keep your purchase receipt as proof of purchase.