1. Okwu mmalite
Daalụ maka ịzụrụasing the Depusheng U6 Audio Mixer. This 6-channel DJ sound controller is designed for versatile audio mixing, recording, and live streaming applications. It features a built-in USB audio interface, Bluetooth connectivity, and U-Disk playback/recording capabilities. This manual provides essential information for safe operation, setup, and optimal performance of your device. Please read it thoroughly before use and retain it for future reference.
2. Ozi nchekwa
- Isi mmalite ike: Use only the specified power adapter or a compatible USB power source. Ensure the voltage dakọtara na ngwaọrụ chọrọ.
- Mmiri na mmiri: Do not expose the mixer to water, rain, or excessive moisture. Avoid placing liquid-filled objects on the unit.
- Igwe ikuku: Gbaa mbọ hụ na ikuku ikuku dị mma. Akwụsịla oghere ikuku.
- Okpomọkụ: Debe ihe dị n'ime ya ka ọ ghara ịdị n'ebe okpomọkụ dị dịka radiator, ihe ndekọ okpomọkụ, stovu, ma ọ bụ ngwa ndị ọzọ na-emepụta okpomọkụ dị.
- Nhicha: Jiri akwa kpọrọ nkụ hichaa naanị. Ejila ihe nhicha mmiri ma ọ bụ ihe nhicha ikuku.
- Ije ozi: Anwala ịnye ngwaahịa a n'onwe gị. Tụtụ aka n'aka ndị ọrụ ruru eru.
- Phantom Ike: When using condenser microphones, ensure +48V phantom power is activated only when necessary and that the microphone is compatible.
3. Ihe ngwugwu
Biko lelee na etinyere ihe niile ndị a na ngwugwu gị:
- Depusheng U6 Audio Mixer
- USB Power USB
- Akwụkwọ ntuziaka onye ọrụ
4. Ngwaahịa gafereview
The Depusheng U6 is a compact 6-channel mixer designed for various audio applications. It features multiple input and output options, integrated effects, and digital connectivity.
4.1 Njikwa ihu ihu na njikọ
The front panel provides access to all mixing controls and primary input/output ports.

Nkọwa onyonyo: A zuru ezu view of the Depusheng U6 Audio Mixer's front panel, showing all knobs, faders, buttons, and the digital display for USB/Bluetooth functions. Key controls include GAIN, HIGH, LOW, EFX, PEAK, VOL for each channel, along with DELAY, REPEAT, and MAIN volume controls. The USB port and Bluetooth indicator are also visible.
- Ntinye MIC/LINE (Ọwa 1-4): Combo jacks supporting both XLR and 1/4" (6.35mm) inputs for microphones or line-level instruments.
- +48V PHANTOM: Button to activate +48V phantom power for condenser microphones on channels 1-4.
- Nweta: Na-agbanwe mmetụta ntinye maka ọwa ọ bụla.
- Elu/ala: 2-band equalizer for adjusting treble and bass frequencies for each channel.
- EFX: Sends signal to the built-in effects processor (DELAY/REPEAT).
- Ọkụ ọkụ kacha elu: Na-enwu mgbe ihe mgbaàmà ntinye dị oke elu, na-egosi ike ịbelata.
- Mpịakọta: Channel volume control.
- S/S (Stereo Input 5/6): 1/4" stereo inputs for connecting line-level devices.
- REC/MAIN OUT (RCA): Stereo RCA outputs for recording or connecting to external devices.
- MAIN OUT (1/4"): Stereo 1/4" outputs for connecting to power amplifiers ma ọ bụ ndị na-ekwu okwu na-arụ ọrụ.
- Ọdụ ụgbọ mmiri USB: For U-Disk playback/recording and connection to a computer as an audio interface.
- MODE/BT (Bluetooth): Button to switch between USB, Bluetooth, and other modes.
- PLAY/PAUSE, PREVIOUS, NEXT: Controls for U-Disk and Bluetooth playback.
- DELAY/REPEAT: Controls for adjusting the built-in delay effect.
- CLIP LED: Indicates output signal clipping.
- Ike Ikanam: Na-egosi na agbanyere unit ahụ.
- Isi: Master volume control for the main output.
- Ekwentị: Njikwa olu ekweisi.
- Jack ekweisi: 1/4" stereo output for monitoring.
4.2 Input Interface Types

Nkọwa onyonyo: Agara nso view of the input jacks on the Depusheng U6 Audio Mixer, illustrating both the 6.5mm (1/4 inch) and XLR connection types for microphones and line-level devices. This image highlights the versatility of the combo input jacks.
- 6.5mm (1/4") Interface: For connecting instruments or line-level audio sources.
- XLR Interface: For connecting microphones, providing a balanced connection.
5. Nhazi
5.1 Ịkwanye Ngwakọta ahụ Ike
The Depusheng U6 mixer can be powered via its USB port.

Nkọwa onyonyo: This image demonstrates two methods of powering the Depusheng U6 Audio Mixer via USB: connecting it to a computer's USB port or to a portable power bank. This highlights the flexibility of its power options.
- Connect the provided USB cable to the mixer's USB power input.
- Connect the other end of the USB cable to a computer's USB port or a USB power adapter (not included) connected to a wall outlet, or a power bank.
- The POWER LED on the mixer will illuminate when power is supplied.
5.2 Njikọ njikọ
Refer to the diagram below for typical connection setups.

Nkọwa onyonyo: A comprehensive diagram illustrating various connection possibilities for the Depusheng U6 Audio Mixer. It shows connections for a computer, condenser microphone, dynamic microphone, wireless microphone receiver, power amplifier, passive speakers, and headphones, demonstrating a complete audio setup.
- Igwe okwu: Connect dynamic or condenser microphones to the MIC/LINE inputs (Channels 1-4) using XLR cables. Activate +48V phantom power for condenser microphones.
- Instruments/Line Devices: Connect instruments or other line-level devices to the MIC/LINE inputs (Channels 1-4) using 1/4" cables, or to the S/S (Stereo Input 5/6) using 1/4" stereo cables.
- Output to Speakers/Ampntughari: Connect the MAIN OUT (1/4") to your power amplifier ma ọ bụ ndị na-ekwu okwu na-arụ ọrụ.
- Igwe ekweisi: Connect headphones to the PHONE jack for monitoring.
- Kọmputa: Connect the mixer's USB port to your computer for use as an audio interface.
6. Ntuziaka ọrụ
6.1 Wireless Bluetooth Streaming
The U6 mixer supports wireless Bluetooth audio streaming from compatible devices.
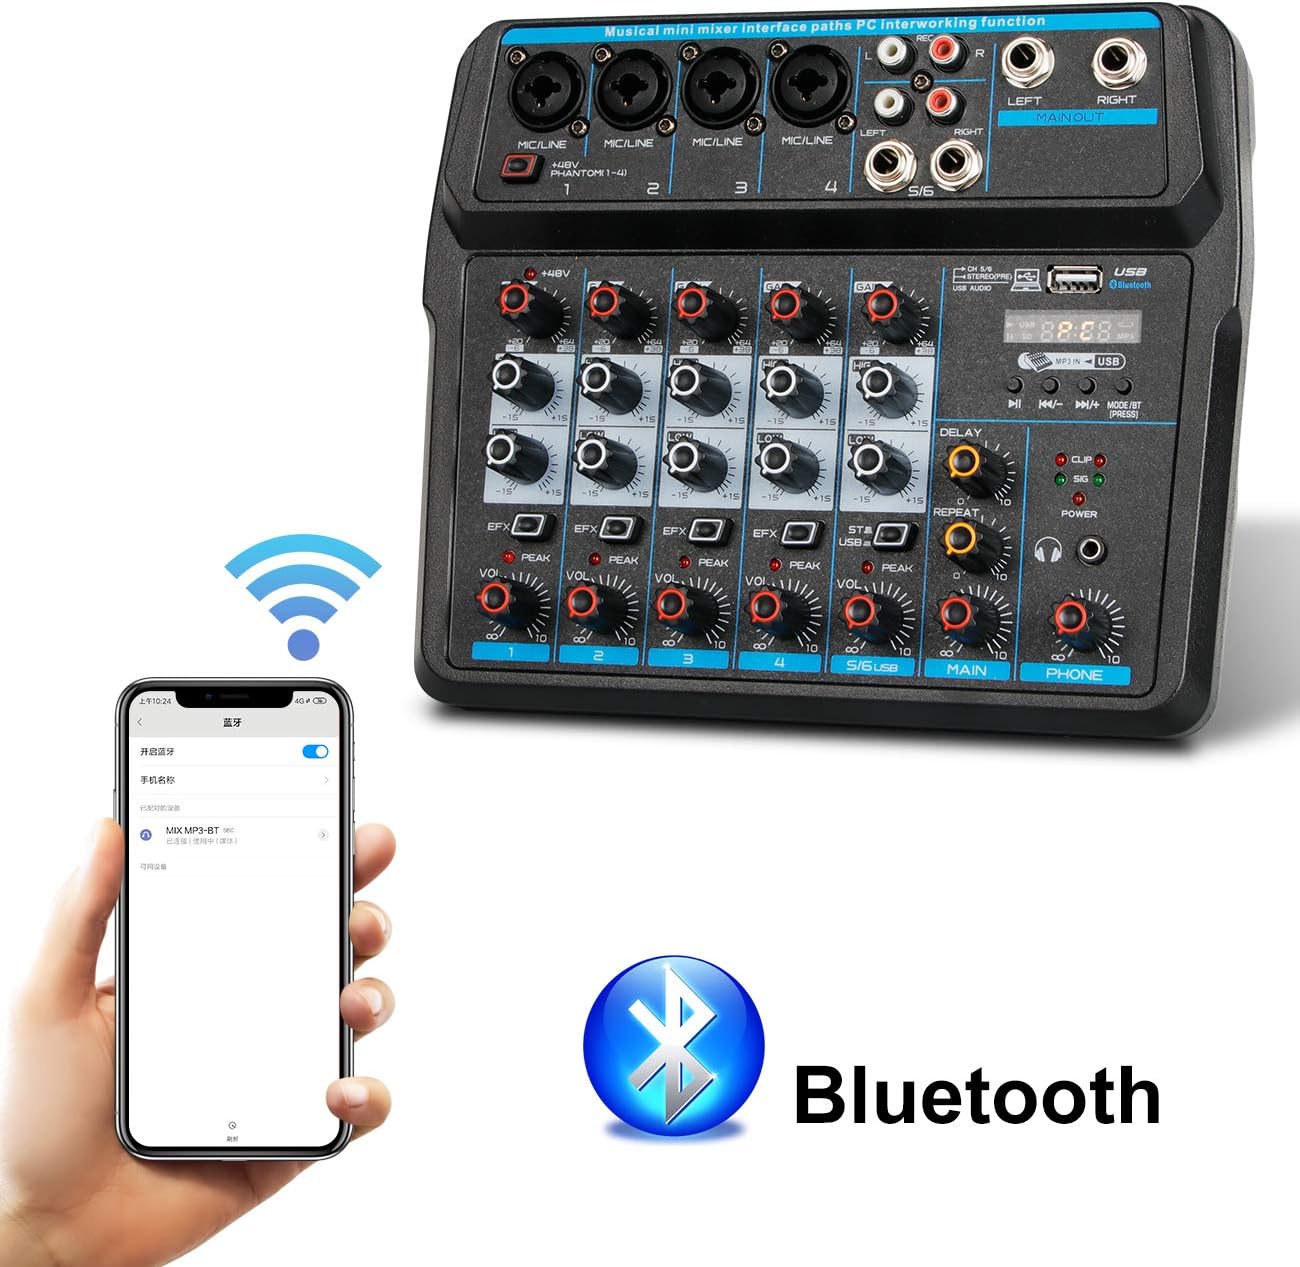
Nkọwa onyonyo: This image shows a smartphone displaying its Bluetooth settings, with the Depusheng U6 Audio Mixer (labeled 'U6 MP3-BT') available for connection. A large Bluetooth logo is also present, indicating the wireless connectivity feature.
- Pịa MODE/BT button on the mixer until the Bluetooth indicator lights up and the display shows 'BT'.
- Na ngwaọrụ mkpanaaka gị (smartphone, tabletị, wdg), gbanye Bluetooth wee chọọ ngwaọrụ dịnụ.
- Select 'U6 MP3-BT' from the list to pair.
- Once paired, you can stream audio wirelessly from your device to the mixer. Bluetooth operates effectively within approximately 1.5 feet.
6.2 USB Audio Interface (PC Recording/Playback)
The U6 mixer can function as an external sound card for your computer.

Nkọwa onyonyo: This diagram illustrates how to connect the Depusheng U6 Audio Mixer to a laptop via USB for both playback and recording. It shows audio signals flowing from the computer to the mixer (background music) and from the mixer to the computer (for recording), with a close-up of the USB connection port on the mixer.
- Connect the mixer to your PC using a USB cable.
- The mixer will be recognized as a USB audio device by your computer.
- In your computer's sound settings or DAW (Digital Audio Workstation) software (e.g., Pro Tools, Logic Pro X, GarageBand, Audacity), select the U6 mixer as the input and output audio device.
- You can now record audio from the mixer's inputs to your computer or play back audio from your computer through the mixer.
6.3 U-Disk Playback and Recording
The mixer supports direct playback of audio files from a USB flash drive (U-Disk) and recording to it.

Nkọwa onyonyo: This image highlights the U-Disk functionality of the Depusheng U6 Audio Mixer. It shows a USB flash drive inserted into the mixer's USB port, with text indicating its capabilities: 1. Play MP3/WAV/WMA/FLAC files, and 2. Record audio. The mixer's digital display shows '88:88', likely indicating playback time or a menu option.
- Nkpọghachi: Insert a U-Disk containing audio files (MP3/WAV/WMA/FLAC) into the USB port. The mixer will automatically switch to U-Disk mode or you may need to press MODE/BT. Use the PLAY/PAUSE, PREVIOUS, and NEXT buttons to control playback.
- Edekọ: To record to a U-Disk, ensure it is inserted and the mixer is in U-Disk mode. Follow the specific recording instructions in the full manual (if available) or typically press and hold the PLAY/PAUSE button to initiate recording.
6.4 Using Effects (DELAY and REPEAT)
The U6 mixer includes built-in DELAY and REPEAT effects to enhance your audio.
- Jiri ihe EFX knob on each channel to send a portion of that channel's signal to the effects processor.
- Hazie nke gbu oge knob to control the delay time of the effect.
- Hazie nke Tinyegharịa knob to control the number of repetitions of the delay effect.
- The overall level of the effects return can be controlled via a dedicated EFX return knob (if present) or integrated into the main mix.
7. Nlekọta
- Nhicha: Use a soft, dry cloth to clean the surface of the mixer. Do not use abrasive cleaners, waxes, or solvents.
- Nchekwa: Mgbe a naghị eji ya ruo ogologo oge, debe ihe ngwakọta ahụ n'ebe dị jụụ ma kpọọ nkụ, ebe anwụ na-anaghị apụta kpọmkwem ma ọ bụ oke okpomọkụ.
- Nlekọta USB: Always grasp the connector, not the cable, when unplugging. Avoid bending or kinking cables excessively.
8. Nchọpụta nsogbu
If you encounter issues with your Depusheng U6 Audio Mixer, refer to the following common problems and solutions:
| Nsogbu | Ihe nwere ike ime | Ngwọta |
|---|---|---|
| Enweghị mmepụta ụda |
|
|
| Igwe okwu anaghị arụ ọrụ |
|
|
| Bluetooth anaghị ejikọ |
|
|
| USB recording/playback issues |
|
|
9. Nkọwapụta
| Njirimara | Nkọwapụta |
|---|---|
| Ụdị | Depusheng |
| Nọmba nlereanya | U6 |
| Ọnụọgụ nke ọwa | 6 |
| Teknụzụ Njikọta | Bluetooth, USB |
| Ntinye ọdịyo | XLR, 1/4" (6.35mm) |
| Isi Iyi Ike | eriri USB |
| Ibu Ibu | 1.02 kilogram |
| Akụkụ ngwugwu | 29.3 x 24.3 x 9.2 cm |
| Ngwaọrụ Akụrụngwa | Bluetooth |
10. Akwụkwọ ikike na nkwado
Depusheng products are designed for reliability and performance. This product comes with a standard manufacturer's warranty. For specific warranty terms and conditions, please refer to the documentation provided at the time of purchase or contact your retailer.
If you require technical support or have questions not covered in this manual, please contact Depusheng customer service through the retailer where you purchased the product. Please have your model number (U6) and purchase information ready.