
Interlight QUASAR
Interlight Quasar Wall Sconce - Instruction Manual
Model: Quasar | Color Temperature: 2700K | Voltage: Bivolt
Okwu mmalite
This manual provides essential information for the safe and correct installation, operation, and maintenance of your Interlight Quasar Wall Sconce. Please read these instructions thoroughly before installation and retain them for future reference.
Ntuziaka nchekwa
- Nchekwa Eletriki: Always disconnect power at the circuit breaker or fuse box before beginning installation or performing any maintenance. Failure to do so may result in electric shock or serious injury.
- Nwụnye ọkachamara: Onye ọrụ ọkụ eletrik ruru eru kwesịrị ịrụ nrụnye ahụ dịka iwu eletriki mpaghara na nke mba si dị.
- Voltage ndakọrịta: This fixture is Bivolt (110-240V). Ensure your electrical supply matches this range.
- Ijikwa: Handle the product with care to avoid damage. Do not install if the product appears damaged.
- gburugburu: This product is designed for specific environments. Ensure it is suitable for your intended indoor or outdoor application.
Ihe ngwugwu
Nyochaa na akụrụngwa niile dị tupu ịmalite nwụnye:
- Interlight Quasar Wall Sconce (1 unit)
- Ihe nkwado mgbakwunye (otu nkeji)
- Mounting Screws and Wall Anchors (quantity may vary)
- Akwụkwọ ntuziaka (akwụkwọ a)

Foto: N'ihu view of the Interlight Quasar Wall Sconce, showcasing its black finish and geometric design.
Nkọwapụta
| Ụdị | Interlight |
| Nlereanya | Quasar |
| Okpomọkụ agba | 2700K (Ọcha na-ekpo ọkụ) |
| Voltage | Bivolt (110-240V) |
| Akụkụ ngwaahịa (L x W x H) | 𠃠.1 x 0.95 x 0.1 cm; 370 g (Note: These dimensions appear unusually small for a wall sconce and may be a data entry error. Please refer to package dimensions for a more typical size indication.) |
| Akụkụ ngwugwu | 10.8 x 10.7 x 10.4 cm |
| EAN/GTIN | 7894088042365 |
| ASIN | B09QCZSRFC |
| Batrị achọrọ | Mba |
Ntọala na nwụnye
Ihe dị mkpa: Ensure power is disconnected at the main circuit breaker before starting installation.
- Kwadebe Mpaghara Nwụnye: Choose a suitable location on a wall. Ensure there is existing electrical wiring available.
- Nwụnye bracket:
- Carefully remove the mounting bracket from the back of the sconce.
- Position the mounting bracket against the wall at the desired installation point. Mark the drilling locations.
- Drill pilot holes at the marked locations. Insert wall anchors if necessary.
- Chekwaa ihe nkwado mgbago na mgbidi site na iji skru ndị enyere. Gbaa mbọ hụ na etinyere ya nke ọma.
- Njikọ eletrik:
- Connect the electrical wires from the wall to the corresponding wires on the sconce. Typically, this involves connecting live to live, neutral to neutral, and ground to ground. Refer to local electrical codes for proper wiring color conventions.
- Use appropriate wire connectors (not included) to secure all connections.
- Gbaa mbọ hụ na njikọ niile siri ike na mkpuchi.
- Tinye Sconce:
- Carefully align the sconce with the installed mounting bracket.
- Secure the sconce to the mounting bracket using the screws provided, ensuring it is flush against the wall and stable.
- Wụnye isi iyi ọkụ: The product image suggests a G9 bulb.
- Insert the G9 bulb (not included, or pre-installed if specified by manufacturer) into the socket. Do not overtighten.

Foto: Akụkụ view of the Interlight Quasar Wall Sconce, revealing the internal light source (G9 bulb type).
- Weghachi ike: Ozugbo echichi zuru ezu na njikọ niile echekwara, weghachi ike na ihe nbibi sekit.
Examples of installed sconces:
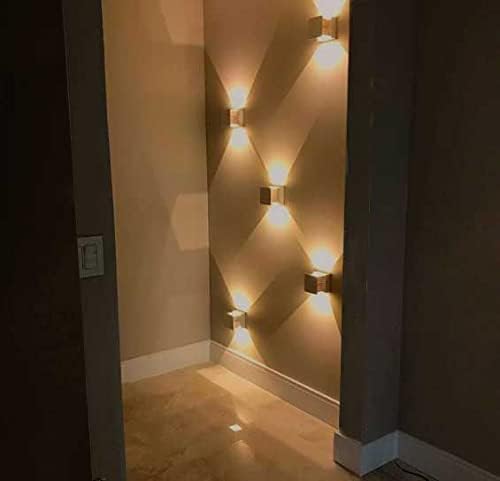
Image: Multiple Interlight Quasar sconces installed on an interior wall, demonstrating the upward and downward light projection.

Image: Interlight Quasar sconces mounted on an exterior building wall, providing ambient outdoor lighting.
Ntuziaka ọrụ
The Interlight Quasar Wall Sconce operates via a standard wall switch connected to its electrical circuit. There are no additional controls on the fixture itself.
- Ka ịgbanwuo: Flip the connected wall switch to the "ON" position.
- Ịgbanyụ: Flip the connected wall switch to the "OFF" position.
Nlekọta
Regular maintenance ensures the longevity and optimal performance of your wall sconce.
- Nhicha:
- Tupu ị sachaa ya, hụ na agbanyụrụ ọkụ eletrik na ihe nkwụnye sekit ahụ.
- Wipe the exterior surface with a soft, dry, or slightly damp akwa .
- Ejila ihe nhicha, ihe mgbaze, ma ọ bụ ihe na-eme ka ọ dị ọcha n'ihi na ha nwere ike imebi ihe niile dị n'ime ya.
- Bulb Replacement (if applicable):
- Ensure power is off and the bulb has cooled completely before attempting replacement.
- Carefully remove the old G9 bulb by pulling it straight out.
- Insert a new G9 bulb of the correct wattage and type (e.g., LED G9 2700K) by pushing it gently into the socket.
- Agafela oke wattage specified for the fixture (refer to fixture label if available).
Nchọpụta nsogbu
If you encounter issues with your Interlight Quasar Wall Sconce, refer to the following common problems and solutions:
| Nsogbu | Ihe nwere ike ime | Ngwọta |
|---|---|---|
| Ìhè anaghị agbanwuo. |
|
|
| Ìhè flickers. |
|
|
| Ngwa ahụ dị ọkụ nke ọma. |
|
|
If problems persist, consult a qualified electrician or contact Interlight customer support.
Akwụkwọ ikike na nkwado
Interlight products are manufactured to high-quality standards. For information regarding warranty coverage, please refer to the warranty card included with your purchase or visit the official Interlight websaịtị.
For technical support, replacement parts, or any other inquiries, please contact Interlight customer service through their official channels.
Websaịtị: www.interlight.com.br (Ọpụample njikọ, ezigbo njikọ nwere ike ịdị iche)
Ask a question about this manual
Ask about setup, troubleshooting, compatibility, parts, safety, or missing instructions. Manuals+ will review the question and use this page’s manual context to help answer it.