
MEDIC GROW Smart-8 LED Grow Light Instruction Manual
Ụdị: Smart-8
1. Okwu mmalite
The MEDIC GROW Smart-8 LED Grow Light is designed to provide optimal lighting conditions for indoor plants throughout their entire growth cycle. Featuring a built-in dimmer, timer, and tunable spectrum, this 760-watt fixture offers high Photosynthetic Photon Flux Density (PPFD) to support both vegetative and flowering stages. This manual provides detailed instructions for safe installation, operation, and maintenance of your Smart-8 grow light.
2. Ozi nchekwa
- Always disconnect the power supply before installation, cleaning, or maintenance.
- Do not operate the light with a damaged cord or plug.
- Ensure the light is installed in a well-ventilated area to prevent overheating.
- Avoid direct eye exposure to the LED light when operating, as it can be intensely bright. Eye protection is recommended.
- Keep the light away from water and other liquids. This product is for indoor use only.
- Do not attempt to disassemble or modify the light. Refer all servicing to qualified personnel.
3. Ihe ngwugwu
Nyochaa na etinyere ihe niile edepụtara n'okpuru na ngwugwu gị:
- 1 x Smart-8 LED Grow Light
- 1 x 6ft eriri ike
- 1 x RJ Wire (for daisy-chaining)
- 1 x nkwụnye
- 1 x Set of Hanging Strings

Image: The Smart-8 LED Grow Light with its dimensions and all included accessories: hanging strings, adapter, power cord, and RJ wire.
4. Ntọala na nwụnye
- Iwepu: Jiri nlezianya wepụ ihe niile dị na nkwakọ ngwaahịa. Nyochaa maka mmebi ọ bụla.
- Ịkonye ọkụ: Attach the provided hanging strings to the designated points on the grow light fixture. Securely hang the light from a sturdy support structure in your grow area. Ensure the light is level.
- Njikọ ike: Connect the 6ft power cord to the light fixture and then plug it into a standard 110V AC power outlet.
- Daisy-Chain Connection (Optional): If connecting multiple Smart-8 lights, use the provided RJ wire to link them. Consult the daisy-chaining diagram for proper connection sequence.
5. Ntuziaka ọrụ
5.1 Ogwe njikwa gafereview

Foto: Zuru ezu view of the Smart-8 control panel, highlighting the Timer knob, Dimmer knob, Spectrum switch button, and the LCD display.
The Smart-8 features an integrated control panel with a timer knob, a dimmer knob, a spectrum switch button, and an LCD display for real-time monitoring.
5.2 Ọrụ ngụ oge
Nke TIMER knob allows you to set the operating duration of the light. Rotate the knob to select your desired ON period:
- Gbanyụọ: Light remains off.
- 12H: Light operates for 12 hours, then turns off for 12 hours.
- 16H: Light operates for 16 hours, then turns off for 8 hours.
- 18H: Light operates for 18 hours, then turns off for 6 hours.
- 20H: Light operates for 20 hours, then turns off for 4 hours.
- 22H: Light operates for 22 hours, then turns off for 2 hours.
5.3 Ọrụ Dimmer
Nke DIMMER knob controls the light intensity. This is a built-in 0-10V dimmer, allowing adjustment from 40% to 100% output. Rotate the knob clockwise to increase intensity and counter-clockwise to decrease it.
5.4 Tunable Spectrum (V1/F1)
The Smart-8 offers two distinct spectrums optimized for different growth stages:
- V1 Spectrum: Balanced blue and red wavelengths, ideal for the vegetative growth stage.
- F1 Spectrum: Enhanced red output to boost flowering and fruiting stages.
Press the button located between the Timer and Dimmer knobs to switch between the V1 and F1 spectrums. The current spectrum will be displayed on the LCD screen.
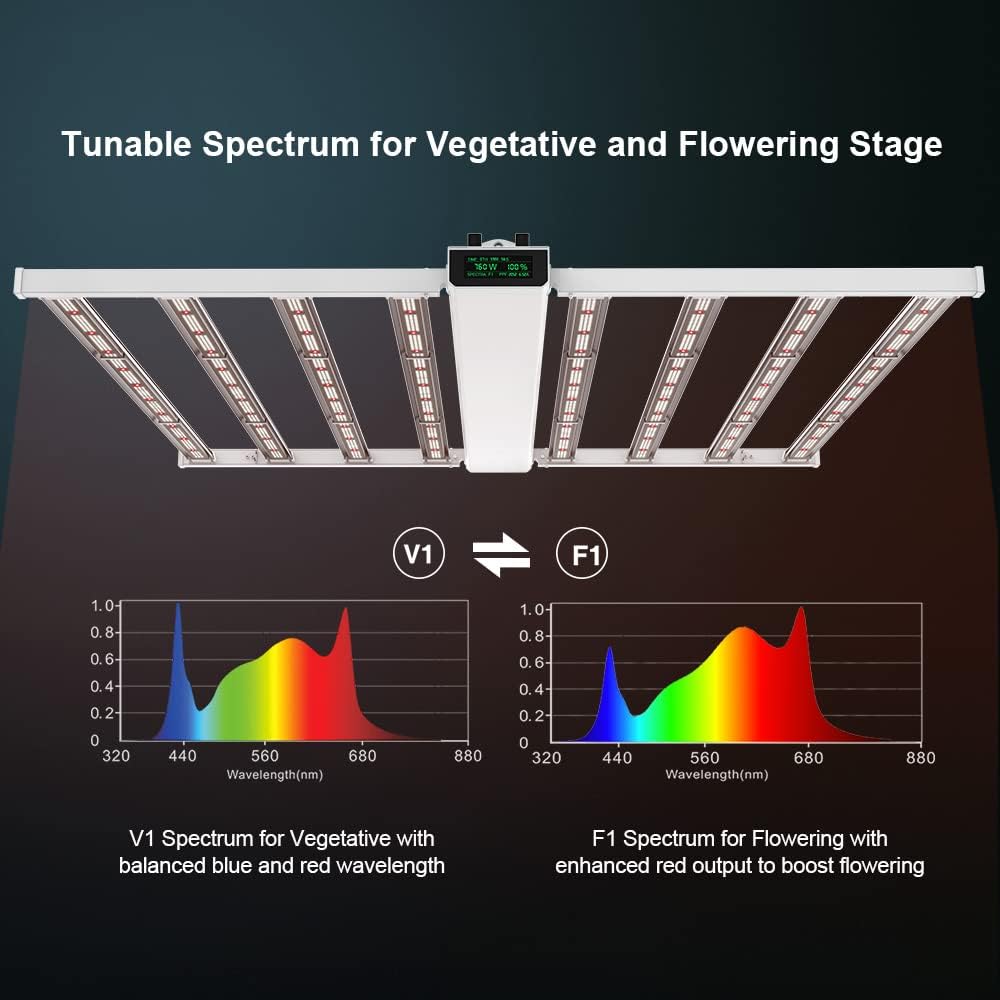
Image: Graphs illustrating the spectral distribution for V1 (Vegetative) with balanced blue and red, and F1 (Flowering) with enhanced red output.
Ngosipụta L5.5 XNUMX
The smart display screen provides real-time information:
- OGE: Displays the remaining time in the current ON cycle.
- W: Shows the current power consumption in Watts.
- %: Indicates the current dimming percentage.
- SPECTRA: Displays the active spectrum (V1 or F1).
- PPF: Shows the Photosynthetic Photon Flux value.
- Ampafọ: Na-egosiputa ihe dị ugbu a ampoge ịdọrọ.
6. Arụmọrụ na mkpuchi
The Smart-8 LED Grow Light is designed for high performance, providing uniform light distribution over a 5x5 ft (1.5m x 1.5m) grow area. Optimal hanging height and PPFD levels are crucial for plant development.

Image: PPFD map illustrating high and uniform light distribution within a 5x5 ft grow tent, showing Max, Average, and Low PPFD values.

Image: PPFD maps showing edge-to-edge coverage test results for a 4x4 ft grow tent at hanging heights of 6 inches, 12 inches, and 24 inches.

Image: Diagram showing PPFD values at various light heights from 0 to 60 inches, indicating light intensity over a 5x5 ft footprint.
7. Nkọwapụta
| Njirimara | Nkọwapụta |
|---|---|
| Nọmba nlereanya | Smart-8 |
| Spectrum | V1 & F1 Full Tunable Spectrum |
| PPF (Light Output) | 2128 μmol / s |
| Ike Denye | 760 Watt |
| Ịrụ ọrụ | 2.6 µmol/J @277 AC |
| Na-ebelata | 0-10V (40%-100% onboard) |
| Mpaghara mkpuchi | 4x4 Feet; 5x5 Feet |
| Akụkụ Nrụgide | 47.2"L x 45.6"W x 3.1"H (1199mm L x 1158mm W x 78.1mm H) |
| Ogologo eriri ike | Ogologo 6ft |
| Ibu Ibu | 30.86 lbs / 14 n'arọ |
| Ntinye ACtage | 120-277V AC, 347-480V AC, 50/60Hz |
| Ụdị isi iyi ọkụ | Light Emitting Diode |
| Ụdị mmecha | Ekpuchiri ntụ ntụ |
8. Nlekọta
- Nhicha: Periodically clean the light fixture and LED lenses with a soft, dry cloth to remove dust and debris. Ensure the light is unplugged before cleaning. Do not use harsh chemicals or abrasive cleaners.
- Nyocha: Regularly inspect the power cord and hanging hardware for any signs of wear or damage. Replace any damaged components immediately.
- Nchekwa: If storing the light for an extended period, ensure it is clean, dry, and stored in a safe place away from extreme temperatures and moisture.
9. Nchọpụta nsogbu
- Ìhè anaghị agbanwu:
- Check if the power cord is securely plugged into both the fixture and the outlet.
- Nyochaa na ntinye ọkụ na-arụ ọrụ.
- Ensure the timer knob is not set to 'OFF'.
- Dimmer/Timer Not Responding:
- Ensure the light is powered on.
- If using multiple lights, check the RJ wire connections.
- Try resetting the light by unplugging it for a few minutes and then plugging it back in.
- Abnormal Heat:
- Ensure adequate ventilation around the fixture.
- Verify that the light is not obstructed by other objects.
- Ọ bụrụ na oke okpomọkụ anọgide, kwụsị iji ya ma kpọtụrụ ndị ahịa.
10. Akwụkwọ ikike na nkwado
For warranty information, technical support, or any inquiries regarding your MEDIC GROW Smart-8 LED Grow Light, please refer to the contact information provided on the official MEDIC GROW website or your purchase documentation. Please have your model number (Smart-8) and purchase date available when contacting support.