BOMAKER Mini WiFi Projector 10''
BOMAKER Mini WiFi Projector 10'' User Manual
Model: Mini WiFi Projector 10''
1. Okwu mmalite
This manual provides comprehensive instructions for the setup, operation, maintenance, and troubleshooting of your BOMAKER Mini WiFi Projector 10''. Please read this manual thoroughly before using the projector to ensure proper operation and to maximize its lifespan. Keep this manual for future reference.
The BOMAKER Mini WiFi Projector 10'' is a portable 720P HD LCD projector designed for home cinema, gaming, and various multimedia applications. It features WiFi connectivity for smartphone mirroring, multiple input options including HDMI, USB, and AV, and supports projection sizes up to 300 inches.
2. Ozi nchekwa dị mkpa
To prevent fire, electric shock, or injury, always observe the following safety precautions:
- Do not block the ventilation openings. Ensure adequate airflow around the projector.
- Elela anya ozugbo na oghere projector mgbe lamp Ọ na-agba ọkụ. Ọkụ na-egbuke egbuke nwere ike imebi anya.
- Do not expose the projector to rain or moisture to avoid electric shock.
- Jiri naanị ihe nkwụnye ike enyere na ihe ngosi ahụ.
- Tinye projector n'elu elu kwụsiri ike, dịkwa larịị.
- Unplug the projector from the power outlet during lightning storms or when unused for long periods.
- Anwala ịrụzi ngwaahịa a n'onwe gị. Nye ndị ọrụ ọrụ ruru eru ọrụ niile.
3. Ihe ngwugwu
Nyochaa na etinyere ihe niile edepụtara n'okpuru na ngwugwu gị:
- 1 x BOMAKER Mini WiFi Projector
- 1 x Njikwa anya
- 1 x nkwụnye ọkụ
- 1 x HDMI USB
- 1 x AV Ca
- 1 x Akwụkwọ ntuziaka onye ọrụ
4. Ngwaahịa gafereview
Familiarize yourself with the various parts and connections of your projector.

Foto 4.1: N'ihu view of the BOMAKER Mini WiFi Projector. This image shows the projector's lens, focus ring, and keystone correction dial, with a smartphone wirelessly connected and displaying content on its screen, illustrating the WiFi mirroring capability.
4.1. Ọdụ ụgbọ mmiri ntinye/mpụta
The projector features a variety of ports for connecting different devices.

Foto 4.2: N'azụ view of the projector displaying its connectivity options. From left to right, the ports include AV, USB, Audio Out, VGA, HDMI, and Micro SD card slot, allowing for versatile device connections.
- Ọdụ ụgbọ mmiri AV: Connect to older devices using the included AV cable.
- Ọdụ ụgbọ mmiri USB: Maka ijikọ draịva USB iji kpọọ mgbasa ozi files.
- Apụọ ọdịyo: Jikọọ igwe okwu ma ọ bụ ekweisi mpụga.
- VGA ọdụ ụgbọ mmiri: Connect to computers or laptops with a VGA output.
- Ọdụ ụgbọ mmiri HDMI: Connect to devices like laptops, gaming consoles (PS4), TV sticks, etc.
- Oghere kaadị Micro SD: Insert a Micro SD card to play media files.
5. Nhazi
5.1. Ntinye
Choose a suitable location for your projector. For optimal viewing, place the projector on a flat, stable surface or mount it. The optimal projection distance is between 8.2 and 11.2 feet (2.5 to 3.4 meters) for a screen size of 30 to 300 inches.
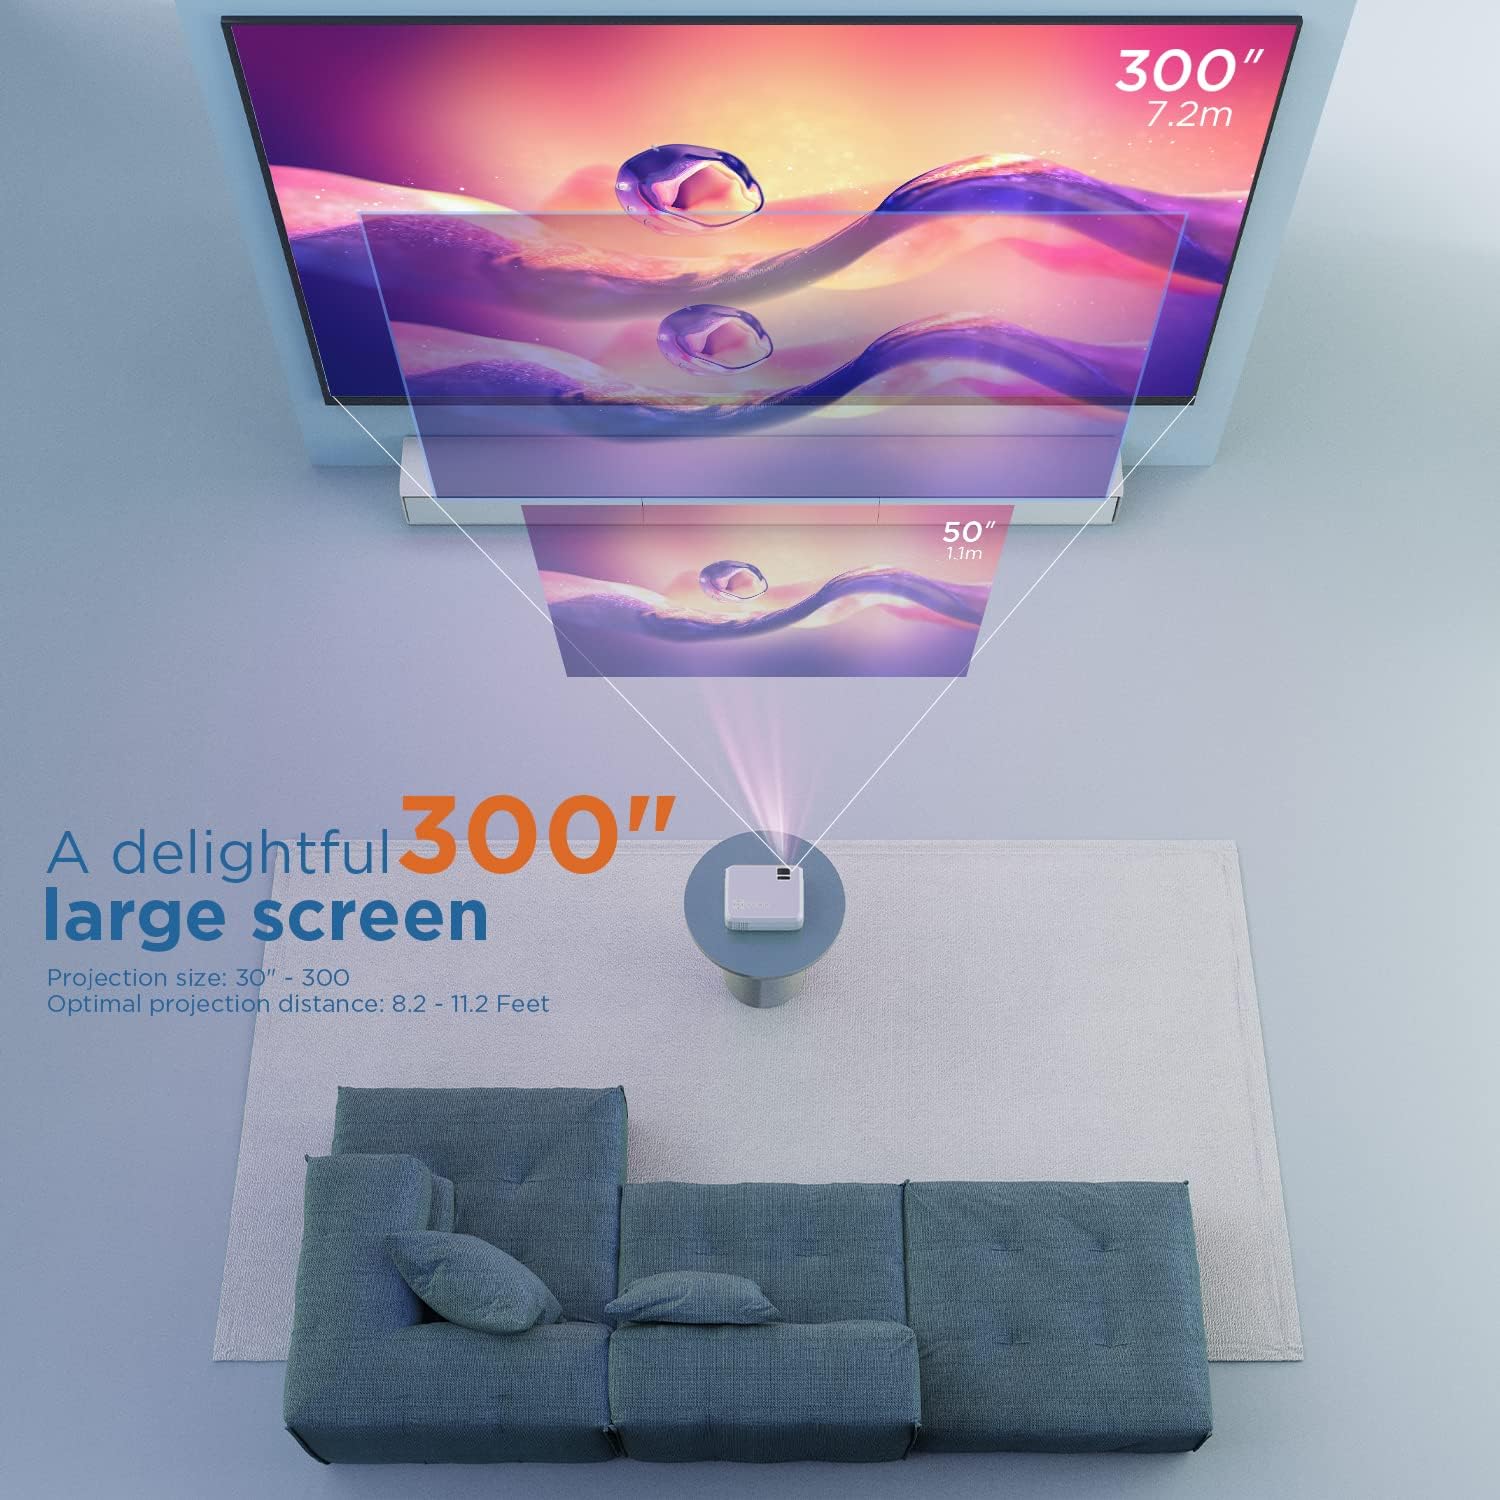
Foto 5.1: Illustration of projection distances and corresponding screen sizes. The image demonstrates how varying the distance between the projector and the screen affects the projected image size, from 50 inches (1.1m) to 300 inches (7.2m).
5.2. Njikọ ike
- Jikọọ ihe nkwụnye ọkụ na ọdụ ụgbọ mmiri ntinye ike nke projector.
- Tinye nkwụnye ọkụ n'ime oghere mgbidi.
- Pịa bọtịnụ ike na projector ma ọ bụ remote control ka ịgbanwuo ya.
5.3. Nleba anya na ngbanwe isi okwu
- Gbado anya: Rotate the focus ring on the projector lens until the image is clear and sharp.
- Nkume isi: If the projected image appears trapezoidal, adjust the keystone correction dial (usually located near the lens) until the image is rectangular.
6. Ntuziaka ọrụ
6.1. Basic Ọrụ
- Gbanyụọ/ Gbanyụọ: Pịa bọtịnụ ike na projector ma ọ bụ njikwa anya.
- Nhọrọ Isi mmalite ntinye: Use the "Source" button on the remote or projector to select the desired input (HDMI, AV, USB, Micro SD, WiFi).
- Ndozi olu: Use the volume buttons on the remote control.
6.2. Ijikọ Ngwaọrụ
The projector supports various connection methods:
6.2.1. Njikọ HDMI
Connect your laptop, gaming console (PS4), TV stick (e.g., Roku, Fire TV), or other HDMI-enabled devices using an HDMI cable. Select "HDMI" as the input source.
6.2.2. USB/Micro SD Connection
Insert a USB drive or Micro SD card into the respective port. Select "USB" or "Micro SD" as the input source. The projector will display a menu to browse and play media files (foto, vidiyo, egwu, ederede).
6.2.3. AV Connection
Use the included AV cable to connect to devices with AV output. Select "AV" as the input source.
6.2.4. WiFi Mirroring (Smartphone Connection)
The projector supports wireless screen mirroring from smartphones (iOS and Android).
- Select "WiFi" as the input source on the projector.
- Follow the on-screen instructions to connect your smartphone to the projector's WiFi network.
- Once connected, enable screen mirroring/casting feature on your smartphone (e.g., "Screen Mirroring" for iOS, "Smart View" or "Cast" for Android).
- Select the projector from the list of available devices.
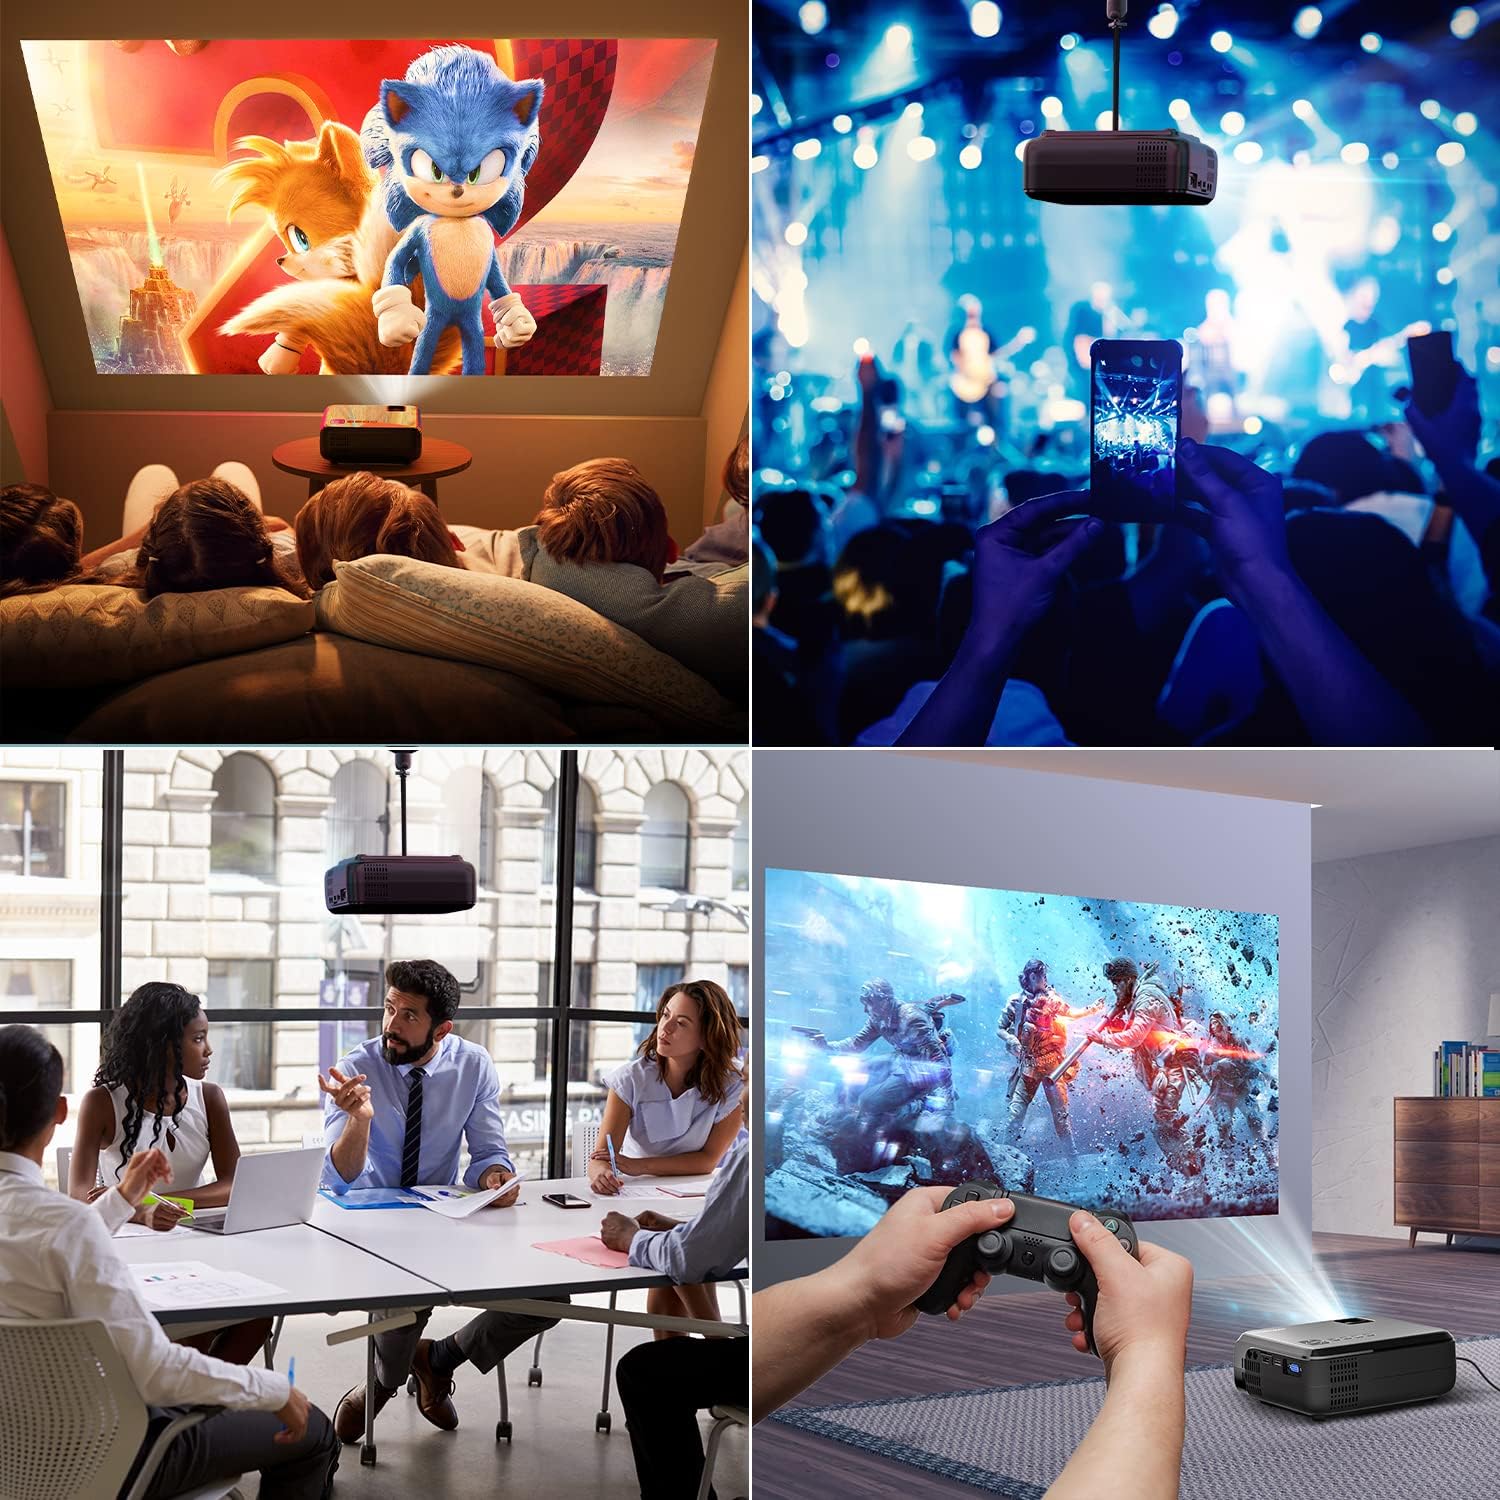
Foto 6.1: This image displays a collage of the projector in different environments: a family watching a movie, a person using a smartphone to control the projector at a concert, a business meeting with a presentation, and a person playing video games. It highlights the versatility of the BOMAKER Mini WiFi Projector for entertainment and professional use.
6.3. Visual Experience
The projector delivers a native 720P HD resolution, ensuring clear and detailed images. It supports 1080P decoding and features a high brightness output for vibrant visuals.
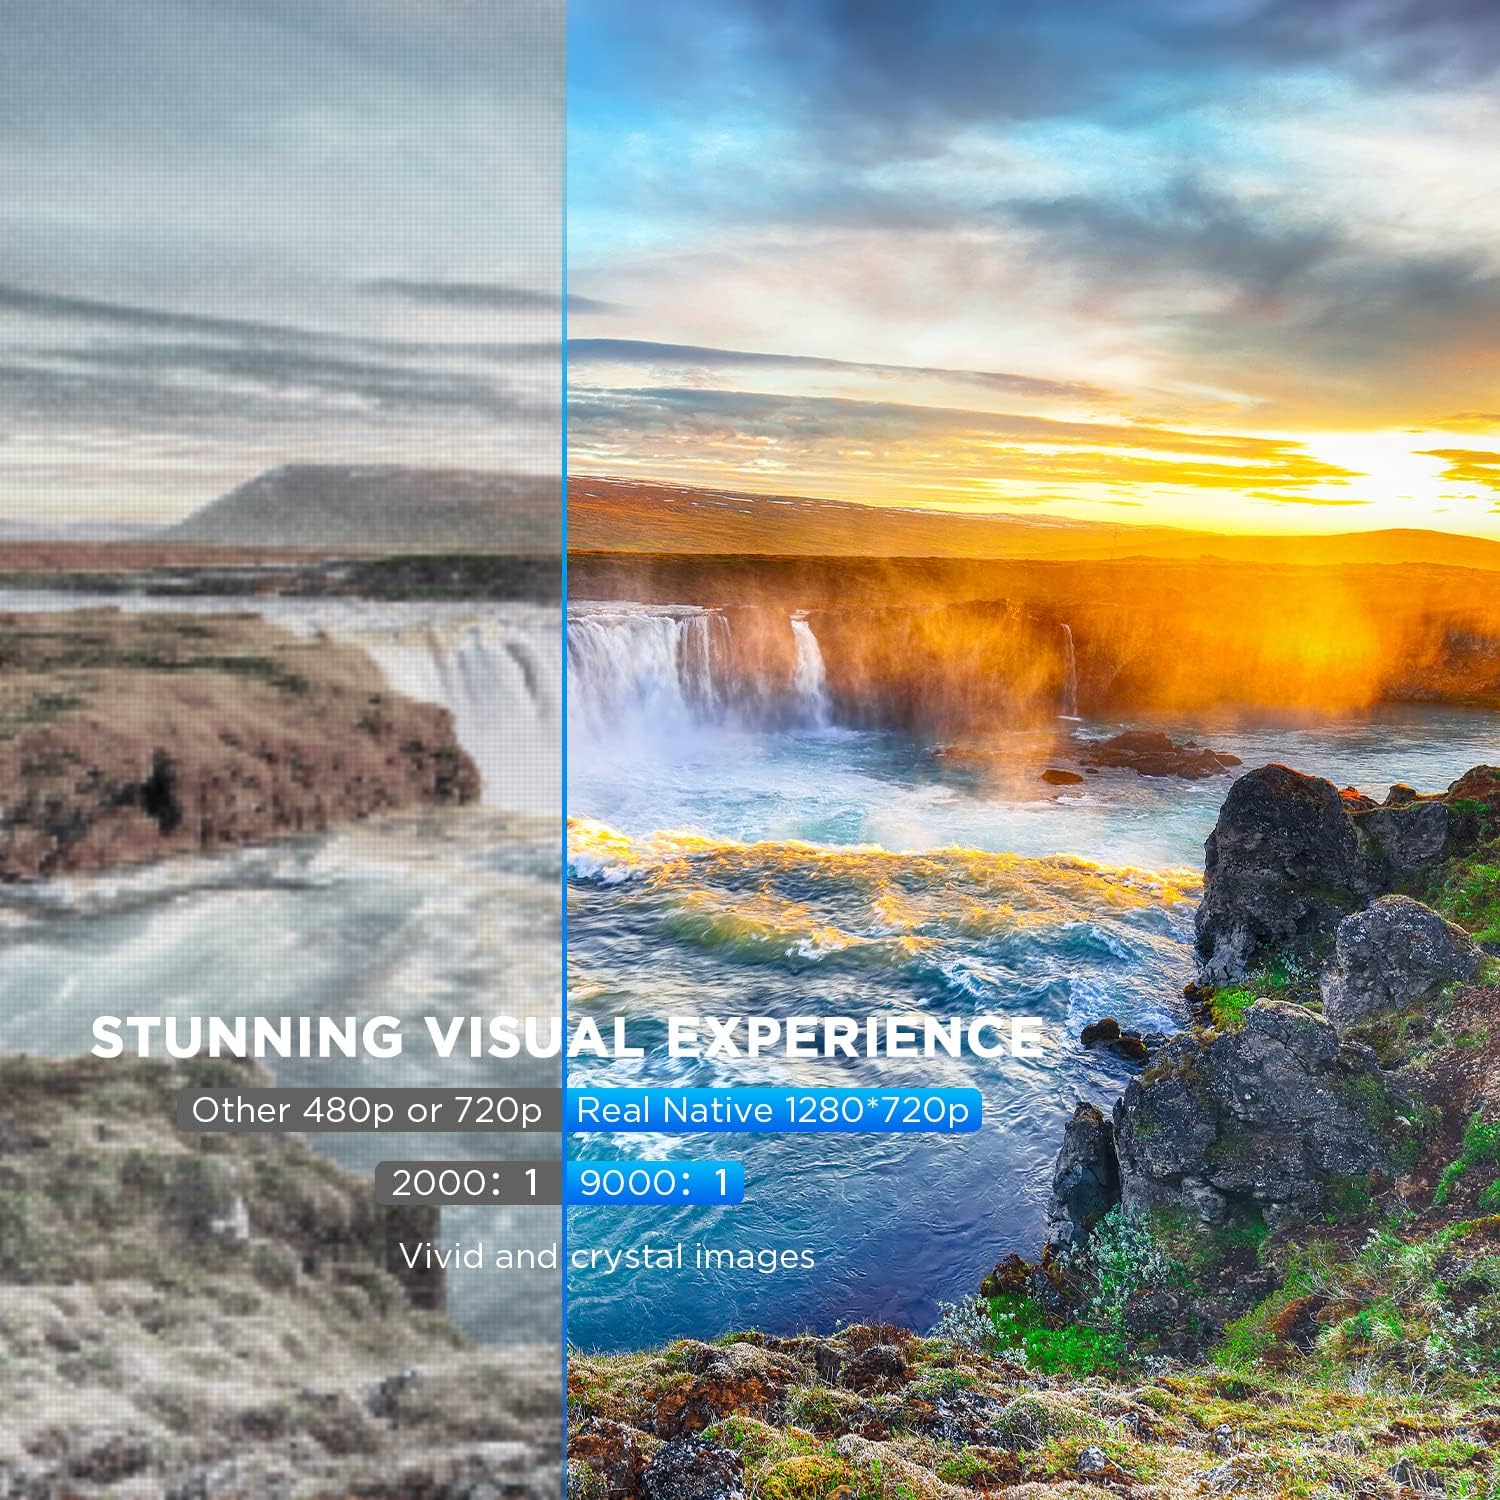
Foto 6.2: A side-by-side comparison demonstrating the difference between standard 480p/720p projection and the projector's real native 1280x720p resolution. The native resolution side shows significantly sharper details and richer colors in a landscape image, emphasizing the "Stunning Visual Experience" and "Vivid and crystal images".

Foto 6.3: This image illustrates the projector's "Crystal Clear Picture with Ultra-low Latency" feature, showing a vibrant, high-definition projection of a car racing scene on a large screen in a living room setting. The text highlights upgraded lens settings for a new visual experience with latency less than 30ms.
7. Nlekọta
7.1. Na-ehicha oghere
Use a soft, lint-free cloth specifically designed for cleaning optical lenses. Do not use abrasive cleaners or solvents. Gently wipe the lens to remove dust or smudges.
7.2. Ịsacha Ahụ Ihe Nlereanya
Wipe the projector's exterior with a soft, dry cloth. For stubborn dirt, a slightly damp cloth can be used, followed by a dry cloth. Ensure no liquid enters the ventilation openings.
7.3. Nchekwa
When not in use, store the projector in a cool, dry place, away from direct sunlight and extreme temperatures. Cover the lens with its cap to protect it from dust.
8. Nchọpụta nsogbu
Ọ bụrụ na ị na-enwe nsogbu na projector gị, rụtụ aka na nsogbu na azịza ndị a na-ahụkarị:
| Nsogbu | Ihe nwere ike ime | Ngwọta |
|---|---|---|
| Enweghị onyonyo na ihuenyo | Power cable not connected; incorrect input source; device not powered on. | Check power connection; select correct input source; ensure connected device is on. |
| Onyonyo na-agba agba | A naghị agbanwe anya; ihe ngosi onyonyo dị nso/dị anya na ihuenyo. | Adjust the focus ring; reposition the projector. |
| Foto a bụ trapezoidal | Keystone correction not adjusted. | Adjust the keystone correction dial. |
| Enweghị ụda | Volume too low; external speakers not connected; audio settings on source device. | Increase volume; connect external speakers if needed; check audio output settings on source device. |
| WiFi mirroring issues | Incorrect WiFi connection; smartphone mirroring feature not activated. | Ensure correct WiFi network is selected; activate screen mirroring on your smartphone. |
9. Nkọwapụta
| Njirimara | Nkọwa |
|---|---|
| Ụdị | BOMAKER |
| Nọmba nlereanya | Mini WiFi Projector 10'' |
| Ngosipụta mkpebi | Native 1280 x 720 (Supports 1080P decoding) |
| Ụdị ngosi | LCD |
| Teknụzụ Njikọta | HDMI, Wi-Fi |
| Ngwa dakọtara | Smartphone, TV Stick, PS4, Laptop, USB Drive, Micro SD Card |
| Akụkụ ngwaahịa | 22L x 17l x 9H centimeters |
| Ụdị Ihe | Enwere ike ibugharị |
| Eji akwadoro | Ụlọ ihe nkiri, egwuregwu |
| Agba | Ọcha |
10. Akwụkwọ ikike na nkwado
For warranty information or technical support, please refer to the documentation included with your purchase or contact BOMAKER customer service. Details regarding specific warranty periods and support channels are typically provided on the manufacturer's official websaịtị ma ọ bụ n'ime nkwakọ ngwaahịa.
Ask a question about this manual
Ask about setup, troubleshooting, compatibility, parts, safety, or missing instructions. Manuals+ will review the question and use this page’s manual context to help answer it.