1. Okwu mmalite
Thank you for choosing the Depusheng DT8 Professional 8-Channel Mixer. This manual provides essential information for the safe and efficient operation of your new audio mixer. Please read this manual thoroughly before use and retain it for future reference.

Figure 1: Depusheng DT8 Professional 8-Channel Mixer overview.
2. Ntuziaka nchekwa
- Ịnye ọkụ: Jiri naanị ihe nkwụnye ike akọwapụtara. Hụ na vol ahụ dị.tage dakọtara ọkụ ọkụ mpaghara gị.
- Mmiri na mmiri: Do not expose the mixer to water, rain, or excessive moisture. Avoid placing liquid-filled objects on the unit.
- Igwe ikuku: Hụ na ikuku na-abata nke ọma. Ekpuchila oghere ikuku.
- Isi mmalite ọkụ: Keep the mixer away from heat sources such as radiators, heat registers, stoves, or other heat-producing appliances.
- Nhicha: Disconnect power before cleaning. Use a dry, soft cloth. Do not use liquid cleaners or aerosol cleaners.
- Ije ozi: Anwala ịnye ngwaahịa a n'onwe gị. Tụtụ aka n'aka ndị ọrụ ruru eru.
- Phantom Ike: When using +48V phantom power, ensure microphones are connected before activating to prevent damage.
3. Ngwaahịa gafereview
The Depusheng DT8 is a professional 8-channel audio mixer designed for various applications, including live performances, studio recording, and home use. It features built-in DSP digital effects, USB playback, Bluetooth connectivity, and +48V phantom power.
Akụkụ ndị bụ isi:
- Built-in DSP digital effects for enhanced audio.
- Eight audio input interfaces for versatile connectivity.
- USB playback function for direct media access.
- +48V phantom power supply for condenser microphones.
- Atọ-stage equilibrium adjustment (3-band EQ) on all channels.
- Wireless Bluetooth audio streaming.
- Ultra-thin and robust casing with dust-resistant rotary knobs.
4. Nhazi
4.1 Njikọ ike
Connect the provided power adapter to the AC IN socket on the rear panel of the mixer. Plug the adapter into a suitable power outlet. Use the Power Switch to turn the unit on or off.

Figure 2: Rear panel showing Power Switch and external power input socket. The USB interface is also visible on the top panel.
4.2 Njikọ ntinye ọdịyo
The DT8 mixer offers various input options:
- Ntinye XLR: For microphones. Channels 1-8 feature XLR inputs.
- Ntinye Jack 6.35mm: For line-level instruments or other audio sources. Channels 1-8 also feature 6.35mm unbalanced jack inputs.
- Ntinye ahịrị stereo: Dedicated stereo line inputs for devices like keyboards or media players.
- Njikọ USB: Connect a USB flash drive for MP3 playback or connect to a computer for digital audio interface functionality.
4.3 Njikọ Mbupụ Ọdịyo
Connect your monitoring and recording equipment to the appropriate output interfaces:
- Main Output (MIX L/R): XLR and 6.35mm jack outputs for connecting to main speakers or power ampndị na -enye ndụ.
- Control Room Output (CTRL ROOM): 6.35mm jack outputs for connecting to studio monitors.
- Monitor Headphones (PHONES): 6.35mm stereo jack for headphone monitoring.
- Auxiliary Send (AUX SEND): 6.35mm jack for sending audio to external effects processors or monitor mixes.
- Effect Send (EFFECT): 6.35mm jack for sending audio to the internal effects processor.
- Mmepụta REC (RCA): RCA outputs for connecting to recording devices.
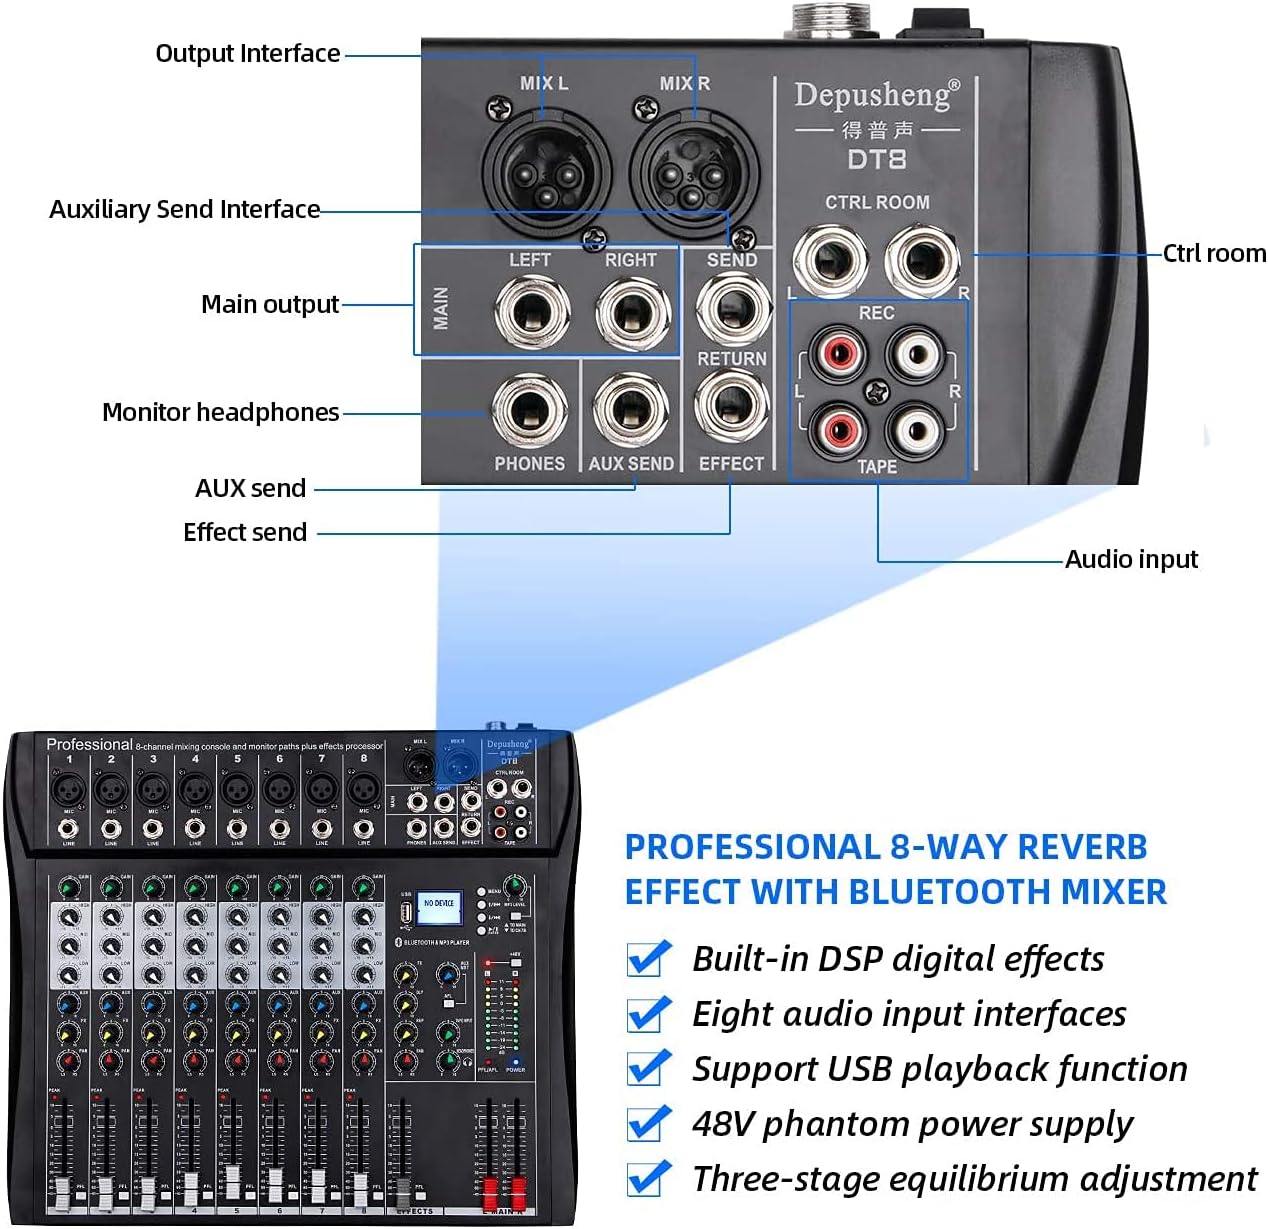
Figure 3: Rear panel showing various output and auxiliary interfaces.
5. Ntuziaka ọrụ
5.1 njikwa ọwa
Each input channel features the following controls:
- Nweta: Adjusts the input sensitivity for the microphone or line input.
- HIGH, MID, BASS (EQ): Three-band equalizer for adjusting the treble, midrange, and bass frequencies of the input signal.
- FX: Controls the amount of signal sent to the internal effects processor.
- PAN: Adjusts the stereo position of the channel signal (left to right).
- PFL (Pre-Fader Listen): Activates pre-fader monitoring of the channel through headphones.
- Volume Fader: Controls the output level of the channel to the main mix.

Ọgụgụ 4: Zuru ezu view of a single channel strip with Gain, EQ, Effect, Balance, and Volume Fader controls.
5.2 USB/MP3 Player Operation
The integrated USB/MP3 player allows for direct playback of audio files from a USB flash drive or connection to a computer.
- Njikọ USB: Insert a USB flash drive into the USB port. The display will show "NO DEVICE" until a compatible device is detected.
- Njikwa: Use the dedicated buttons for Previous Song, Next Song, Play/Pause, and Enter to navigate and control playback.
- Ọkwa MP3: Adjust the volume of the MP3 player using the corresponding level control.

Figure 5: MP3 player controls, FX section, and +48V phantom power button.
5.3 Njikọ Bluetooth
Iji na-ekiri ọdịyo na-enweghị eriri site na Bluetooth:
- Gbaa mbọ hụ na agbanyere igwekota.
- Mee ka ọnọdụ Bluetooth rụọ ọrụ na igwekota (lee ihe ngosi maka nhọrọ ụdị).
- On your smartphone or tablet, search for available Bluetooth devices and select "Depusheng DT8" (or similar name).
- Once paired, you can stream audio from your device to the mixer.

Figure 6: Illustrates Bluetooth wireless streaming from a smart device to the mixer.
Ike Phantom 5.4 (+48V)
The mixer provides +48V phantom power for condenser microphones. Locate the +48V button on the mixer's control panel. Press this button to activate phantom power. Ensure all condenser microphones are connected before activating phantom power to prevent damage.
6. Nlekọta
- Nhicha: Regularly wipe the mixer's surface with a soft, dry cloth. Avoid abrasive cleaners or solvents.
- Nchedo uzuzu: Debe ihe ngwakọta ahụ n'ime mkpuchi mgbe a na-ejighị ya iji gbochie uzuzu ịchịkọta, ọkachasị na fader na knobs.
- Nchekwa: Debe ihe dị n'ime ya n'ebe dị jụụ ma kpọọ nkụ, ebe anwụ na-anaghị anwụ kpọmkwem na oke okpomọkụ dị oke njọ.
- Njikwa USB: Hụ na e nwere eriri ndị a haziri nke ọma, ọ bụghịkwa nsogbu iji gbochie mmebi nke njikọ na ọdụ ụgbọ mmiri.
7. Nchọpụta nsogbu
| Nsogbu | Ihe nwere ike ime | Ngwọta |
|---|---|---|
| Enweghị ike | Power cable disconnected; Power switch off; Faulty power adapter | Check power cable connection; Turn on power switch; Test with another power adapter if available |
| Enweghị mmepụta ụda | Volume faders down; Output cables disconnected; Speakers off/faulty | Increase master and channel faders; Check all output cable connections; Verify speakers are powered on and working |
| Enweghị mgbama ntinye | Input cable disconnected; Gain knob too low; Microphone/instrument off/faulty; Phantom power off for condenser mics | Check input cable connections; Increase GAIN knob; Verify microphone/instrument functionality; Activate +48V phantom power for condenser mics |
| Nsogbu njikọ Bluetooth | Mixer not in Bluetooth mode; Device too far; Interference | Ensure mixer is in Bluetooth mode; Move device closer to mixer; Reduce other wireless interference |
| Ntugharị USB anaghị arụ ọrụ | Etinyeghị draịva USB nke ọma; Anaghị ekwekọ file format; USB drive faulty | Reinsert USB drive; Ensure audio files are in a compatible format (e.g., MP3); Try a different USB drive |
8. Nkọwapụta
| Njirimara | Nkọwa |
|---|---|
| Nọmba nlereanya | DT8 |
| Ọnụọgụ nke ọwa | 8 |
| Akụkụ ngwaahịa (L x W x H) | 33.6 x 39 x 3.5 cm |
| Ibu Ibu | 4.67 kilogram |
| Teknụzụ Njikọta | Bluetooth, USB |
| Isi Iyi Ike | Igwe ọkụ eletrik |
| Nzaghachi ugboro ugboro | 20 Hz (opekempe akọwapụtara) |
| Ụdị njikọ mmepụta | 6.35 mm, RCA, XLR |
| Ntinye ọdịyo | Microphone, Music |
| Sound Level / Noise Level | 90 decibel |
| Voltage | 220 volts (AC) |
| Onye nrụpụta | Depusheng |
9. Akwụkwọ ikike na nkwado
For warranty information and technical support, please refer to the documentation included with your purchase or contact Depusheng customer service through their official website or your retailer. Keep your proof of purchase for warranty claims.