1. Okwu mmalite
This manual provides detailed instructions for the setup, operation, maintenance, and troubleshooting of your HISTTON Fanless Industrial Mini PC. Please read this manual thoroughly before using the device to ensure proper functionality and longevity.
2. Ihe ngwugwu
Hụ na ihe niile edepụtara n'okpuru dị na ngwugwu ngwaahịa gị:
- 1 x HISTTON Mini PC
- 1 x nkwụnye ọkụ
- 1 x Akwụkwọ ntuziaka onye ọrụ
- 1 x HDMI USB
- 1 x DVD for drivers (if applicable)
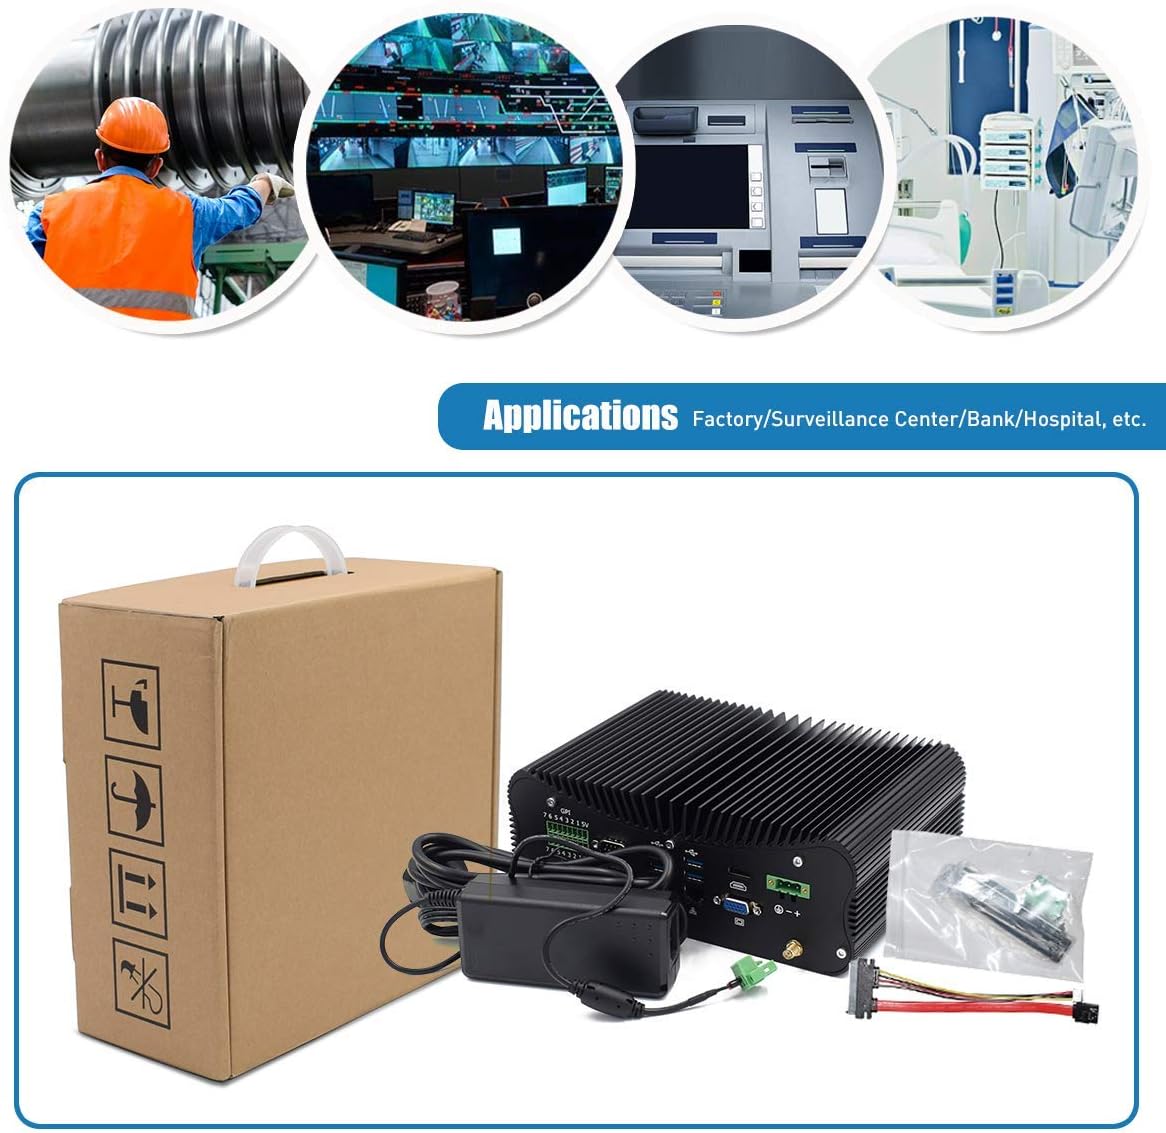
Figure 2.1: Included accessories and the Mini PC.
3. Ngwaahịa gafereview
Familiarize yourself with the various ports and features of your HISTTON Mini PC.
3.1 ọdụ ụgbọ mmiri azụ

Figure 3.1: Rear panel connectivity options.
- GPIO (General Purpose Input/Output): 7 input and 7 output ports for industrial control.
- COM Ports (RS232/422/485): 4 ports for serial communication.
- ọdụ ụgbọ mmiri USB 3.0: 4 ports for high-speed peripheral connections.
- LAN Ports (RJ45 Gigabit Ethernet): 2 ports for wired network connectivity.
- Ọdụ ụgbọ mmiri HDMI: For digital video and audio output.
- VGA ọdụ ụgbọ mmiri: For analog video output.
- DC na: 3-pin Phoenix terminal for DC 9-36V power input.
- WiFi Antenna Connectors: For external WiFi antennas.
3.2 Side Panel Ports

Figure 3.2: Side panel connectivity and controls.
- Mgbanwu ma ọ bụ gbanyụọ ọkụ: Njikwa ike bụ isi.
- ọdụ ụgbọ mmiri USB 2.0: 2 ports for peripheral connections.
- Jacks ọdịyo: 1 x SPK Out (speaker), 1 x MIC In (microphone).
- PS/2 Port: Maka njikọ nke keyboard na òké ochie.
- ATX/AT Switch: For power mode selection.
- CMOS Button Hole: Maka ịtọgharịa ntọala CMOS.
3.3 Ngwa ime

Figure 3.3: Internal layout for storage and memory expansion.
- M.2 SSD oghere: For M.2 solid-state drives.
- mSATA SSD Slot: For mSATA solid-state drives.
- 2.5 inch HDD Slot: For 2.5-inch SATA SSD/HDD.
- DDR4 RAM Slots: Two 260-pin SO-DIMM slots supporting up to 64GB DDR4 memory.
- WiFi Module Slot: M.2 slot for dual-band 802.11AC WiFi with Bluetooth 4.0.
4. Nhazi ntuziaka
Follow these steps to set up your Mini PC for first use.
- Ngwa njikọ: Connect your monitor(s) to the HDMI and/or VGA ports. Connect a USB keyboard and mouse to the available USB ports.
- Njikọ netwọk: For wired internet, connect an Ethernet cable to one of the RJ45 LAN ports. For wireless internet, attach the provided WiFi antennas to the connectors on the rear panel.
- Njikọ ike: Connect the power adapter to the DC In port on the rear panel, then plug the adapter into a power outlet.
- Ike Na: Press the power button on the side panel to turn on the Mini PC. The power indicator light will illuminate.
Video 4.1: Demonstration of connecting peripherals and powering on the Mini PC.
5. Operating System and Basic Use
Your Mini PC comes with Windows 10 Pro 64bit pre-installed and activated, ready for immediate use.
5.1 Ntọala Ngosipụta Abụọ
The Mini PC supports dual display output via HDMI and VGA ports, allowing for extended desktop or mirrored display configurations. Connect two monitors to the respective ports and configure display settings within the Windows operating system.

Figure 5.1: Dual monitor setup for enhanced productivity.
5.2 Ọrụ izugbe
The Intel Core i7-10510U processor and Intel UHD Graphics provide stable and efficient performance for various tasks, including office applications, web browsing, multimedia playback, and light gaming. The integrated M.2 Dual Band 802.11AC WiFi with Bluetooth 4.0 ensures reliable wireless connectivity.
6. Nlekọta
The HISTTON Mini PC features a fanless cooling design, which contributes to its durability and silent operation. This design minimizes dust accumulation and reduces the need for frequent internal cleaning.

Figure 6.1: Fanless cooling system for silent and reliable operation.
Iji nọgide na-arụ ọrụ kacha mma:
- Keep the exterior of the device clean by wiping it with a soft, dry cloth.
- Ensure adequate airflow around the device, especially around the heat sink fins, to facilitate heat dissipation.
- Avoid placing the Mini PC in direct sunlight or near heat sources.
- Do not obstruct the heat sink fins.
7. Nchọpụta nsogbu
Ọ bụrụ na ị hụ nsogbu na Mini PC gị, lee usoro ndị a na-emekarị maka nsogbu ndị a:
- Enweghị ike: Hụ na e jikọrọ ihe nkwụnye ọkụ eletrik ahụ nke ọma na Mini PC na ebe a na-ere ọkụ eletrik. Lelee ma ọkụ ihe ngosi ọkụ eletrik ahụ agbanyere.
- Enweghị Ngosipụta: Verify that the monitor cable(s) are securely connected to both the Mini PC and the monitor(s). Ensure the monitor is powered on and set to the correct input source (HDMI/VGA).
- Enweghị njikọ ịntanetị: For wired connections, check the Ethernet cable and router status. For wireless connections, ensure WiFi antennas are attached, WiFi is enabled in the operating system, and you are connected to the correct network.
- Ngwaọrụ ndị na-anaghị arụ ọrụ: Ensure USB devices (keyboard, mouse) are properly connected. Try connecting them to different USB ports.
- Sistemụ anaghị aza: Press and hold the power button for 5-10 seconds to force a shutdown, then restart the device. If issues persist, consider resetting the CMOS using the button hole on the side panel (refer to Section 3.2).
8. Nkọwapụta
Detailed technical specifications for the HISTTON Fanless Industrial Mini PC:
| Njirimara | Nkọwapụta |
|---|---|
| Ihe nhazi (CPU) | Intel Core i7-10510U, 1.80 GHz (up to 4.90 GHz), 8M Cache |
| Eserese | Ihe eserese Intel UHD maka 10th Gen Intel Processors |
| Ebe nchekwa (RAM) | 64GB DDR4 (2 x 32GB SO-DIMM slots, max 64GB) |
| Nchekwa | 1TB SSD (Supports M.2 SSD + mSATA SSD + 2.5 inch SATA SSD/HDD) |
| Sistemụ nrụọrụ | Windows 10 Pro (64bit, activated) |
| Njikọ ikuku | M.2 Dual Band 802.11AC WiFi with Bluetooth 4.0 |
| LAN | 2 x Intel L211/210 RJ45 Gigabit Ethernet |
| ọdụ ụgbọ mmiri USB | 4 x USB 3.0, 2 x USB 2.0 |
| Mmepụta vidiyo | 1 x HDMI, 1 x VGA Port (Supports 4K UHD dual display) |
| Ọdụ ụgbọ mmiri Serial | 4 x RS232/422/485 COM, 2 x RS232 COM |
| GPIO | 7 x Ports Input, 7 x Ports Output |
| Audio | 1 x SPK Out, 1 x MIC In |
| Ịnye ọkụ | 12V DC In (3-pin Phoenix terminal DC 9-36V Input) |
| Oriri ike | Max 15W (real use), TDP Down 10W |
| Ihe gbasara ikpe | Aluminom Alloy |
| Akụkụ (LxWxH) | 9.45 x 6.30 x 3.39 sentimita asatọ |
| Ibu | 5.07 lb (Net weight) |
| Okpomọkụ na-arụ ọrụ | 0 ℃ ruo 70 ℃ |
| Iru mmiri na-arụ ọrụ | 10% - 85% |
9. Akwụkwọ ikike na nkwado
For warranty information and technical assistance, please use the following contact methods:

Figure 9.1: Support contact details.
- Nkwado Amazon: Log in to your Amazon account, navigate to 'Your Account' > 'Your Orders', and select 'Ask Product Question' for assistance.
- Nkwado mgbe-ahịa gasịrị: For direct technical support, you may send an email to the After-Sales Team at minipc_service@yeah.net. This service is available 24/7.
Ịdọ aka ná ntị: Please connect the power supply correctly. Keep away from damp and high-temperature environments, as well as sources of fire and water. Parents should strictly control kids' device time and content access.