1. Okwu mmalite
This manual provides essential information for the proper installation, operation, and maintenance of your Apevia CAPTAIN550 ATX Power Supply. The CAPTAIN550 is a 550W ATX power supply featuring a 120mm auto-thermally controlled fan and all black cables for a neat system build.
Please read this manual thoroughly before installation to ensure safe and efficient use of the product.
2. Ozi nchekwa
- Do not overload, abuse, or modify the power supply unit. Such actions can lead to damage, malfunction, or safety hazards.
- Ensure the power supply is disconnected from the main power outlet before performing any installation, maintenance, or troubleshooting.
- This unit contains high voltage components. Emeghela ọkụ ọkụ casing. Nye ọrụ naanị ndị ọrụ ruru eru.
- Use of this unit for Bitcoin mining or similar intensive, continuous load applications is not suggested as it will shorten the life and may cause failures of the power supply. Use for mining purposes is not covered by warranty.
- Gbaa mbọ hụ na ikuku ikuku dị n'akụkụ ọkụ ọkụ iji gbochie ikpo oke ọkụ.
3. Ihe ngwugwu
Chọpụta na ihe niile dị na ngwugwu:
- Apevia CAPTAIN550 ATX Power Supply Unit
- Igwe ọkụ AC
- Ihe mgbakwasị ụkwụ (4x)
- Akwụkwọ (akwụkwọ ntuziaka a)

Figure 3.1: Apevia CAPTAIN550 retail packaging.
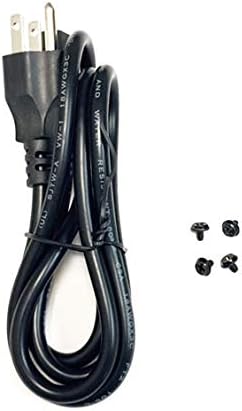
Figure 3.2: AC power cord and mounting screws included with the power supply.
4. Nhazi
4.1 Nwụnye anụ ahụ
- Ensure your computer case has an ATX power supply mounting bay. The CAPTAIN550 has standard ATX dimensions of 5.9" (L) x 5.5" (W) x 3.4" (H).
- Carefully slide the power supply into the designated bay in your computer case.
- Secure the power supply to the case using the four provided mounting screws.

Foto 4.1: Top view of the Apevia CAPTAIN550 Power Supply, showing the 120mm cooling fan.

Ọgụgụ 4.2: N'azụ view of the power supply, including the AC input and 115/230V switch.
4.2 Ụgbọ elutage Nhọrọ
The power supply features a 115/230V switch on the rear panel. Ensure this switch is set to the correct voltage for your region before connecting the power cord to a wall outlet. Incorrect voltage selection can damage the power supply and connected components.
4.3 Njikọ eriri
Connect the power supply cables to the corresponding components in your computer system. All cables are black for improved aesthetics.
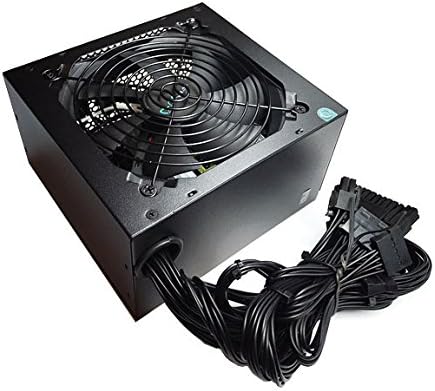
Figure 4.3: The Apevia CAPTAIN550 Power Supply with its attached black cables.
- 20/24pin Main Power Connector: Connect this to your motherboard. The 24pin connector can be split into a 20+4 configuration for motherboards requiring a 20pin connector.
- P8pin (P4+4pin) CPU Connector: Connect this to your motherboard's CPU power input. This 8pin connector can be split into a 4+4 configuration for motherboards requiring a 4pin power connector.
- 6/8pin PCI-express Connector: Connect this to your graphics card. This 8pin connector can be split into a 6+2 configuration for graphics cards requiring a 6pin power connector.
- Njikọ SATA: Connect these to SATA devices such as hard drives, solid-state drives, and optical drives.
- Njikọ ndị dị n'akụkụ (Molex): Connect these to older devices or case fans that use Molex power.

Nyocha 4.4: N'eluview of available connectors and their configurations.
5. Ntuziaka ọrụ
After all components are securely connected and the voltage switch is correctly set:
- Jikọọ eriri ọkụ AC na ọkụ ọkụ wee banye na mgbidi mgbidi.
- Ensure the power switch on the rear of the power supply is in the 'ON' position.
- Power on your computer system using the case's power button.
Ihe ndetu dị mkpa: The power supply will not power on simply by connecting the power cord to both the power supply and wall outlet. All power supply cables must be properly connected to the PC components for the system to power on.
6. Nlekọta
To ensure optimal performance and longevity of your Apevia CAPTAIN550 power supply:
- Regularly check for dust accumulation on the fan and ventilation grilles. Use compressed air to gently clean dust from these areas.
- Ensure adequate airflow within your computer case. Blocked vents can lead to overheating.
- Do not obstruct the power supply's fan or exhaust.
7. Nchọpụta nsogbu
7.1 Power Supply Does Not Turn On
- Verify that the AC power cord is securely connected to both the power supply and a functional wall outlet.
- Check that the 115/230V switch on the rear of the power supply is set to the correct voltage maka mpaghara gị.
- Ensure the power switch on the rear of the power supply is in the 'ON' position.
- Confirm that all power supply cables (20/24pin Main, CPU, PCI-e, SATA, Peripheral) are properly and securely connected to their respective components within the PC. A loose connection can prevent the system from powering on.
- If possible, test the power supply with a power supply tester or in another known working system to rule out other component failures.
8. Nkọwapụta

Figure 8.1: Side label displaying electrical specifications.
| Mmepụta DC Voltage | +3.3V | +5V | +12V | -12V | + 5Vsb |
|---|---|---|---|---|---|
| Mmepụta Max Ugbu A | 16A | 17A | 39A | 0.3A | 2.5A |
| Ejikọtara ike | 105W | 468W | 3.6W | 12.5W | |
| Mgbakọta Ike | 550W | ||||
Nkọwapụta izugbe
- Ihe kpatara ụdị: ATX
- Mpụta Wattage: 550W
- Ụzọ oyi: Air (1x 120mm Auto-Thermally Controlled Fan)
- Ntinye Voltage: 115 / 230V Switchable
- Nchedo: Circuit, Over-Current, Over-Voltage, Over-Power, Under-Voltage, Over-Temperature Protections
- Akụkụ (LxWxH): 5.9 x 5.5 x 3.4 sentimita asatọ
- Arọ: Ihe dị ka 2.9 pound
9. Akwụkwọ ikike
The Apevia CAPTAIN550 Power Supply is covered by a manufacturer's warranty. Please refer to the warranty card included with your product or visit the official Apevia websaịtị maka nkọwa na usoro akwụkwọ ikike.
Ihe dị mkpa: Use of this power supply unit for Bitcoin mining or similar intensive, continuous load applications is not covered by the warranty, as such use can shorten the product's lifespan and cause failures.
10. Nkwado
For technical assistance, product inquiries, or warranty claims, please contact Apevia customer support. You can find contact information on the official Apevia websaịtị ma ọ bụ site na akwụkwọ ngwaahịa gị.
Onye nrụpụta: Apevia Corp
Websaịtị: www.apevia.com (Biko lelee maka ozi kọntaktị kachasị ọhụrụ)