
1. Ntuziaka nchekwa
Please read these safety instructions carefully before using the MINISO Mini Portable Aromatic Fan. Keep this manual for future reference.
- Adịnyela fan n'ime mmiri ma ọ bụ ihe mmiri ndị ọzọ.
- Debe ebe ụmụaka na-apụghị iru.
- Do not insert fingers or any objects into the fan blades.
- Jiri naanị eriri USB enyere maka ịchaji.
- Emela ka fan ahụ gbawaa, rụzie ya, ma ọ bụ gbanwee ya n'onwe gị. Kpọtụrụ ndị ọrụ ruru eru maka ọrụ ahụ.
- Avoid exposing the fan to extreme temperatures or direct sunlight for prolonged periods.
- Only use essential oils specifically designed for diffusers in the aromatherapy compartment.
2. Ngwaahịa gafereview
The MINISO Mini Portable Aromatic Fan is designed for personal cooling and aromatherapy. Its compact and ergonomic design makes it suitable for various environments, including offices, schools, and outdoor use.

Foto 2.1: N'ihu view of the MINISO Mini Portable Aromatic Fan. This image shows the fan's overall design, including the protective grille and handle.
Akụkụ ndị bụ isi:
- Enwere ike ibugharị: Compact size (4.5 x 9.8 x 20.1 cm) and ergonomic handle for easy carrying.
- Ntọala ọsọ atọ: Adjustable airflow for personalized comfort.
- Aromatherapy Compartment: Integrated space for adding aromatic oils.
- USB enwere ike ịchaji: Built-in 1200 mAh lithium battery, charged via USB.
- Ọrụ dị jụụ: Engineered for low noise while providing effective airflow.

Foto 2.2: Close-up of the fan's ergonomic handle. The handle is designed to fit comfortably in your hand, ensuring a secure grip.
3. Nhazi
3.1 Ịchaji onye ofufe
Before first use, fully charge the fan. The fan is equipped with a 1200 mAh lithium battery.
- Locate the USB charging port on the fan handle.
- Connect the provided USB cable to the fan's charging port.
- Connect the other end of the USB cable to a compatible USB power source (e.g., computer, wall adapter).
- The charging indicator light will illuminate (color may vary) to show that the fan is charging.
- Charging time is approximately 1.5 to 3 hours. The indicator light will change or turn off once fully charged.

Foto 3.1: Illustration of the fan's rechargeable battery feature. The fan uses a USB cable for charging, providing up to 3.5 hours of continuous use on a full charge.
3.2 Adding Aromatic Oil
The fan includes a special compartment for aromatherapy.
- Locate the aromatherapy cover on the front grille of the fan.
- Gently open the cover.
- Add a few drops of your preferred aromatic oil onto the small pad inside the compartment. Do not overfill.
- Mechie mkpuchi ahụ nke ọma.

Foto 3.2: Detail of the aromatherapy cover. To use, open the cover, add a few drops of aromatic oil, and then close it.
4. Ọrụ
4.1 Gbanyụọ/ Gbanyụọ na ngbanwe ọsọ
The fan features a single button for power control and speed adjustment.
- Iji gbanye: Press the power button located on the handle once. The fan will start at the lowest speed setting.
- Iji gbanwee ọsọ: While the fan is on, press the power button repeatedly to cycle through the three speed settings (Low → Medium → High).
- Iji gbanyụọ: After the highest speed setting, press the power button one more time to turn the fan off.

Foto 4.1: Location of the power/speed button on the fan handle. Pressing this button cycles through the three available speeds and turns the fan off.
5. Nlekọta
Proper maintenance ensures the longevity and optimal performance of your fan.
- Na-ehicha Mpụga: Wipe the fan's exterior with a soft, dry cloth. For stubborn dirt, a slightly damp cloth can be used, but ensure no water enters the fan's internal components.
- Na-ehicha agụba: Use a soft brush or cotton swab to gently clean dust from the fan blades through the grille. Do not attempt to remove the grille or blades.
- Aromatherapy Compartment: Regularly clean the aromatic oil pad and compartment to prevent residue buildup. Replace the pad if it becomes discolored or loses effectiveness.
- Nchekwa: When not in use for extended periods, store the fan in a cool, dry place, away from direct sunlight and moisture. Ensure the battery is partially charged before storage.
6. Nchọpụta nsogbu
If you encounter issues with your fan, refer to the following table for common problems and solutions.
| Nsogbu | Ihe nwere ike ime | Ngwọta |
|---|---|---|
| Onye ofufe anaghị agbanwuo. | Batrị agwụla. | Charge the fan using the provided USB cable. |
| Fan runs weakly or stops unexpectedly. | Obere ụgwọ batrị. | Tinyeghachi fan ahụ. |
| Aroma is not noticeable. | Aromatic oil pad is dry or needs more oil. | Add more drops of aromatic oil to the pad or replace the pad. |
| Fan na-eme mkpọtụ na-adịghị ahụkebe. | Obstruction in fan blades or internal issue. | Turn off the fan and check for any visible obstructions. If the noise persists, discontinue use and contact support. |
7. Nkọwapụta
Technical details for the MINISO Mini Portable Aromatic Fan.
| Njirimara | Nkọwa |
|---|---|
| Ụdị | MINISO |
| Aha Nlereanya | Mini Ventilador Aromático |
| Isi Iyi Ike | Battery, Electric Cord (USB) |
| Ụdị batrị | Batrị lithium 1200mAh |
| Oge Nchaji | 1.5 ruo 3 awa |
| Oge eji | 1.5 to 3 hours (up to 3.5 hours continuous use) |
| Mpụta ike | 3 Watt |
| Ọnụọgụ nke Ọsọ ọsọ | 3 |
| Usoro njikwa | Touch (Single Button) |
| Akụkụ (D x W x H) | 4.5 x 9.8 x 20.1 cm (1.77 x 3.86 x 7.91 inch) |
| Ihe onwunwe | Plastic |
| Agba | Black (as per product data, though images show grey) |
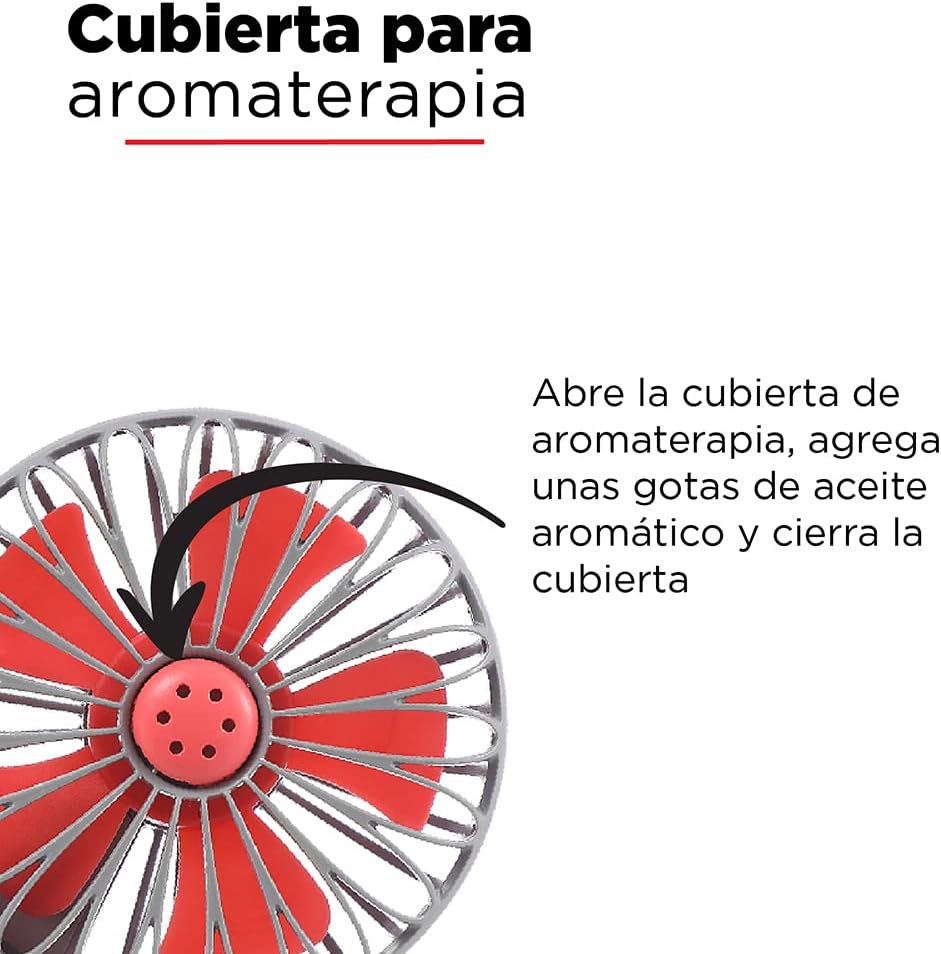
Foto 7.1: Visual representation of the fan's dimensions, showing a height of 20 cm and a width of 9.8 cm.
8. Akwụkwọ ikike na nkwado
For warranty information, technical support, or service inquiries, please contact MINISO customer support through their official websaịtị ma ọ bụ onye na-ere ahịa ebe a zụrụ ngwaahịa ahụ.
Please have your product model name (Mini Ventilador Aromático) and purchase details ready when contacting support.
You can visit the MINISO store on Amazon for more information: MINISO Official Store