
1. Okwu mmalite
The WAVLINK 8-Port Fast Ethernet Switch is designed to expand your network connectivity with ease. It features 8 RJ45 ports supporting 10/100 Mbps auto-negotiation and Auto-MDI/MDIX, eliminating the need for crossover cables. This plug-and-play device is ideal for extending network connections in various environments, from home offices to conference rooms, providing a reliable and efficient solution for your networking needs. It incorporates Green IT technology for energy saving.
2. Ihe ngwugwu
Chọpụta na ngwungwu gị nwere ihe ndị a:
- WAVLINK 8-Port 10/100 Mbps Fast Ethernet Switch (Model RC-N081M2-EU)
- Ihe nkwụnye ọkụ
- Akwụkwọ ntuziaka onye ọrụ
3. Akụrụngwa Ngwaahịa
- 8 RJ45 10/100 Mbps ports with auto-negotiation and Auto-MDI/MDIX.
- Green IT technology for up to 75% energy savings.
- IEEE802.3x flow control ensures reliable data transfer.
- Durable ABS plastic housing for desktop mounting.
- Plug and Play: No configuration or software required.
- Layer 2 switch functions including IGMP Snooping, Port Mirroring, and Spanning Tree.
4. Akụrụngwa Kwụsịrịview
The WAVLINK Fast Ethernet Switch features a compact design with essential ports and indicators for easy monitoring and connectivity.
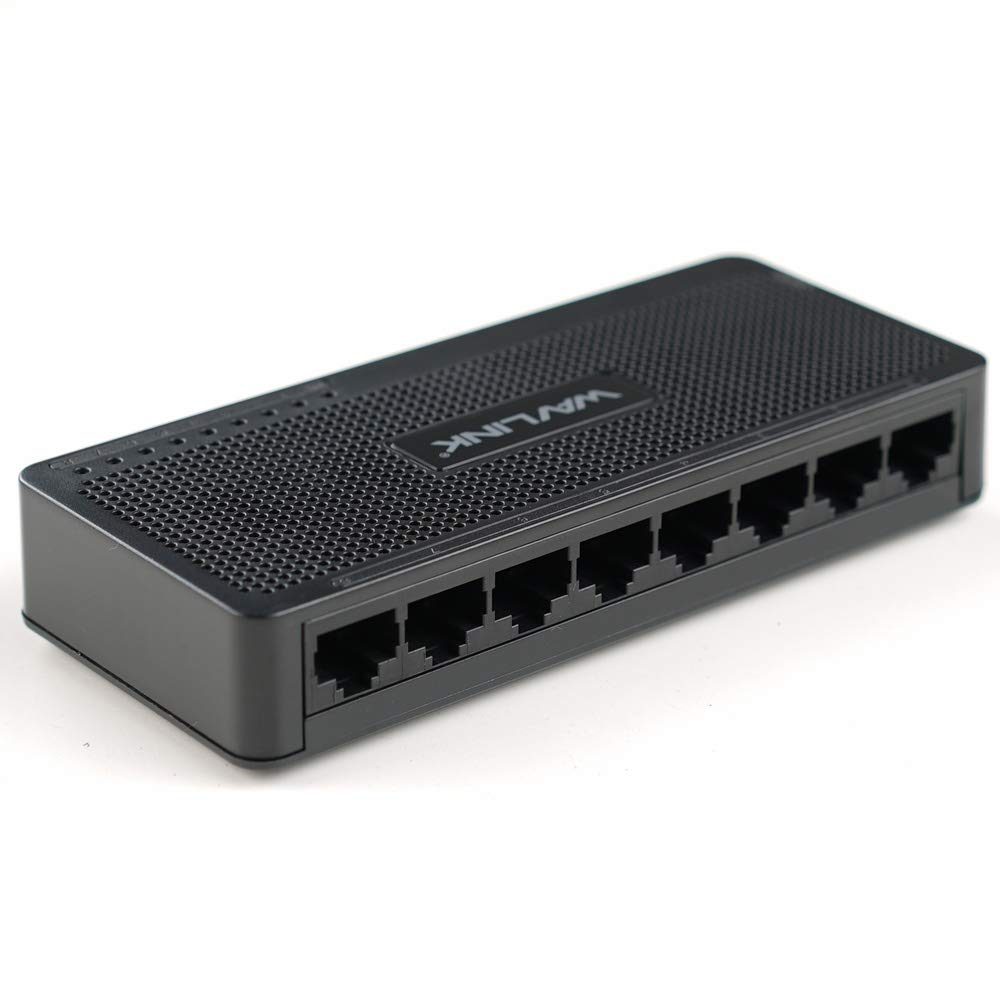
Foto 4.1: Top view of the WAVLINK 8-Port Fast Ethernet Switch, showing the brand logo and ventilation holes.
Ogwe ihu
The front panel includes the 8 RJ45 Ethernet ports and LED indicators for status monitoring.

Foto 4.2: N'ihu view of the switch, displaying the eight RJ45 Ethernet ports.
- Ọdụ ụgbọ mmiri RJ45 (1-8): Connect your network devices (computers, printers, gaming consoles, etc.) using standard Ethernet cables.
- Ihe ngosi LED: Each port has an associated LED that indicates connection status and activity.
Ogwe azụ
The rear panel typically contains the power input port.

Foto 4.3: Akụkụ view of the switch, illustrating its compact dimensions (13cm x 5.5cm x 2.1cm) and the power input port.
- Ntinye ike: Jikọọ ihe nkwụnye ọkụ enyere ebe a.
5. Ntuziaka Nhazi
The WAVLINK Fast Ethernet Switch is designed for simple plug-and-play installation. No complex configuration is required.
5.1 Ijikọ mgba ọkụ
- Nkwanye: Choose a stable, flat surface for the switch, such as a desktop. Ensure adequate ventilation around the device.
- Njikọ Ike: Plug the provided power adapter into the switch's power input port, then plug the other end into a standard electrical outlet. The power LED on the switch should illuminate.
- Connect to Router/Modem: Use an Ethernet cable to connect one of the switch's RJ45 ports to a LAN port on your router or modem.
- Jikọọ ngwaọrụ netwọk: Connect your computers, printers, network-attached storage (NAS), gaming consoles, or other network devices to the remaining RJ45 ports on the switch using Ethernet cables.

Figure 5.1: Connection diagram illustrating how the switch integrates into a network, connecting to a router and multiple end devices like computers, printers, and gaming consoles.

Figure 5.2: Visual representation of the plug-and-play setup, showing Ethernet cables ready for connection to the switch's ports.
Once all connections are made, the switch will automatically detect and configure the connected devices. The corresponding port LEDs will light up to indicate an active connection.
6. Na-arụ ọrụ mgba ọkụ
The WAVLINK Fast Ethernet Switch operates automatically once powered on and connected. It functions as a central connection point for your wired network devices.
- Nyefee data: The switch intelligently forwards data packets between connected devices at 10/100 Mbps speeds.
- Auto-MDI/MDIX: This feature automatically detects the type of Ethernet cable (straight-through or crossover) and adjusts accordingly, simplifying connections.
- Ihe ngosi LED:
- Green siri ike: Indicates a stable link connection.
- Green na-egbuke egbuke: Na-egosi ọrụ data na ọdụ ụgbọ mmiri.
- Gbanyụọ: No device connected or device is powered off.

Figure 6.1: The Ethernet switch acting as a splitter, providing additional wired connections for multiple devices such as laptops, gaming consoles, and printers.
7. Nlekọta
To ensure optimal performance and longevity of your WAVLINK Fast Ethernet Switch, follow these simple maintenance guidelines:
- Debe Ọcha: Regularly wipe the exterior of the switch with a soft, dry cloth. Avoid using liquid cleaners or aerosols.
- Igwe ikuku: Ensure that the ventilation holes are not blocked to prevent overheating.
- Gbanyụọ na nchekwa: If you need to power off the device, disconnect the power adapter from the electrical outlet.
- Ọnọdụ gburugburu: Operate the switch within the recommended temperature range of 0°C to 40°C (32°F to 104°F). Avoid extreme humidity.
8. Nchọpụta nsogbu
If you encounter issues with your WAVLINK Fast Ethernet Switch, refer to the following common problems and solutions:
8.1 Enweghị ike
- Gbaa mbọ hụ na ejikọrọ ihe nkwụnye ọkụ na nke ọma na ma ngbanwe yana oghere eletrik na-arụ ọrụ.
- Nyochaa na oghere ọkụ ahụ na-arụ ọrụ site na itinye na ngwaọrụ ọzọ.
8.2 No Link/Activity LED
- Check that the Ethernet cable is securely connected to both the switch port and the network device.
- Gbalịa eriri Ethernet dị iche iji wepụ eriri adịghị mma.
- Gbaa mbọ hụ na agbanyere ngwaọrụ netwọk ejikọrọ ma na-arụ ọrụ nke ọma.
- Gbalịa ijikọ ngwaọrụ na ọdụ ụgbọ mmiri dị iche na mgba ọkụ.
8.3 Ọsọ netwọkụ dị nwayọ
- Ensure all connected devices and cables support 10/100 Mbps speeds.
- Check for excessive network traffic or bandwidth-intensive applications running on connected devices.
- Verify that your router/modem is providing adequate internet speed.
9. Nkọwapụta
| Njirimara | Nkọwa |
|---|---|
| Ụdị | WAVLINK |
| Nọmba nlereanya | RC-N081M2-EU |
| Ọnụọgụ nke ọdụ ụgbọ mmiri | 8 |
| Typedị Port | RJ45 |
| Ọnụego mbufe data | 10/100 Mbps (Ọsọ ọsọ Ethernet) |
| Mkparịta ụka akpaaka | Akwadoro |
| Nchekwa onwe-MDI/MDIX | Akwadoro |
| Njikwa usoro | IEEE802.3x |
| Ihe eji eme ụlọ | ABS Plastic |
| Nwụnye | Desktọpụ |
| Okpomọkụ na-arụ ọrụ | 0°C ~ 40°C (32°F ~ 104°F) |
| Akụkụ (Ihe dị ka) | 13 cm x 5.5 cm x 2.1 cm (5.1 na x 2.2 na x 0.8 na) |
10. System chọrọ
The WAVLINK Fast Ethernet Switch is compatible with any operating system that supports standard Ethernet connectivity. No specific drivers are required for the switch itself.
- Microsoft Windows (10/8/2012/7/2008/Vista/2003/XP/2000/Me/NT/98/95/3.11)
- macOS
- NetWare
- UNIX
- Linux
11. Akwụkwọ ikike na nkwado
WAVLINK products are designed for reliability and performance. For warranty information and technical support, please refer to the warranty card included with your product or visit the official WAVLINK websaịtị. Debe akwụkwọ nnata ịzụrụ maka akwụkwọ ikike.
For further assistance, you may contact WAVLINK customer support through their official channels.


