
Okwu mmalite
This manual provides essential instructions for the safe operation, installation, and maintenance of your Chicago Pneumatic Digital Timer for Lamps & Appliances. Please read this manual thoroughly before using the product and retain it for future reference. Proper use ensures optimal performance and extends the product's lifespan.
Ntuziaka nchekwa
Na-edebe nchekwa nchekwa ndị a mgbe niile ka igbochi mmerụ ahụ ma ọ bụ mmebi ngwaahịa:
- Do not immerse the timer in water or expose it to excessive moisture.
- Do not exceed the maximum load rating specified for the timer.
- Hụ na e tinyere ihe nhazi oge ahụ n'ime oghere dị n'ala nke ọma.
- Do not disassemble or attempt to repair the timer yourself. Contact qualified service personnel.
- Debe ebe ụmụaka na-apụghị iru.
- Unplug the timer from the power outlet before cleaning.
Ihe ngwugwu
Chọpụta na ihe niile dị na ngwugwu:
- 1 x Chicago Pneumatic Digital Timer
- Akwụkwọ ntuziaka onye ọrụ 1 x (akwụkwọ a)
Ngwaahịa gafereview
Familiarize yourself with the components of your digital timer.
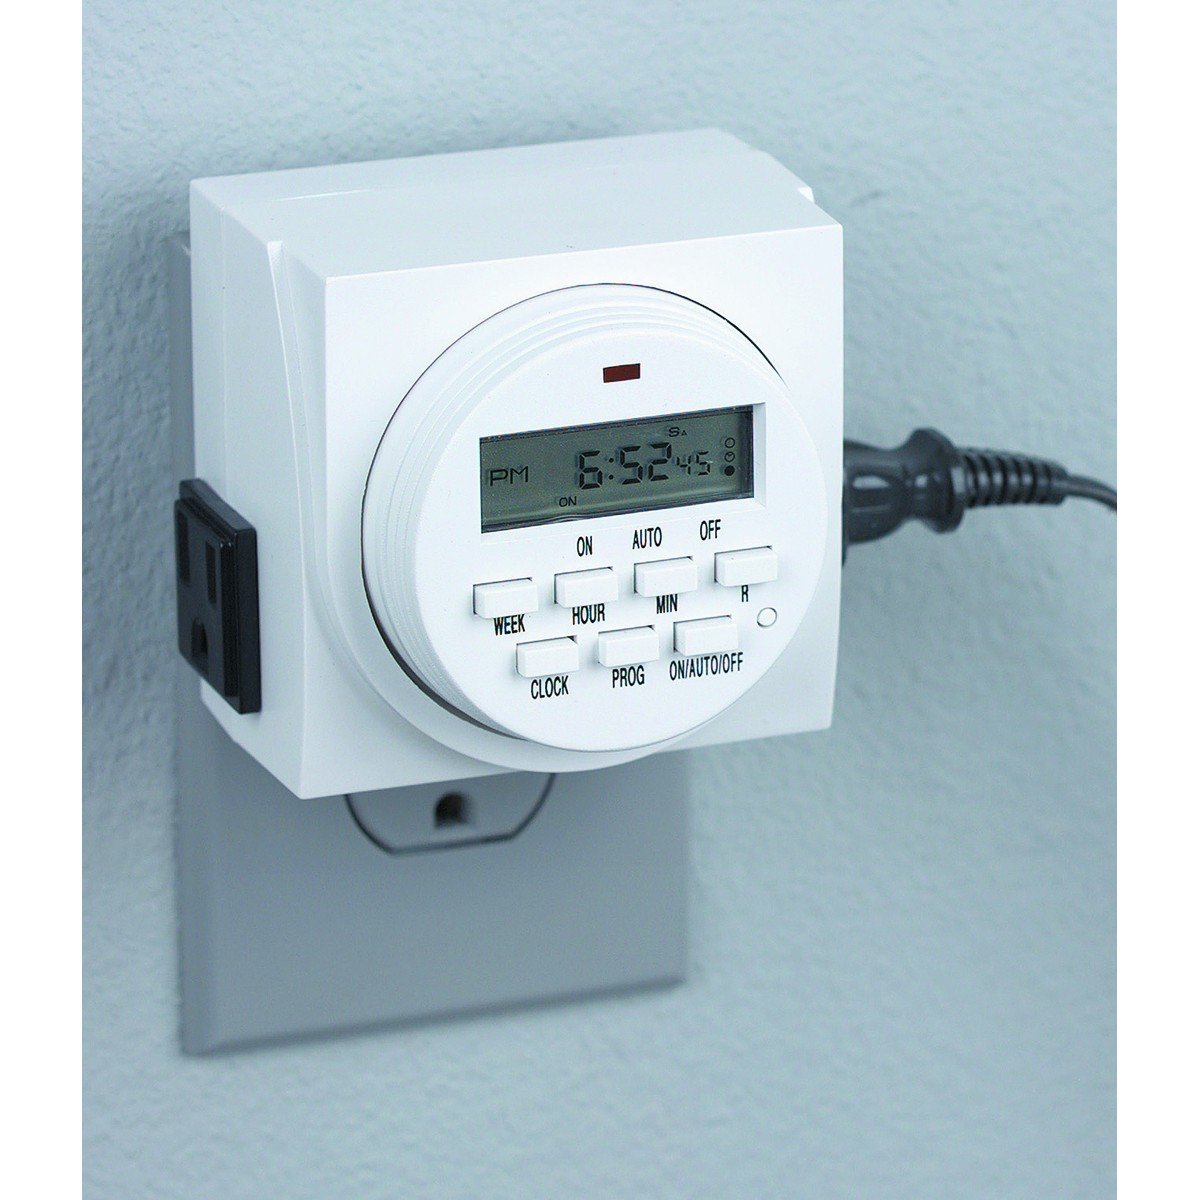
Foto 1: N'ihu view of the Chicago Pneumatic Digital Timer. This image displays the digital screen, which shows the current time and programming status, along with various control buttons for setting programs, adjusting time, and manual override.
The timer features a clear digital display, multiple programming buttons, and a power outlet for connecting appliances.
Melite
- Ebube mbụ: Before first use, plug the timer into a live electrical outlet for at least 30 minutes to charge the internal battery. This battery retains settings during power outages.
- Kpochapụ ntọala niile: Press the "RESET" button (often a small recessed button requiring a pen tip) to clear all previous settings and restore factory defaults.
- Tọọ oge ugbu a:
- Press the "CLOCK" button.
- Use the "HOUR" and "MINUTE" buttons to set the current time.
- Use the "WEEK" button to set the current day of the week.
- Press "CLOCK" again to confirm and exit time setting mode.
Ntuziaka ọrụ
Mmemme ịgbanwuo/ Gbanyụọ Oge
The timer allows for multiple ON/OFF programs. Follow these steps to set a program:
- Press the "PROG" button. The display will show "1 ON".
- Use "WEEK" to select the day(s) for this program (e.g., MO, TU, WE, TH, FR, SA, SU, or combinations like MO-FR, SA-SU, MO-SU).
- Use "HOUR" and "MINUTE" to set the desired ON time.
- Press "PROG" again. The display will show "1 OFF".
- Use "WEEK", "HOUR", and "MINUTE" to set the desired OFF time for the same program.
- Repeat steps 1-5 for additional programs (e.g., "2 ON", "2 OFF", etc.).
- After setting all programs, press the "CLOCK" button to return to the current time display.
Ntugharị akwụkwọ ntuziaka
To manually switch the timer's output ON or OFF, or to cycle through modes:
- Press the "MANUAL" or "ON/AUTO/OFF" button repeatedly.
- The display will cycle through "ON" (always on), "AUTO" (follows programs), and "OFF" (always off). Select "AUTO" for programmed operation.
Connecting an Appliance
Plug the appliance you wish to control into the outlet on the front of the digital timer. Ensure the appliance's power switch is in the ON position if it has one, so the timer can control its power supply.
Nlekọta
- Nhicha: Disconnect the timer from the power outlet. Wipe the exterior with a soft, dry cloth. Do not use abrasive cleaners or solvents.
- Nchekwa: Chekwaa ngụ oge n'ebe dị jụụ, kpọrọ nkụ mgbe anaghị eji ya.
- Batrị: The internal battery is designed for long life and typically does not require replacement. If the display becomes dim or settings are frequently lost, ensure the timer is regularly plugged in to charge the battery.
Nchọpụta nsogbu
| Nsogbu | Ihe nwere ike ime | Ngwọta |
|---|---|---|
| Oge anaghị agbanyụ/gbanyụọ n'oge mmemme. |
|
|
| Ngosipụta bụ oghere ma ọ bụ nchara nchara. |
|
|
| Settings are lost after power outage. | Internal battery not sufficiently charged. | Plug the timer into a live outlet for several hours to fully charge the internal battery. |
Nkọwapụta
| Nlereanya | Oge dijitalụ |
| Ụdị | Chicago Pneumatic |
| Ihe onwunwe | Plastic |
| Ibu Ibu | 8.4 ounces |
| Akụkụ ngwugwu | 7.68 x 7.44 x 3.86 sentimita asatọ |
| UPC | 367877920504 |
| ASIN | B082P3B3TY |
| Ogo ike | (Refer to product label for specific voltage/ampiwe) |
Akwụkwọ ikike na nkwado
Chicago Pneumatic products are manufactured to high-quality standards. For warranty information, please refer to the warranty card included with your purchase or visit the official Chicago Pneumatic websaịtị. Debe nnata nzụta gị ka ihe akaebe nke ịzụrụ.
For technical support, troubleshooting assistance beyond this manual, or to inquire about replacement parts, please contact Chicago Pneumatic customer service. Contact details can typically be found on the product packaging or the official brand websaịtị.
Akụrụngwa dị n'ịntanetị: For additional support and product information, visit the official Chicago Pneumatic websaịtị.