
1. Okwu mmalite
This manual provides detailed instructions for the installation, operation, and maintenance of your Lorex D841A82B Series 8 Channel 4K HD Digital Video Recorder (DVR). This DVR is designed to provide high-resolution surveillance with advanced features such as 4K recording, person/vehicle detection, and smart home integration. Please read this manual thoroughly before using the product to ensure proper setup and functionality.
2. Ihe ngwugwu
Verify that all items listed below are included in your product packaging. If any items are missing or damaged, please contact Lorex customer support.
- Lorex D841A82B Series DVR
- HDMI USB
- Ihe nkwụnye ọkụ
- eriri Ethernet
- USB useké
- Ntuziaka mmalite ngwa ngwa (akwụkwọ ntuziaka a)
3. Ngwaahịa gafereview

Figure 3.1: Front Panel of the Lorex D841A82B DVR. This image displays the front of the DVR unit, featuring the "4K Ultra HD DVR" label, a central circular button, and a USB port for connecting a mouse or other peripherals.

Figure 3.2: Side Panel with Ventilation. This image shows the side of the DVR, highlighting the ventilation grilles designed for heat dissipation, crucial for continuous operation.
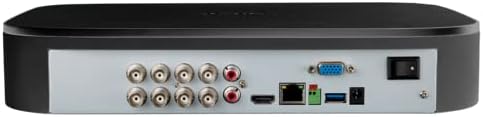
Foto nke 3.3: Njikọ Panel azụ. This image illustrates the rear panel of the DVR, displaying various input/output ports including BNC connectors for cameras, audio inputs/outputs, HDMI, VGA, Ethernet, USB ports, and the power input with an on/off switch.
4. Atụmatụ igodo
- Ndekọ 4K Ultra HD: Capable of recording up to 4K (8MP) resolution on all channels, providing detailed video footage.
- Advanced Motion Detection: Reduces false alarms with intelligent person and vehicle detection, sending push notifications when relevant motion is detected (available on up to 4 channels).
- Ndakọrịta Smart Home: Integrates with Amazon Alexa and Google Assistant for hands-free voice control, and Chromecast for viewing live or recorded video on your TV.
- Lorex Home Mobile Application: Allows remote viewing and control of active deterrence features from a smartphone or tablet.
- Nchekwa mpaghara: Equipped with a pre-installed 2TB security-grade hard drive, ensuring secure local storage without monthly cloud fees. Expandable up to 10TB.
- Ọchụchọ amamihe: Filter motion events to quickly review footage.
- Bọtịnụ ụjọ: Located on the DVR, activates lights and sirens on connected cameras for immediate response.
- 24/7 nlekota: Designed for continuous operation and reliable surveillance.
5. Ntuziaka Nhazi
5.1 Njikọ Mbụ
- Jikọọ Igwefoto: Connect your analog HD security cameras to the BNC video input ports on the rear of the DVR. Ensure connections are secure.
- Jikọọ na Nyocha: Use the provided HDMI cable to connect the DVR's HDMI output port to an HDMI input on your TV or monitor. Alternatively, use a VGA cable for VGA monitors.
- Jikọọ òké USB: Plug the included USB mouse into one of the USB ports on the DVR (front or rear).
- Connect to Network (Optional but Recommended): Maka ime ime viewing and smart features, connect the DVR to your router using the supplied Ethernet cable.
- Njikọ Ike: Connect the power adapter to the DVR's power input and then plug it into a power outlet. Turn on the DVR using the power switch on the rear panel.
5.2 Ọkachamara nhazi oge izizi
Upon first power-up, the DVR will guide you through a setup wizard. Follow the on-screen prompts to:
- Mepụta paswọọdụ echedoro.
- Hazie ntọala ụbọchị na oge.
- Set up network parameters (if not automatically detected).
- Adjust recording preferences.
It is crucial to complete these steps to ensure your system is secure and functioning correctly.
6. Ntuziaka ọrụ
6.1 Ndụ View
Mgbe ntọala mbụ gasịrị, DVR ga-egosi ihe dị ndụ view from all connected cameras on your monitor.
- Otu Igwefoto View: Double-click on any camera feed to view it in full screen. Double-click again to return to multi-camera view.
- Mbugharị dijitalụ: Na ihuenyo zuru oke view, use the digital zoom function to magnify specific areas of interest.
6.2 Ndekọ na ịkpọghachi
The DVR is configured for continuous recording by default. You can adjust recording schedules and motion detection settings via the main menu.
- Access Playback: Pịa aka nri na ndụ view screen and select "Playback" from the menu.
- Search Footage: Use the date and time filters to locate specific recordings. The Smart Search feature allows filtering by motion events.
- Export Footage: Connect a USB flash drive to a USB port on the DVR to export selected video clips.
6.3 Lorex Home Mobile Application
Download the Lorex Home app from your smartphone's app store.
- Mepụta akaụntụ wee banye.
- Add your DVR by scanning the QR code displayed on the DVR's monitor (found in the network settings) or by manually entering the device ID.
- Ozugbo ejikọrọ, ị nwere ike view live feeds, play back recordings, receive push notifications, and control active deterrence features remotely.
6.4 Ngwakọta ụlọ Smart
The Lorex D841A82B DVR supports integration with Amazon Alexa, Google Assistant, and Chromecast.
- Njikwa olu: Enable the Lorex skill/action in your smart home app (Alexa or Google Home). Use voice commands to view camera feeds on compatible smart displays or TVs (e.g., "Alexa, show me the front door camera").
- Chromecast: Link your Lorex account to Google Home and cast live or recorded video directly to a Chromecast-enabled display.
7. Nlekọta
7.1 Njikwa Draịvụ Ike
The DVR's hard drive is designed for continuous operation. When the hard drive is full, the system will automatically overwrite the oldest recordings.
- Na-akwado nri dị mkpa mgbe niiletage to an external storage device.
- Check the hard drive status periodically through the DVR's system settings to ensure optimal performance.
7.2 Nhicha
To maintain the DVR's performance and longevity:
- Wipe the exterior of the DVR with a soft, dry cloth.
- Ensure ventilation openings are clear of dust and debris to prevent overheating. Do not use liquid cleaners or aerosol sprays directly on the unit.
7.3 Mmelite firmware
Lorex periodically releases firmware updates to improve performance and add new features. Check the Lorex support website for the latest firmware for your model and follow the provided instructions for updating.
8. Nchọpụta nsogbu
If you encounter issues with your Lorex D841A82B DVR, refer to the following common troubleshooting steps.
| Nsogbu | Ihe nwere ike ime | Ngwọta |
|---|---|---|
| Enweghị vidiyo na ihe nlele. | Loose HDMI/VGA cable, incorrect monitor input, DVR not powered on. | Check cable connections. Ensure monitor is set to the correct input source. Verify DVR power. |
| Enweghị onyonyo igwefoto. | Loose BNC cable, camera power issue, camera malfunction. | Check BNC connections. Ensure cameras are receiving power. Test camera with another channel or DVR if possible. |
| Cannot connect to Lorex Home app. | No network connection, incorrect device ID, firewall settings. | Verify DVR is connected to the internet. Double-check device ID. Ensure router/firewall allows DVR access. |
| Motion detection alerts are too frequent or not working. | Sensitivity settings, detection zone configuration. | Adjust motion detection sensitivity and detection zones in the DVR settings. Ensure person/vehicle detection is enabled for relevant channels. |
For further assistance, please contact Lorex customer support.
9. Nkọwapụta
| Njirimara | Nkọwa |
|---|---|
| Nọmba nlereanya | D841A82B |
| Video Channels | 8 Ọwa |
| Mkpebi ndekọ | Ruo 4K (8MP) Ultra HD |
| Nha diski ike | 2 TB (pre-installed), expandable up to 10 TB |
| Teknụzụ Njikọta | Ethernet, HDMI |
| Ngwa dakọtara | Cameras, Smartphone, Tablet, Television |
| Akụkụ ngwaahịa | 13.25 x 16 x 5.5 sentimita asatọ |
| Ibu Ibu | 6.41 pound |
10. Compatible Cameras
The D841B series DVR is compatible with a wide range of Lorex cameras. Below is a list of compatible camera models:
- LW2287, LW2297, LW4211B
- C841CA, LAB243
- LBV1511, LBV1521B, LBV2521, LBV2531, LBV2561U, LBV2711, LBV2723, LBV4711, LBV8531B, LBV8451XB, LBV8721AB
- LEV2750AB, LEV4712
- LZV2722, LZV2925
- C241XC-E, C241DA-E, C581CB, C581CD, C581DA, C861CF, C861CH, C861XC-E, C881DA, C882DA
11. Nkwado na akwụkwọ ikike
For technical support, product registration, and warranty information, please visit the official Lorex website or contact Lorex customer service directly. Keeping your product registered helps ensure you receive timely updates and support.
Oghere Websaịtị: www.lorex.com