Ngwaahịa gafereview
The Sunbuck AV-MP326BT is a versatile 2-channel stereo amplifier designed for home audio systems. It features multiple input options, including 4-way microphone inputs, USB disk, and SD card support, along with Bluetooth connectivity for wireless audio streaming. The amplifier also includes an integrated EQ for sound customization and an LED display for easy operation.
Atụmatụ gụnyere:
- Support for 4-way microphone input
- Kpochapụ ihe ngosi LED
- 2-track output with integrated EQ
- Reverberation, fine-tuning, and balance controls
- SD card and USB interface for media playback
- Njikọ Bluetooth

Foto 1: N'ihu view of the Sunbuck AV-MP326BT ampihe ngosi, ihe ngosiasing its control panel and inputs.
Ntuziaka nchekwa
Please read and understand all safety instructions before operating this device. Failure to follow these instructions may result in electric shock, fire, or damage to the unit.
- Ịnye ọkụ: Nke a amplifier operates on 220V-240V AC, 50/60Hz. Ensure your power source matches these requirements. Do not connect to a different voltage.
- Igwe ikuku: Ensure adequate ventilation around the unit. Do not block ventilation openings. Avoid placing the amplifier in enclosed spaces or on soft surfaces that may impede airflow.
- Mmiri: Etinyela ihe ndị e ji mmiri mee, mmiri mmiri, mmiri mmiri na-asọpụta, ma ọ bụ mmiri na-efesa. Etinyela ihe ndị e ji mmiri mmiri, dị ka ite, n'elu ihe ahụ.
- Okpomọkụ: Debe ngwaọrụ ahụ n'ebe dị anya site na isi iyi okpomọkụ dịka radiators, ndekọ okpomọkụ, stovu, ma ọ bụ ngwaọrụ ndị ọzọ (gụnyere amplifiers) nke na-emepụta okpomọkụ.
- Ije ozi: Do not attempt to service this product yourself. Refer all servicing to qualified service personnel. Opening the casing nwere ike ikpughe gị na vol dị ize ndụtage ma ọ bụ ihe egwu ndị ọzọ.
- Nhicha: Unplug the unit from the power outlet before cleaning. Use a dry cloth for cleaning. Do not use liquid cleaners or aerosol cleaners.
- Nkwanye: Debe ihe ahụ n'elu ebe kwụsiri ike ma dị larịị iji gbochie ya ịda.

Figure 2: Detail of the power switch and handle, showing the "POWER ON/OFF" label. Always ensure the unit is off before connecting or disconnecting cables.
Melite
Follow these steps to set up your Sunbuck AV-MP326BT ampntughari:
- Nkwanye: Debe ya amplifier on a stable, flat surface with adequate ventilation space around it.
- Njikọ Ọkà Okwu: Connect your speakers to the "SPEAKER SYSTEM" terminals on the rear panel. Ensure correct polarity (+ to + and - to -). This amplifier supports speakers with an impedance of 4 to 16 ohms.
- Njikọ ntinye ọdịyo: Connect your audio sources (e.g., CD player, DVD player, TV) to the "AUDIO INPUT" RCA jacks (L/R) on the rear panel. There are two sets of inputs labeled A and B.
- Njikọ igwe okwu: If using microphones, connect them to the MIC1, MIC2, MIC3, or MIC4 inputs on the front panel.
- Antenna FM: Connect the FM antenna to the "FM ANT" terminal on the rear panel for radio reception.
- Njikọ ike: Gbaa mbọ hụ na amplifier's power switch is in the OFF position. Connect the power cord to the "POWER SOURCE 220V-240V 50Hz" input on the rear panel, then plug the other end into a suitable wall outlet.
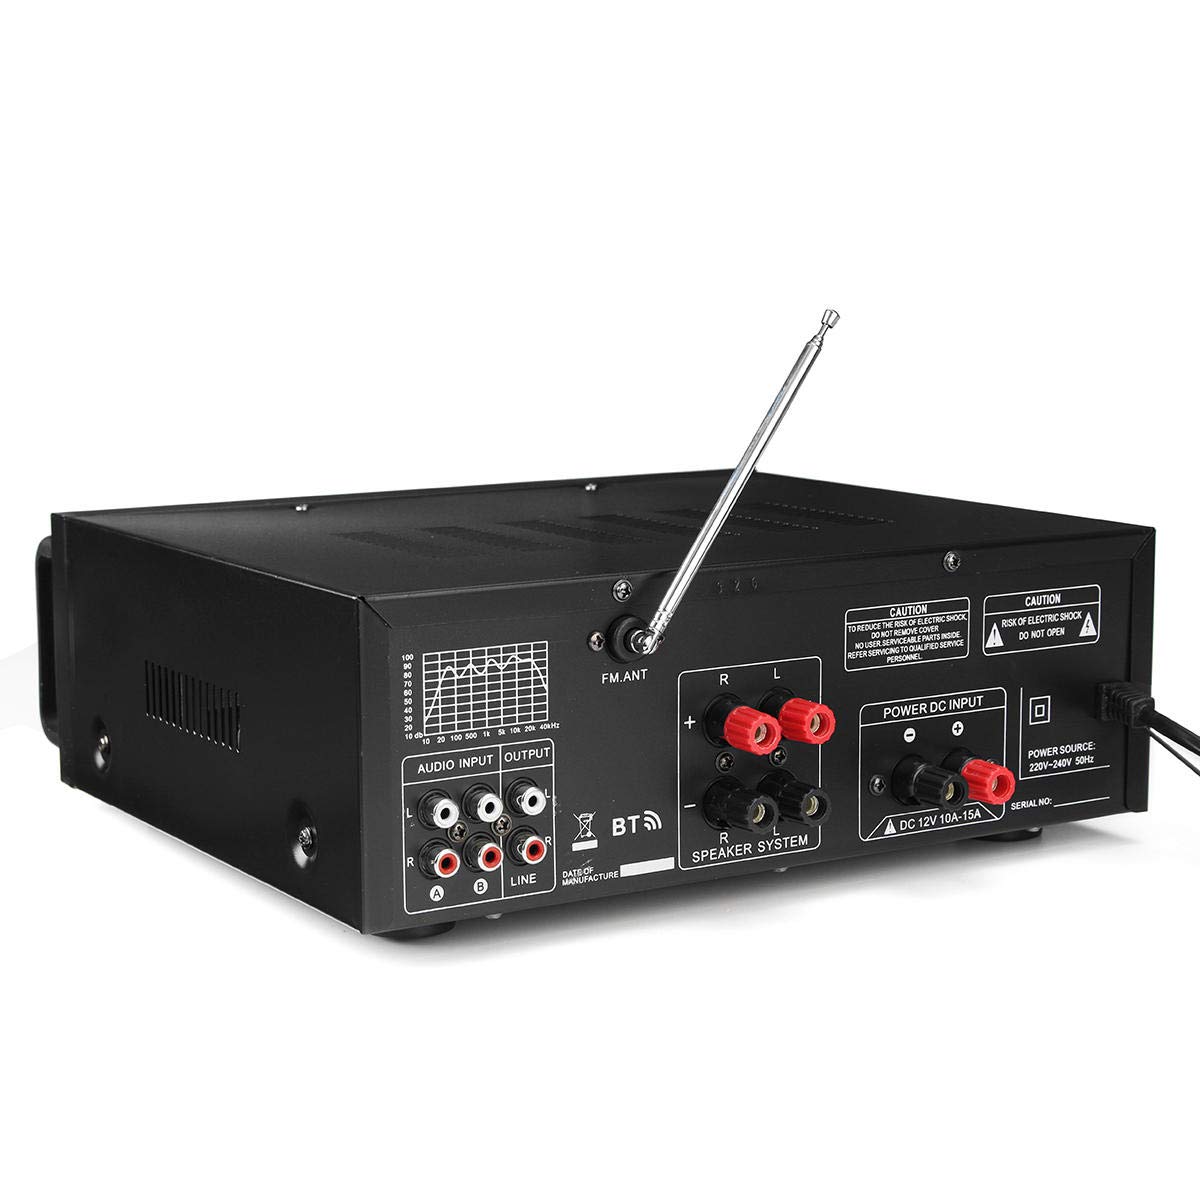
Figure 3: Rear panel connections, including speaker terminals, audio inputs, and power input.

Ọgụgụ 4: Zuru ezu view of the "AUDIO INPUT" (A, B) and "OUTPUT" (LINE) RCA jacks.
Ntuziaka ọrụ
This section details the operation of your amplifier's various functions.
Gbanyụọ/ Gbanyụọ
- Ka ịgbanwuo amplifier, press the "POWER" switch on the front panel to the ON position. The LED display will illuminate.
- Iji gbanyụọ amplifier, press the "POWER" switch to the OFF position.
Njikwa igwe okwu
- MIC VOL: Adjusts the overall volume of the microphones.
- MIC1/MIC2 VOL, MIC3/MIC4 VOL: Individual volume controls for microphone pairs.
- TREBLE, MID, BASS (Microphone): Adjusts the tone of the microphone input.
- ECHO: Controls the echo effect applied to microphone vocals.
- EGWU: Adjusts the delay time for the echo effect.
Njikwa egwu
- Mpịakọta Egwu: Adjusts the overall volume of the music input.
- TREBLE, BASS (Music): Adjusts the tone of the music input.
- Nhazi: Adjusts the balance between the left and right audio channels.
- EQ: Use the equalizer sliders to fine-tune specific frequency ranges of the music.
Media Playback (USB Disk / SD Card)
- Insert a USB disk or SD card (up to 64GB, not included) into the respective slot on the front panel.
- Nke amplifier will automatically detect and begin playing compatible audio files.
- Use the playback controls (Play/Pause, Next, Previous) on the front panel to manage media.
Njikọ Bluetooth
- Press the "MODE" button on the front panel until "BT" (Bluetooth) is displayed.
- On your Bluetooth-enabled device (smartphone, tablet, etc.), search for available Bluetooth devices.
- Select "Sunbuck AV-MP326BT" (or similar name) from the list to pair.
- Ozugbo ejikọtara ya, ị nwere ike ịgbasa ọdịyo na-enweghị eriri site na ngwaọrụ gị gaa na ekwentị gị ampna -emegharị ihe.

Ọgụgụ 5: Zuru ezu view of the microphone and music control knobs, including Treble, Mid, Bass, Echo, Delay, and Balance.

Ọgụgụ 6: N'ihu akụkụ view, showing the LED display, USB port, and SD card slot for media playback.
Nkọwapụta
| Njirimara | Nkọwapụta |
|---|---|
| Voltage | 220V-240V AC, 50/60Hz |
| Enyere ike (RMS) | 200W + 200W |
| Ike kachasị | 400W + 400W |
| Standard Impedance | 4 ruo 16 ohm |
| Nzaghachi ugboro ugboro | 20Hz - 20KHz (+3dB) |
| Oke mgbama-na- mkpọtụ (S/N) | ≥ 90dB |
| Ntughari | ≤0.5% |
| Signal Input Sensitivity | 200mV (+30mV) |
| Mmetụta Ntinye igweokwu | 9mV (+2mV) |
| Recording Output Level | 1V |
| Auxiliary Output Level | 1V |
| Ụdị Ike Ampna -emegharị ihe | Ike AV Ampna -emegharị ihe |
| Traktị olu | 2 Vocal Tract |
| USB Disk / SD Card Support | Max 64GB (Not included) |
Nchọpụta nsogbu
Ọ bụrụ na ị nwere nsogbu na ndụ gị amplifier, rụtụ aka na nsogbu na azịza ndị a na-ahụkarị:
- Enweghị ike:
- Ensure the power cord is securely plugged into both the amplifier and a working wall outlet.
- Check if the power switch on the front panel is in the ON position.
- Verify that the wall outlet is supplying power (test with another device).
- Enweghị mpụta ụda:
- Check all speaker connections for correct polarity and secure fit.
- Ensure the "MUSIC VOL" and "MIC VOL" knobs are turned up.
- Verify that the audio input source (e.g., CD player, phone) is connected correctly and playing audio.
- Confirm the correct input source is selected (if applicable, though this model seems to auto-detect or use mode button for BT/USB/SD).
- Ụda agbagọ:
- Reduce the "MUSIC VOL" or "MIC VOL" to prevent clipping.
- Check speaker impedance. Ensure it is within the 4-16 ohm range.
- Adjust the EQ settings.
- Gbaa mbọ hụ na eriri ọdịyo emebighị ma jikọọ ya na nchekwa.
- Okwu njikọ Bluetooth:
- Gbaa mbọ hụ na amplifier is in Bluetooth mode ("BT" displayed).
- Gbaa mbọ hụ na agbanyere Bluetooth na ngwaọrụ isi iyi gị.
- Move your source device closer to the amplifier to ensure it's within range.
- Gbalịa iwepụ ma megharịa ngwaọrụ ahụ ọzọ.
- USB Disk / SD Card Not Reading:
- Ensure the USB disk or SD card is inserted correctly and fully.
- Check if the media format is compatible (e.g., FAT32 for USB/SD).
- Chọpụta na ọdịyo ahụ files on the media are in a supported format.
- Try a different USB disk or SD card to rule out media issues.
Nlekọta
Nlekọta kwesịrị ekwesị na-eme ka ogologo oge na arụmọrụ kachasị mma nke ngwaọrụ gị ampna -emegharị ihe.
- Nhicha: Na-ehicha mpụta nke akụkụ ahụ mgbe niile amplifier with a soft, dry, lint-free cloth. Do not use abrasive cleaners, waxes, or solvents.
- Igwe ikuku: Periodically check that the ventilation openings are clear of dust and debris. Use a soft brush or compressed air to gently clean them if necessary.
- Nchekwa: Ọ bụrụ na-echekwa amplifier for an extended period, unplug it from the power outlet and store it in a cool, dry place, away from direct sunlight and extreme temperatures.
- Njikwa USB: Ensure all cables are neatly organized and not kinked or pinched, which can cause damage over time.
Akwụkwọ ikike na nkwado
For information regarding warranty coverage and terms, please refer to the warranty policy provided at the time of purchase or contact your retailer. Keep your purchase receipt as proof of purchase for any warranty claims.
For technical support or service inquiries, please contact the vendor or retailer from whom you purchased the product. They can provide assistance with troubleshooting or guide you through the service process.


