Reloop RP-1000-MK2
Reloop RP-1000 MK2 Professional Belt Drive Turntable System
Akwụkwọ ntuziaka onye ọrụ
1. Okwu mmalite
This user manual provides comprehensive instructions for the setup, operation, and maintenance of your Reloop RP-1000 MK2 Professional Belt Drive Turntable System. Please read this manual thoroughly before using the product to ensure proper function and to prevent damage.
The Reloop RP-1000 MK2 is designed for both aspiring DJs and HiFi enthusiasts, offering high-quality audio reproduction through its belt-driven mechanism. This design effectively isolates the platter from motor vibrations, ensuring clear, distortion-free sound. The MK2 version features an enhanced top panel construction, improved metallic buttons, and a pre-fitted Ortofon OM Black pick-up system for immediate playback.
2. Ntuziaka nchekwa
To ensure safe operation and prolong the life of your turntable, please observe the following safety guidelines:
- Ịnye ọkụ: Connect the unit only to an AC outlet with the correct voltage as indicated on the product. Ensure the power cord is not pinched or walked on.
- Mmiri: Do not expose the unit to rain, moisture, or excessive humidity. Do not place objects filled with liquids, such as vases, on the unit.
- Igwe ikuku: Hụ na ikuku zuru oke dị n'akụkụ ngwaọrụ ahụ. Ekpuchila oghere ikuku.
- Isi mmalite ọkụ: Debe ngwaọrụ ahụ n'ebe dị anya site na isi iyi okpomọkụ dịka radiators, ndekọ okpomọkụ, stovu, ma ọ bụ ngwaọrụ ndị ọzọ (gụnyere amplifiers) nke na-emepụta okpomọkụ.
- Nhicha: Clean only with a dry cloth. Avoid using liquid cleaners or aerosols.
- Ije ozi: Do not attempt to service the unit yourself. Refer all servicing to qualified service personnel. Servicing is required when the apparatus has been damaged in any way, such as power-supply cord or plug is damaged, liquid has been spilled or objects have fallen into the apparatus, the apparatus has been exposed to rain or moisture, does not operate normally, or has been dropped.
- Nkwanye: Place the turntable on a stable, level surface to prevent vibrations and ensure proper tracking.
3. Ihe ngwugwu
Biko lelee na etinyere ihe niile edepụtara n'okpuru na ngwugwu gị:
- Pụrụ iche Platter
- OM Black pick-up system (by Ortofon)
- Isi okwu
- Slipmat
- Ibu ibu
- Ụdọ ọkụ
- Operating Instruction Manual (this document)
If any items are missing or damaged, please contact your retailer or Reloop customer support immediately.
4. Ngwaahịa gafereview
Familiarize yourself with the main components of your Reloop RP-1000 MK2 turntable.

Ọgụgụ 4.1: N'akuku view of the Reloop RP-1000 MK2 turntable, showcasing the platter, tonearm, and control panel.
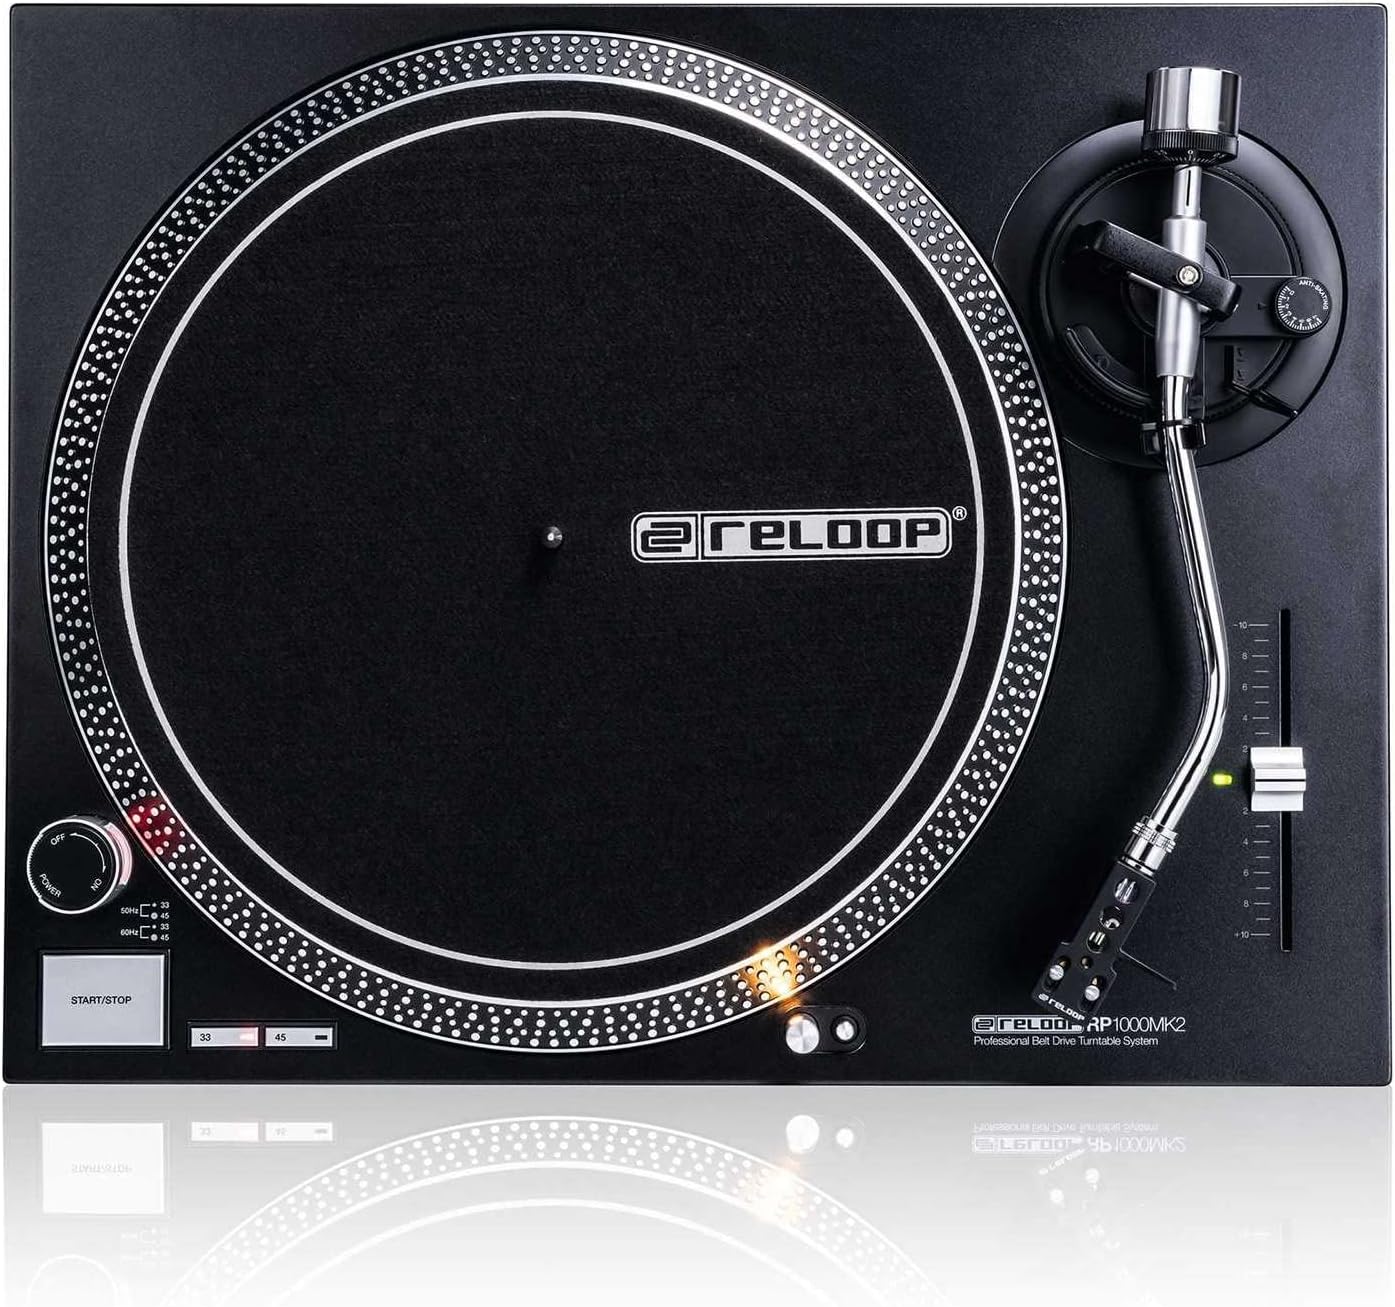
Ọgụgụ 4.2: N'elu-ala view highlighting the platter, slipmat with Reloop logo, S-shaped tonearm, and pitch control slider.

Ọgụgụ 4.3: Zuru ezu view of the S-shaped tonearm, headshell, and the pre-fitted Ortofon OM Black pick-up system.

Figure 4.4: Close-up of the power knob, start/stop button, and speed selection buttons (33/45 RPM).
Isi ihe:
- Platter: Precision-engineered, die-cast aluminum platter for stable rotation.
- Ụda olu: Statically balanced S-shaped tonearm with hydraulic lift and anti-skating mechanism.
- Katrij: High-quality OM Black pick-up system by Ortofon, pre-fitted to a headshell.
- Njikwa ọkwa: Adjustable slider with a range of +/-10% for fine speed adjustments.
- Speed Select Buttons: Buttons for selecting 33 1/3 RPM and 45 RPM playback speeds.
- Bọtịnụ mmalite/Kwụsị: Controls the rotation of the platter.
- Ìhè ebumnobi: Extendable aluminum target light to illuminate the needle position in dark environments.
- Shock-absorbing Feet: Improve isolation from unwanted vibrations.
5. Nhazi
5.1 Mwepu na ntinye
- Jiri nlezianya wepụ ihe niile dị na ngwugwu ahụ. Debe ngwugwu ahụ maka njem ma ọ bụ nchekwa n'ọdịnihu.
- Place the turntable on a flat, stable, and level surface, away from direct sunlight, heat sources, and strong magnetic fields.
- Ensure there is sufficient space around the unit for ventilation.
5.2 Nwụnye efere na eriri
- Place the platter onto the center spindle. Ensure it sits securely.
- Locate the drive belt. Carefully stretch the belt around the inner rim of the platter and hook it onto the motor pulley, which is visible through one of the platter's openings.
- Place the felt slipmat on top of the platter.
5.3 Tonearm Setup
The OM Black pick-up system is pre-fitted to the headshell. Follow these steps to balance the tonearm:
- Attach the headshell with the pre-fitted cartridge to the front end of the tonearm. Secure it by turning the locking ring clockwise.
- Place the counterweight onto the rear of the tonearm and rotate it until it is approximately centered.
- Hapụ ụda olu clamp and lower the tonearm lift.
- Carefully adjust the counterweight by rotating it forwards or backwards until the tonearm is perfectly balanced and floats horizontally.
- Once balanced, hold the counterweight steady and rotate only the numbered ring on the front of the counterweight to '0' (zero).
- Rotate the entire counterweight (including the numbered ring) counter-clockwise to set the recommended tracking force for the Ortofon OM Black cartridge, typically between 1.5 to 2.0 grams. Refer to the cartridge manufacturer's specifications for the precise recommended tracking force.
- Set the anti-skating dial to the same value as your tracking force.
- Return the tonearm to its rest and secure it with the clamp.
5.4 Njikọ ọdịyo na ike
- Connect the RCA audio cables from the turntable's output to the PHONO input of your amplifier or mixer. Ensure correct left (white) and right (red) channel connections.
- Connect the ground wire from the turntable to the ground terminal on your amplifier or mixer to minimize hum.
- Plug the power cord into the turntable's power input and then into a suitable AC power outlet.
6. Ntuziaka ọrụ
6.1 Basic Arụmọrụ
- Ike Na: Turn the power knob clockwise to the "ON" position. The platter will not start spinning until the START/STOP button is pressed.
- Họrọ Ọsọ: Press the "33" or "45" button to select the desired playback speed according to the record you are playing. The corresponding LED will illuminate.
- Ebe Ndekọ: Carefully place a vinyl record onto the platter.
- Start Platter: Press the START/STOP button. The platter will begin to rotate.
- Ogwe aka ọnọdụ: Hapụ ụda olu clamp. Use the tonearm lift lever to raise the tonearm. Carefully move the tonearm over the desired track on the record.
- Ogwe aka dị ala: Gently lower the tonearm lift lever to allow the stylus to descend onto the record groove.
- Egwu: The audio will now play through your connected audio system.
- Kwụsị ịkpọghachi: At the end of the record, or when you wish to stop, use the tonearm lift lever to raise the tonearm, return it to its rest, and secure it with the clamp. Press the START/STOP button to stop the platter rotation.
- Gbanyụọ: Turn the power knob counter-clockwise to the "OFF" position when not in use.
6.2 Using Pitch Control
The pitch control slider allows you to finely adjust the playback speed by +/-10%. Move the slider up or down to increase or decrease the speed. The center detent indicates 0% pitch adjustment (nominal speed).
6.3 Target Light
Press the aluminum target light button to extend the light, illuminating the needle position. This is particularly useful in low-light environments. Press it again to retract the light.
7. Nlekọta
7.1 Na-ehicha ngalaba ahụ
- Kpupu eriri ọkụ mgbe niile tupu ihicha.
- Use a soft, dry, lint-free cloth to wipe the surface of the turntable.
- Maka akara siri ike, ntakịrị damp cloth can be used, followed immediately by a dry cloth. Avoid abrasive cleaners or solvents.
7.2 Nlekọta Stylus
- The stylus (needle) is a delicate component. Handle it with extreme care.
- Clean the stylus regularly using a soft brush designed for stylus cleaning, brushing gently from back to front.
- A worn or dirty stylus can damage your records and degrade sound quality. Replace the stylus when signs of wear are apparent (e.g., distorted sound, skipping).
7.3 Ndochi eriri
The belt is a wear-and-tear part. If you notice inconsistent speed or the platter not spinning, the belt may need replacement. Contact Reloop support or an authorized service center for replacement belts and instructions.
7.4 Dust Cover Care (if applicable)
If your turntable includes a dust cover, clean it with a soft, damp cloth. Avoid using dry cloths as they can scratch the acrylic surface. Do not use harsh chemicals.
8. Nchọpụta nsogbu
Before contacting support, please refer to the following common issues and their solutions:
| Nsogbu | Ihe nwere ike ime | Ngwọta |
|---|---|---|
| Enweghị ike / Efere anaghị agbagharị agbagharị | Power cord not connected; Power switch off; Belt not installed or broken. | Ensure power cord is securely plugged in. Turn power switch ON. Check if the drive belt is correctly installed around the platter and motor pulley. Replace belt if broken. |
| Enweghị ụda ma ọ bụ ụda dị ala nke ukwuu | RCA cables not connected correctly; Amplifier/mixer input incorrect; Stylus damaged or dirty; Cartridge not properly seated. | Check RCA connections to amplifier/mixer (PHONO input). Ensure ground wire is connected. Clean stylus. Re-seat cartridge in headshell. |
| Ụda gbagọrọ agbagọ / ịwụli elu | Stylus dirty or worn; Tracking force incorrect; Anti-skating incorrect; Turntable not level; Record dirty or damaged. | Clean or replace stylus. Re-adjust tracking force and anti-skating. Ensure turntable is on a level surface. Clean record. |
| Ọsọ na-ekwekọghị ekwekọ | Worn or stretched belt; Motor issue. | Inspect the drive belt for wear and replace if necessary. If the issue persists, contact service. |
9. Nkọwapụta
| Njirimara | Nkọwa |
|---|---|
| Aha Nlereanya | RP-1000 MK2 Professional Belt Drive Turntable System |
| Ụdị ụgbọala | Eriri mbanye |
| Sistemụ moto | Powerful belt-drive motor system absorbs unwanted vibration and noise |
| Ebute | Precision-engineered, die-cast aluminum platter with stable rotation |
| Ọsọ ọsọ | 2 selectable speeds (33 1/3 & 45 RPM) |
| Njikwa Pitch | Adjustable range of +/-10% |
| Ụda olu | Statically balanced S-shaped tonearm with hydraulic lift and anti-skate |
| Ihe owuwu | Redesigned metal top panel, tactile buttons, reinforced housing construction, optimized damping features, shock-absorbing feet |
| Akụkụ (W x D x H) | 17.72 x 13.86 x 5.67 sentimita (ihe dịka 45 x 35.2 x 14.4 cm) |
| Ibu | 16.06 pound (ihe dị ka 7.3 n'arọ) |
| Njikọta | Analog RCA output, Ground terminal |
| Isi Iyi Ike | Corded Electric, 220 Volts (check local voltage chọrọ) |
10. Akwụkwọ ikike na nkwado
10.1 Ozi akwụkwọ ikike
Reloop products are manufactured to the highest quality standards. This product comes with a manufacturer's warranty. Please refer to the warranty card included in your package or visit the official Reloop websaịtị maka usoro na ọnọdụ nkwa zuru ezu metụtara mpaghara gị.
Debe ihe akaebe nke ịzụrụ (nnata ma ọ bụ akwụkwọ ọnụahịa) dịka a ga-achọrọ maka nkwupụta akwụkwọ ikike ọ bụla.
10.2 Nkwado ndị ahịa
Should you encounter any issues not covered in the troubleshooting section, or require further assistance, please contact Reloop customer support or your authorized dealer. Contact information can typically be found on the official Reloop websaịtị ma ọ bụ na nkwakọ ngwaahịa gị.
For the latest information, FAQs, and support resources, please visit the official Reloop websaịtị: www.reloop.com
Ask a question about this manual
Ask about setup, troubleshooting, compatibility, parts, safety, or missing instructions. Manuals+ will review the question and use this page’s manual context to help answer it.