1. Okwu mmalite
Daalụ maka ịzụrụasing the BYINTEK BT140 WiFi Projector. This manual provides essential information for setting up, operating, and maintaining your projector. Please read it thoroughly before use to ensure proper functionality and to extend the lifespan of your device.
2. Ozi nchekwa
Iji gbochie ọkụ, ọkụ eletrik, ma ọ bụ mmerụ ahụ, biko debe ihe nchekwa nchekwa ndị a:
- Elela anya ozugbo na oghere projector mgbe lamp is on. The intense light can cause eye damage.
- Ensure proper ventilation. Do not block ventilation openings. Overheating can damage the projector.
- Place the projector on a stable, level surface to prevent it from falling.
- Debe ihe ngosi ahụ ka ọ ghara ịnọ n'ebe mmiri, mmiri, na ihe ndị nwere ike ire ọkụ nọ.
- Jiri naanị ihe nkwụnye ike enyere na ihe ngosi ahụ.
- Do not attempt to repair the projector yourself. Refer all servicing to qualified personnel.
- Unplug the projector from the power outlet during lightning storms or when unused for long periods.
3. Ihe ngwugwu
Biko lelee na ihe niile dị:
- BYINTEK BT140 Projector
- Igwe ọkụ ọkụ
- Njikwa anya
- Igwe AV
- Akwụkwọ ntuziaka (akwụkwọ a)
Note: Specific accessories may vary slightly depending on the region or retailer.
4. Ngwaahịa gafereview
Familiarize yourself with the projector's components and interfaces.
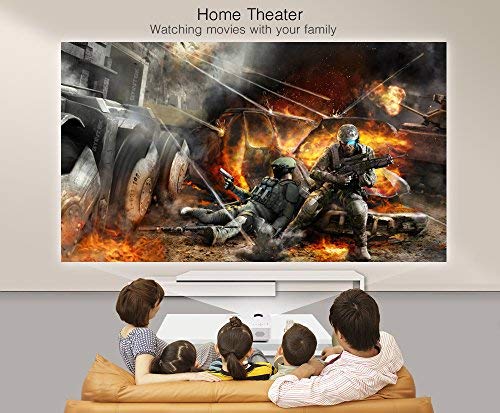
Foto: N'ihu view of the BYINTEK BT140 Projector, showing the lens and ventilation grilles.
Ọnụ ụzọ:
- HDMI: Connect to devices like laptops, Blu-ray players, gaming consoles.
- USB: Jikọọ draịva USB maka ịkpọghachi mgbasa ozi.
- Oghere kaadị SD: Insert SD cards for media playback.
- Nke: Connect to older devices using the included AV cable.
- VGA: Connect to computers with a VGA output.
- Apụọ ọdịyo: Jikọọ igwe okwu ma ọ bụ ekweisi mpụga.
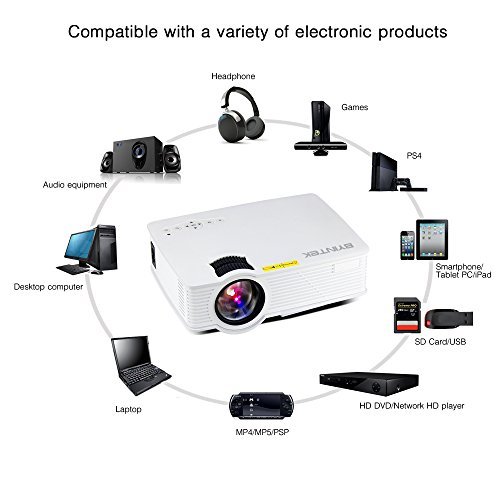
Image: Diagram illustrating various devices compatible with the BYINTEK BT140 Projector, including laptops, smartphones, tablets, gaming consoles (PS4, PSP), desktop computers, headphones, audio equipment, and HD media players, connected via HDMI, USB, SD, AV, and VGA ports.
5. Nhazi
5.1 Ntinye
Place the projector on a stable surface. The recommended projection distance is 1.5 to 2.5 meters for an optimal screen size of 50 to 80 inches. The projector supports image sizes from 34 to 100 inches.
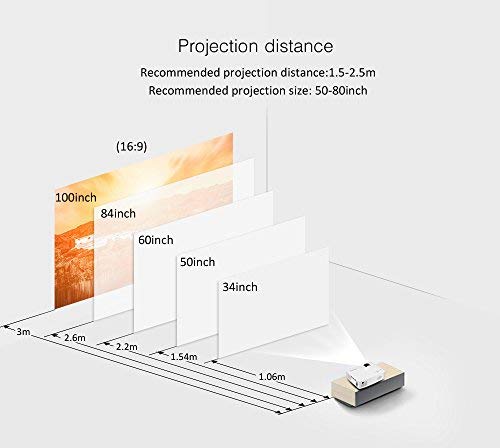
Image: Diagram showing recommended projection distances and corresponding screen sizes for the BYINTEK BT140 Projector, ranging from 34 inches at 1.06m to 100 inches at 3m.
5.2 Njikọ ike
- Jikọọ eriri ọkụ na ọdụ ụgbọ mmiri ntinye ike nke projector.
- Tinye nsọtụ nke ọzọ nke eriri ọkụ n'ime oghere mgbidi.
5.3 Ngwa jikọọ
- HDMI: Connect an HDMI cable from your source device (e.g., laptop, game console) to the projector's HDMI port.
- USB/SD: Insert a USB drive or SD card into the respective port for direct media playback.
- AV/VGA: Use the appropriate cable to connect older devices.
5.4 Ndozi anya
Rotate the focus ring on the projector lens until the projected image is clear and sharp.
5.5 Ndozi isi okwu
If the projected image appears trapezoidal, adjust the keystone correction dial (usually located near the lens) to square the image. The projector supports vertical keystone correction of ±15 degrees.
5.6 Wireless Connection (Airplay/Miracast)
The BT140plus model includes a built-in wireless push module supporting Airplay and Miracast functionality for wireless connection to smartphones, tablets, and iPads. Refer to the on-screen instructions for pairing your device.
6. Ntuziaka ọrụ
6.1 Gbanyụọ/ gbanyụọ
- Ike Na: Pịa bọtịnụ ike na projector ma ọ bụ akara njikwa.
- Gbanyụọ: Press the power button again. Confirm shutdown if prompted.
6.2 Nhọrọ Isi mmalite ntinye
Use the "Source" button on the remote control or the projector's control panel to cycle through available input sources (HDMI, USB, SD, AV, VGA, Wireless).
6.3 Mgbasa mgbasa ozi (USB/SD)
When a USB drive or SD card is inserted, the projector's multimedia interface will typically appear. Navigate through folders and select your desired media file (videos, photos, music) using the remote control.
- Ụdị vidiyo akwadoro: RMVB/RM (Realvideo2.0/3.0/4.0), AVI (Xvid/H264), FLV (Sorenson H.263), MOV (H264), MP4 (MPEG4, AVC), MPG (MPG1)
- Ụdị ọdịyo akwadoro: MP3, WMA, AAC, AC3
7. Nlekọta
7.1 Ihicha oghere
Use a soft, lint-free cloth or lens cleaning paper to gently wipe the projector lens. Avoid using abrasive cleaners or excessive force, which can scratch the lens.
7.2 Cleaning the Projector Body and Vents
Wipe the projector's exterior with a soft, dry cloth. Use a small brush or compressed air to clear dust from the ventilation openings to ensure proper airflow and prevent overheating.
7.3 Lamp Ndụ
The BYINTEK BT140 uses an LED lamp with an estimated lifespan of 20,000 hours, significantly reducing the need for lamp replacement compared to conventional lamps.
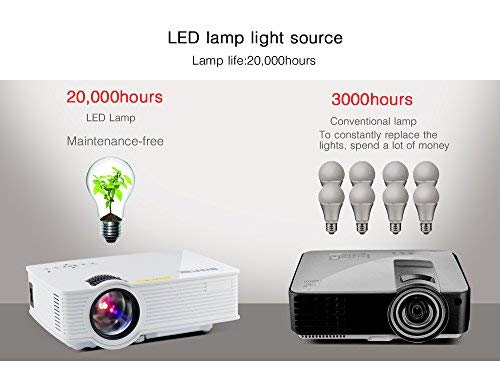
Image: Comparison showing the BYINTEK BT140's LED lamp with 20,000 hours lifespan versus conventional lamps with 3,000 hours lifespan, highlighting the maintenance-free aspect of LED technology.
8. Nchọpụta nsogbu
Ọ bụrụ na ị na-enwe nsogbu na projector gị, rụtụ aka na nsogbu na azịza ndị a na-ahụkarị:
| Nsogbu | Ihe kpatara/ Ngwọta nwere ike ime |
|---|---|
| Enweghị onyonyo na ihuenyo |
|
| Onyonyo na-agba agba |
|
| Foto a bụ trapezoidal |
|
| Enweghị ụda |
|
| Njikwa anya anaghị arụ ọrụ |
|
9. Nkọwapụta
Below are the technical specifications for the BYINTEK BT140 Projector:
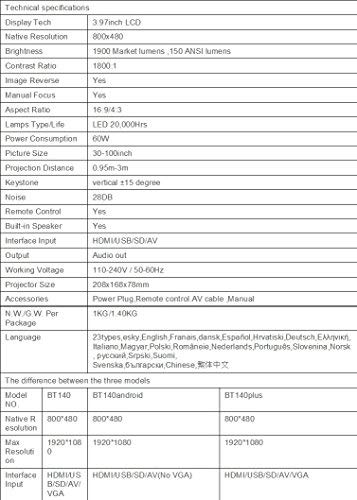
Image: Table detailing the technical specifications of the BYINTEK BT140 Projector, including display tech, resolution, brightness, contrast, aspect ratio, lamp life, power consumption, and interface inputs.
| Njirimara | Nkọwa |
|---|---|
| Ngosipụta teknụzụ | 3.97" LCD |
| Mkpebi obodo | 800 x480 |
| Ngosipụta kachasị | 1920 x 1080 (Support 1080P) |
| Icha ọkụ | 1900 Lumens (150 ANSI lumens) |
| Ọnụọgụ ọdịiche | 1800:1 |
| Ntughari onyonyo | Ee |
| Ntinye akwụkwọ ntuziaka | Ee |
| Akụkụ akụkụ | 16:9 / 4:3 |
| Lamp Type / Life | LED, 20,000 awa |
| Oriri ike | 70W |
| Nha foto | 34-100 sentimita asatọ |
| Ogologo amụma | 0.95m - 3m |
| Keystone Ndozi | Ogo ±15 kwụ ọtọ |
| Ọkwa mkpọtụ | 28dB |
| Njikwa anya | Ee |
| Ọkà okwu arụnyere n'ime ya | Ee |
| Interface Input | HDMI / USB / SD / AV / VGA |
| Mmepụta ọdịyo | Audio si n'ọdụ ụgbọ mmiri |
| Vol -arụ ọrụ Voltage | 110-240V / 50-60Hz |
| Nha projector | 208 x 168 x 78mm |
| Nha ịbụ | 950 Grams (1KG N.W./G.W. Per Package) |
| Teknụzụ Njikọta | Wi-Fi (for Airplay/Miracast) |
| Ngwa dakọtara | Laptọọpụ, Smartphone, Mbadamba ụrọ |
10. Akwụkwọ ikike na nkwado
BYINTEK products are designed for reliability and performance. For warranty information or technical support, please refer to the warranty card included with your product or contact BYINTEK customer service through their official websaịtị ma ọ bụ onye na-ere ahịa gị.
Maka enyemaka ọzọ, ị nwere ike ịga na BYINTEK Store on Amazon.