
1. Okwu mmalite
This manual provides detailed instructions for the installation, operation, and maintenance of the CP PLUS CP-UVR-1616K1-V3 16-Channel 1080P Digital Video Recorder (DVR). This device supports 16 channels of video input and 16 channels of audio input, offering comprehensive surveillance capabilities. It is designed for reliable performance in various security applications.
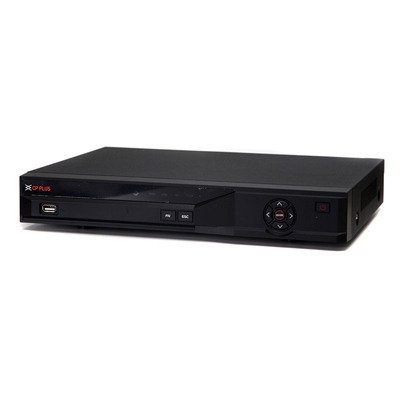
Foto 1: N'ihu view of the CP PLUS CP-UVR-1616K1-V3 DVR unit.
2. Nchekwa nchekwa
- Ensure proper ventilation around the DVR to prevent overheating.
- Ewepụla ngwaọrụ ahụ na mmiri ma ọ bụ mmiri.
- Jiri naanị ihe nkwụnye ọkụ ewepụtara na unit ahụ.
- Zere itinye DVR n'ebe anwụ na-acha kpọmkwem ma ọ bụ nso ebe okpomọkụ dị.
- Jiri nlezianya jikwaa ngwaọrụ ahụ iji gbochie mmebi anụ ahụ.
3. Ntọala na nwụnye
3.1 Nwepu
Jiri nlezianya wepụ ihe niile dị na ngwugwu ahụ. Hụ na ihe niile edepụtara na ndepụta ngwugwu ahụ dị.
3.2 Njikọ ngwaike
- Jikọọ Igwefoto: Connect your HDCVI, Analog, or IP cameras to the BNC video input ports (16 channels available) on the rear panel of the DVR.
- Jikọọ ọdịyo: Connect audio input devices to the 16 RCA audio input channels. Connect an audio output device to the 1 RCA audio output channel.
- Ngosipụta Jikọọ: Connect a monitor or television to the HDMI or VGA output port for video display.
- Jikọọ netwọk: Connect an Ethernet cable from the DVR's network port to your router or network switch for remote access and IP camera integration.
- Install HDD (Optional): If not pre-installed, open the DVR casing and connect a SATA HDD (up to 6TB) to the internal SATA port. Secure the HDD with screws.
- Jikọọ ngwaọrụ USB: Connect a mouse or USB storage device to one of the two USB 2.0 ports.
- Ike Na: Jikọọ ihe nkwụnye ike ahụ na DVR wee banye na ebe a na-ere ọkụ eletrik. DVR ahụ ga-agba ọkụ na akpaghị aka.
4. Ntuziaka ọrụ
4.1 Ọkachamara Mbido Mbido
Upon first power-on, the DVR will guide you through an initial setup wizard. Follow the on-screen prompts to configure basic settings such as language, date/time, network settings, and user accounts.
4.2 Ndụ View
Mgbe ntọala mbụ gasịrị, DVR ga-egosi ihe dị ndụ view of connected cameras. You can switch between different display splits (1/4/8/9/16 channels) using the on-screen controls or mouse.
4.3 Ndekọ
The DVR supports various recording modes including continuous, motion detection, and scheduled recording.
- Main Stream Recording: 1080P (1~15fps), 1080N/720P/960H/D1/HD1/BCIF/CIF/QCIF (1~25/30fps).
- Extra Stream Recording: CIF/QCIF (1~15fps).
Access the recording settings through the main menu to configure your preferred recording schedule and parameters.
4.4 Nghaghachi
Maka review edekọ footage, navigate to the Playback menu. You can search for recordings by date, time, and event type.
4.5 Mobile Access
Download the official mobile applications (iCMOB, gCMOB, wCMOB) from your device's app store to access live view and playback remotely. Refer to the app's instructions for setup.
4.6 CMS Software
For centralized management of multiple DVRs, use the KVMS or KVMS Pro CMS software. Install the software on a compatible computer and follow the provided instructions for device addition and management.
5. Nlekọta
- Nhicha mgbe niile: Keep the DVR free from dust. Use a soft, dry cloth for cleaning. Do not use liquid cleaners.
- Mmelite femụwe: Periodically check the CP PLUS official websaịtị maka mmelite firmware iji hụ na arụmọrụ na nchekwa kacha mma.
- Hard Drive Health: Monitor the health of the installed hard drive through the DVR's system settings. Replace the HDD if errors are detected.
- Backup Recordings: Regularly back up important recordings to an external USB storage device or network storage.
6. Nchọpụta nsogbu
| Nsogbu | Ihe nwere ike ime | Ngwọta |
|---|---|---|
| Enweghị vidiyo na ihe nlele. | Loose HDMI/VGA cable, incorrect input selected on monitor, DVR not powered on. | Check cable connections, ensure monitor is on correct input, verify DVR power. |
| Igwefoto anaghị egosi. | Loose BNC cable, camera power issue, incorrect camera type selected. | Check camera connections and power, verify camera compatibility and settings in DVR menu. |
| Enweghị ndekọ. | HDD not installed or faulty, recording schedule not configured, insufficient storage. | Install/check HDD, configure recording schedule, check HDD space. |
| Ntinye aka dị anya anaghị arụ ọrụ. | Network cable disconnected, incorrect network settings, firewall blocking. | Check network cable, verify IP address/gateway/DNS settings, configure port forwarding or P2P. |
7. Nkọwapụta
| Njirimara | Nkọwa |
|---|---|
| Nlereanya | CP-UVR-1616K1-V3 |
| Ntinye vidiyo | 16 channel BNC (HDCVI/Analog/IP up to 5Mp) |
| Ntinye/mmepụta ọdịyo | 16 channel RCA input, 1 channel RCA output |
| Mmepụta vidiyo | 1 HDMI, 1 VGA (Simultaneous) |
| Mkpebi vidiyo | 1080P(1920×1080), 1080N(960×1080), 720P, 960H, D1, HD1, BCIF, CIF, QCIF |
| Mkpakọ vidiyo | H.264 |
| Mkpakọ ọdịyo | G.711 |
| Recording Frame Rate (Main Stream) | 1080P (1~15fps), 1080N/720P/960H/D1/HD1/BCIF/CIF/QCIF (1~25/30fps) |
| Nkwado HDD | 1 SATA port, up to 6TB |
| USB Interface | 2 x USB 2.0 |
| Ngwa mkpanaaka | iCMOB, gCMOB, wCMOB |
| Akụrụngwa CMS | KVMS, KVMS Pro |
| Akụkụ | 325mm x 255mm x 55mm |
| Ibu | 1.5Kg (without HDD) |
8. Nkwado na akwụkwọ ikike
For technical assistance, product support, or warranty inquiries, please contact CP PLUS customer service. Refer to the official CP PLUS website for the most current contact information and warranty terms.
Ndị ọchịchị Websaịtị: www.cpplusworld.com
Debe nnata nzụta gị dị ka ihe akaebe nke ịzụrụ maka nkwupụta ikike.